
- Setting the locale for users to display correct formats, based on a user’s geographical location. For example, users based in the United States and users based in Italy would see different currency formats due to the local formatting of the fields. To define the location settings for users within your environment, ask your administrator or see Specify A User’s Regional Settings.
- Configuring the formats for number fields in a data source configuration, as described in the rest of this topic. Bear in mind that defining number formats depends on the region (location) settings configured for your environment.
- Finally, you can enable users to override the formatting you have defined at the data source and for most visuals at the visual level. Find more visual formatting information in the following topics:
- Log in as a user with the Administer Sources or Create New Data Sources privilege, or write permission for this source.
- Select the Source card on your home page or Data Sources from the main menu. The Sources work area appears.
- Edit the appropriate data source configuration and access the Fields tab of the data source.
- Locate the number field you want to modify. The Data Type column on the Fields tab must define the field as a Number field.
-
In the sidebar menu, select the settings (
 ) button to open the Settings work area. Select the edit (
 ) button in the Format work area to edit the date and time format for this field.
-
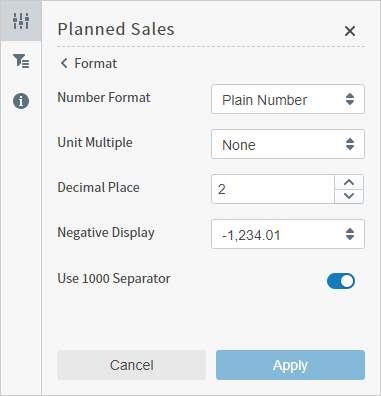
Select one of the following number formats in the drop-down list in the Number Format box. The other fields on the Format dialog change based on the number format you select.
-
Plain Number: Select this format to display the field as plain number values. Additional format information you can select includes:
-
Percentage: Select this format to display the field as percentage values. Additional format information you can select includes:
-
Money: Select this format to display the field as currency values. Additional format information you can select includes:
-
Storage: Select this format to display the field as computer storage values. Additional format information you can select includes:
-
Scientific Notation: Select this format to display the field as scientific decimals. Additional format information you can select includes:
-
Plain Number: Select this format to display the field as plain number values. Additional format information you can select includes:
- Select Apply to apply to apply your changes, then Save to save your changes.
Configure Date and Time Formatting - Data Sources
As a user with data source privileges, configure date and time for Time fields in a data source at creation, or later when you edit an existing source. This defines the default format for time fields as displayed in visuals, data details of visuals, and sample format fields for consistency across your organization. There are three places to control the format of date and time information.- Set the locale for users to display the appropriate order of fields, based on a user’s geographical location. For example, users based in the United States and users based in Italy see different date order formats due to the local formatting of the fields. To define the location settings for users within your environment, ask your administrator or see Specify A User’s Regional Settings.
- Configure the formats for Time fields in a data source configuration, as described in the rest of this topic. The order dates and times are presented in depend on the region (location) settings for your environment: you’re changing the format of each time or date field to suit your organization’s needs.
- Finally, you can enable users to override the formatting you have defined at the data source and for most visuals at the visual level. Find more visual formatting information in the following topics:
If you change the format for dates and times for a field used by current visuals in your data source, the formats used in the visual reflect those changes. If you adjust the granularity of a field in your data source, the change is reflected in the granularity modal of the visual after the change.
- Log in as a user with the Administer Sources or Create New Data Sources privilege, or write permission for this source.
- Select the Source card on your home page or Data Sources from the main menu.
- Select to edit the appropriate data source configuration, and switch to the Fields tab.
- Locate the time field you want to modify. The Data Type column on the Fields tab must define the field as a Time field.
-
In the Settings sidebar menu, select the edit (
 ) button to open the Format work area.
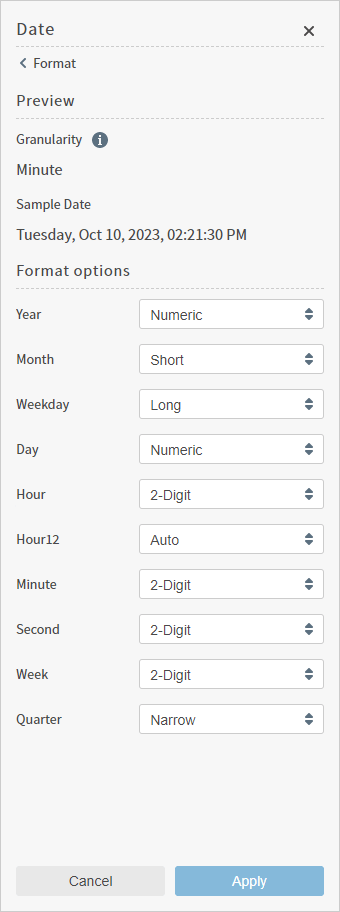
- The changes you make are reflected in the Sample Date preview field.
- When you are finished formatting your date and time values, select Apply and examine your updates. If they are correct, select Save to save these changes to the source.
Configure Date and Time Fields
You can use number and attribute fields as time fields by creating a derived field to use as time data. See Convert Attributes to Time Fields in Data Source Field Specifications.Supported Date and Time Formats
You can use number and attribute fields as time fields by creating a derived field to use as time data. See Convert Attributes to Time Fields in Data Source Field Specifications.Convert Attributes to Time Fields in Data Source Field Specifications
If your data contains time-related fields (attributes) that are not stored in a recognized time format, you can convert the fields to time fields using the Fields tab of the data source configuration. As long as any string field contains date or time data, you change it to a time pattern recognized by Self-Service Analytics.The process described here is not the recommended process. Instead, insightsoftware recommends that you convert the data using a derived field, as described in Convert Attributes to Time Fields Using Derived Fields.
Group functionality does not work for fields for which the type is manually set to Time. You cannot specify these fields as the Group, Group By, or Trend fields for a visual. You can use these fields in filters and apply them as filters on the time bar. However, you may find that the results shown in your visual are incorrect. This may happen because the manually configured time formats are different and, consequently, not in lexicographic order. For example, suppose you have two strings:
- String
20230801(August 1, 2023) matches the time formatyyyyMMdd. - String
08012024(August 1, 2024) matches the time formatMMddyyyy.
In this release, when your admin enables the Enhanced Experience user interface, you will see changes to workflows you may have used in previous releases.
- Make sure you are logged in as an administrator.
- Select the Sources card on your home page or Data Sources from the main menu. The Sources page appears.
- In the sources table on the Sources page, locate and select the data source configuration you want to edit.
- Select the Fields tab.
- Locate and select the time field (Data Type: Attribute) in the list of fields.
-
Select Convert in the Data Type area of the Settings tab for the field and select Convert to Time.

-
Rename the field in the Label field, and define time granularity in the Origin Field Format.
 Valid time parts include:
- YYYY - four digit year
- MM - two digit month
- DD - two digit day
- HH - two digit 24-hour format
- MI - two digit minute
- SS - two digit seconds
- MS - two digit milliseconds
The information returned is limited by the information available in the original field. For example, if a field’s data is stored in hours, you will get values up to the hour level. If you request granularity not available, zeros are returned for information not available, for example, 0 minutes, 0 seconds, and 0 milliseconds. - When your changes are complete, select Save create the derived field.
- Make sure you are logged in as an administrator.
- Select the Source card on your home page or Data Sources from the main menu. The Sources page appears.
- In the sources table on the Sources page, locate and select the data source configuration you want to edit.
- Select the Fields tab.
- Locate and select the time field (Data Type: Number) in the list of fields.
-
Select Convert in the Data Type area of the Settings tab for the field and select Convert to Time.

-
Rename the field in the Label field, and select an available time granularity in the Origin Field Format.
 Valid time parts include:
- YYYY - four digit year
- MM - two digit month
- DD - two digit day
- HH - two digit 24-hour format
- MI - two digit minute
- SS - two digit seconds
- MS - two digit milliseconds
The information returned is limited by the information available in the original field. For example, if a field’s data is stored in hours, you will get values up to the hour level. If you request granularity not available, zeros are returned for information not available, for example, 0 minutes, 0 seconds, and 0 milliseconds. - When your changes are complete, select Save create the derived field.
Convert Attributes to Time Fields Using Derived Fields
If your data contains time-related fields (attributes) that are not stored in a recognized time format, you can convert them to time fields using a derived field. After the derived field is defined, you can use it instead of the original attribute in your visuals. This is the preferred method because the data in the derived field is constructed as data is read from the data store. Convert an attribute field to a time field in a derived field- Log in as an administrator or user with the ability to modify a data source configuration.
- Start creating a derived field as described in Create and Modify Derived Fields.
- Use the
TEXT_TO_TIMEfunction in a row-level expression in the derived field to convert your field to a time field. See Text Functions. - Test and save the derived field. See Create and Modify Derived Fields.
Timezone Conversion for Users
Displaying the source data in dashboards and visualizations in the timezone of individual users instead of the default timezone stored at the source. Additionally, you can convert aTIME field to a custom timezone.
If you are upgrading from an earlier version of Self-Service Analytics, this may be a breaking change: the introduction of the system attribute
User.timeZone may cause a conflict if you used this as a custom attribute. See Upgrade Workflow.- MS SQL
- Snowflake
- MongoDB
- BigQuery
- Hive
- SparkSQL
- Impala
- PostgreSQL
- Redshift
Enable TIME Conversion To User Timezones
Before you convert a TIME field for use by users, define their timezone in user regional settings. Next, convert the TIME field in the source.
Define a User’s Timezone
- Log in as a system administrator or a user who has been assigned to a group with group management privileges. If the user name you log in with is also associated with other tenants, verify that the correct tenant is selected. See Switch Tenants.
- Select Users (formerly Users and Groups) from the Administration menu. The Users work area appears, listing all defined users in this tenant.
- Select a user, then select the Regional Settings tab.
- Select the Time Zone for the user from the options available in the drop-down selector.
- Select Save to save the user
Convert a TIME Field of a Source
When you convert field, your software creates a derived field that includes the User.timeZone system attribute used as an interpolated value, for example to_timezone(TIME_field, '${User.timeZone|UTC}')). Use the created derived field in dashboards and visualizations. The data will be recalculated using the account of each individual user with the custom timezone.
- Log in as a user with the Administer Sources privilege, or a user with read and write permission for the data source.
- Select Data Sources from the main menu. The Sources page appears.
- Select a source to open it, then select a time field in the Fields tab.
- Select the Settingssidebar menu, then select Convert and the Convert to User Timezone option to convert the data type. A field conversion modal window opens.
- In the Time to Time Zone Conversion work area, define a Label for the newly created field, then select User Time Zone for the Time Zone field if not already selected.
- Select Save to create the new field.
Alternative: Convert a Timezone Once Using a Function
You can convert a field with theTIME data type into a selected timezone manually using the to_timezone function. Specify the function as shown below to return static timezone conversion.
Upgrade Workflow
If you are upgrading from an earlier version of Self-Service Analytics, this may be a breaking change: the introduction of the system attributeUser.timeZone may cause a conflict if you used this as a custom attribute.
When you upgrade to the latest version of Self-Service Analytics this feature triggers the following changes:
- Custom user attributes you manually created with the name the
User.timeZonein earlier Logi Composer versions (23.2 and earlier) are automatically converted to the system attributes if their value corresponds to the IANA timezone standard ISO 8601 (for example,‘Europe/Kyiv’, ‘UTC+5’). - All custom user attributes
User.timeZonethat do not correspond to the IANA timezone standard are removed.
- If you want to start using your custom attribute
User.timeZonefor timezone conversion purposes, the attribute will be automatically changed to the system value at upgrade. To ensure this takes place, verify before upgrade that the values of the attribute are provided in IANA format before you upgrade Self-Service Analytics. - If you want to preserve your custom attribute for other purposes, we recommend renaming the attribute before you upgrade Self-Service Analytics. For example, change
User.timeZonetoUser.timeZone_custom. do not change the value of the attributes before running the upgrade script.
API Changes
The APIs in/api/users has been expanded to include the "timeZone": "string" parameter. This displays the user’s timezone formatted as an IANA timezone identifier, ISO 8601 (for example, “Europe/Kyiv”). The default value is UTC.
Payload Changes
Fiscal Calendars
Fiscal Calendars functionality is disabled by default. To enable, contact technical support for assistance.
/api/calendars to define one or more fiscal calendars to use in your sources.
API documentation is provided in your environment at this link: https://<Self-Service Analytics-URL>/composer/swagger-ui.html.
Once defined, you can assign a fiscal calendar for use in specific data sources and convert a time field into a new a derived field you can use as a time field in the data source.
Define a Fiscal Calendar
Fiscal Calendars functionality is disabled by default. To enable, contact technical support for assistance.
Create a Fiscal Calendar
Administrators and users who are assigned to a group with the Administer Calendars privilege can use the REST API endpoint/api/calendars to define one or more fiscal calendars to define calendars for your users.
API documentation is provided in your environment at this link: https://<Self-Service Analytics-URL>/composer/swagger-ui.html.
When you create a fiscal calendar, you can define which month of your quarters is the longest month, and optionally shift the month your year begins. Send an array for the CalendarResource type as MONTH_SHIFT, FISCAL_445, or include both.
The name you select for a calendar is displayed in the user interface.
Set the first month of your fiscal year
If you optionally include and define a MONTH_SHIFT, use an integer value ranging from -11 to 11 to set the start month of your fiscal year. Do not use 0: it is an invalid selection.
- For February of the previous calendar year, use
-11. - For November of the current calendar year, use
11. - If no
MONTH_SHIFTis provided, the default start month of the year is January.
QUARTER_445_WEEKS- the last month of each quarter is the five week month.QUARTER_454_WEEKS- the middle month of each quarter is the five week month.QUARTER_544_WEEKS- the first month of each quarter is the five week month.
Use a Fiscal Calendar
Fiscal Calendars functionality is disabled by default. To enable, contact technical support for assistance.
- Open and edit an existing source or create a new source.
-
Navigate to the Global Settings tab and select an available calendar listed under Alternative Calendars Settings.
The default calendar is used for all sources unless you specifically select an alternative calendar.
- Select one or more calendars for your source as needed. Clear the checkbox for a calendar to not use that specific calendar with this source and prevent fiscal time field conversion.
- After completing your changes, select Save Settings to make available your selected calendars to new and existing visuals that use this source.
- After you have selected one or more calendars for your source, navigate to the Fields tab to convert a time field to a time field that uses one of the calendars you have added to this source.
- Select the time field you want to use in the list of available fields.
- Select the Convert option in the Data Details work area on the Settings tab. Select the option presented, Convert to Fiscal Time to open a conversion dialog.
- Enter a Label for the new derived field, and select a Fiscal Calendar from the list of available options. Save your changes.
- Your new derived field is added to the list of available fields with a data type of Time (Fiscal). It is similar to standard time fields, with the exception that you cannot define a Time Zone for this new derived field.
Alternatively, you can select Add Derived Field from the Fields tab and create the field using the
to_chrono_datetime function. Include the calendar_id and dateTime field in the editor.- Objects that use a fiscal time field are marked with a FISCAL indicator.
- When you export data that relies on fiscal calendars, the data is presented in the appropriate date and time format.
- If you remove an alternative calendar from your source, you cannot make new derived fields based on that calendar.
Preset Time Ranges
The following table describes all the preset time ranges available in Self-Service Analytics.If you are using a field that has time zone information disabled (select Not Specified), only the time-related information is shown in the user interface and exported with your data. Time zone labels are not included.