
| Connector | Supported? | Notes |
|---|---|---|
| Amazon Redshift | Y | |
| Amazon S3 | Y | |
| Apache Drill | Y | |
| Apache Phoenix | Y | Apache Phoenix and Apache Phoenix Query Server connectors support row-level expressions (derived fields) with the following limitations:
|
| Apache Phoenix Query Server (QS) | Y | |
| Apache Solr | N | |
| BigQuery | Y | If you need to access a BigQuery partition, explicitly include an alias for the built in partition column in your select clause, such as select *, _PARTITIONTIME as pt from projectId.datasetId.tableId. |
| Business Central Jet | Y | |
| Cloudera Impala | Y | |
| Cloudera Search | N | |
| Couchbase | Y | |
| Dremio | N | |
| Dundas BI (Managed) | source-dependent | |
| Elasticsearch 7.0 | Y | |
| Elasticsearch 8.0 | Y | |
| File Upload (Upload API) | Y | |
| HDFS | Y | |
| Hive | Y | |
| Jira | Y | |
| MemSQL | Y | |
| Microsoft SQL Server | Y | |
| MongoDB | Y | MongoDB connectors support derived fields with some exceptions. See the discussion in Manage the MongoDB Connector. |
| MySQL | Y | |
| OpenSearch | Y | |
| Oracle | Y | |
| PostgreSQL | Y | |
| Python | Y | |
| Real Time Sales | N/A | |
| Salesforce | Y | |
| SAP Hana | Y | |
| SAP S/4HANA | Y | |
| SAP IQ | Y | |
| Spark SQL | Y | |
| Snowflake | Y | |
| Teradata | Y | |
| TIBCO DV | Y | |
| Trino | N | |
| File Upload (Upload API) | Y | |
| Vertica | Y |
Examples
Your data source has records that list the revenue generated and the term of employment but does not have an average of the two. You can use a derived field to create an average of the two for each record. Use the following formula:- Derived Field Editor
- Create and Modify Derived Fields
- Supported Row-Level Functions
- Delete Derived Fields
- Hide Fields
Create and Modify Derived Fields
Derived fields are created and modified using the Derived Field Editor. Create or modify a derived field- Access the Derived Field Editor in any of the ways described in Derived Field Editor.
-
Enter a name for the derived field in the space labeled Untitled Derived Field.
If you are using non-Latin characters in your functions, the name for your derived field should start with a letter or an underscore (_) symbol followed by one or more letters, numbers, underscore, or period characters. Symbols other than the underscore (_) or period (.) are not allowed.
-
Enter the expression for the derived field in the editing space. Expressions should follow standard mathematical and logical syntax and are resolved using the standard order of operations. You can manually key in expressions or you can select the elements of your expressions from the menus at the left. The expression should not be assigned to a variable because the resolved value of the expression is assigned to the custom metric, which serves as the variable to which the value is assigned. That is, enter
a / brather thanx = a / b. Row-level expressions can be used in derived fields. - To test your derived field, select Run. The editor attempts to run your calculation. Any errors are reported. Any results are shown in the Preview area of the Derived Field Editor.
- When you are finished with your derived field definition, select Save.
- After creating or modifying the derived field and leaving the derived field editor, if you return to the Fields tab of the data source configuration, you can hide the field. See Hide Fields.
Delete Derived Fields
You can delete derived fields from a data source on the Fields tab, or by deleting the source entirely.If you try to delete a visual, filter snippet, dashboard, self service report, dashboard link, source, or source field, Self-Service Analytics displays an error message naming any objects dependent on the item you’re trying to delete. You can delete the item after you’ve removed the association from the dependent object. See Fields Usage.
- Edit the data source configuration in the UI. See Edit a Data Source.
- Access the Fields tab for your source by selecting the Output icon in the data source editing work area. Select Expanded View to expand the work area.
-
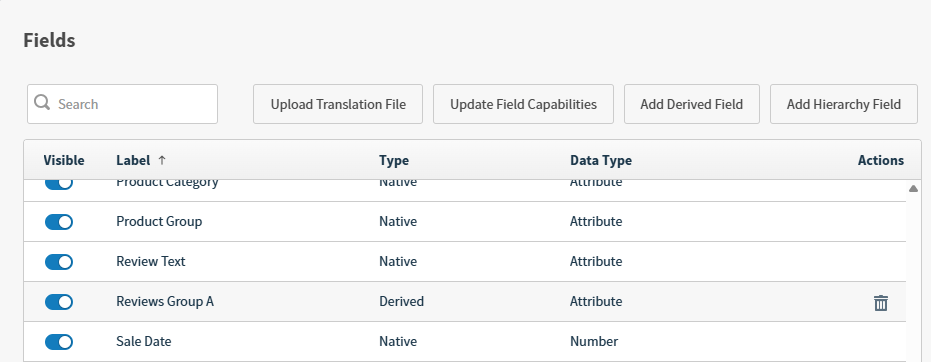
Locate the derived field in the Fields table that you would like to remove.
-
Select the delete icon (
 ) in the Actions column.
- Select Delete in the pop-up confirmation dialog. The derived field is deleted if it is not in use.
Derived Field Editor
Self-Service Analytics provides a Derived Field Editor to help you create and test derived fields for a data source. To define derived fields for a data source, you must have:- Read permission for the data source and the Edit Calculations privilege, or
- Write permission for the data source.
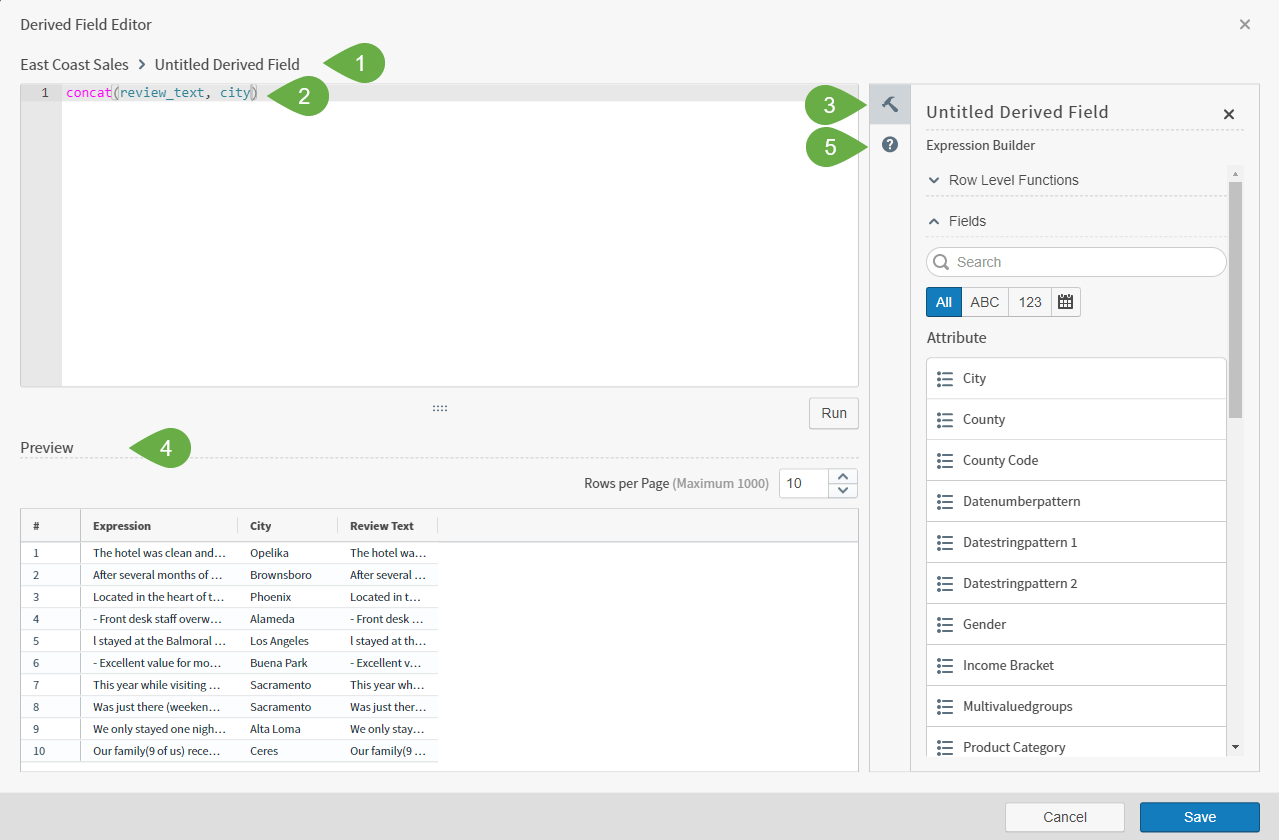
- Derived Field Label: Mandatory, fewer than 255 characters long.
- Editing space: Build your expression in this space. Syntax highlighting improves the readability of your expression.
- Expression Builder: This tool includes Row Level Functions and Fields to help you build your derived field.
- Preview space: Shows a preview of the results of your expression.
- Calculation Help: Provides more detailed information about the types of expressions Self-Service Analytics supports.
-
Syntax highlighting improves the readability of your expressions to provide visual clues about the items being used and their validity.
Parts of an expression are highlighted in different colors or with different text treatments:
- function names, both row level and aggregate
- fields and metrics
- keywords such as CASE and IN
- example parameters
- date period constants such as
year - values such as numbers and
trueorfalse - strings
- arithmetic operators such as
+
- Row Level Functions and Fields sections always appear in the Expression Builder.
-
Autocomplete functionality is included: Type two letters and a list of possible auto-completions appears.
- Function completions provide the type of function, the name of the function, the description of the function, and an example of how the function is used, including parameters.
- Field completions are available by typing either the field ID or the field label. The field ID appears in square brackets next to the field label when the two are different. Field completions provide the type of the field, the field label and ID, expressions for derived fields, and information about whether the field is hidden (as applicable).
- Metric completions provide the metric label and the expression that will be inserted into the editor when the metric is selected.
- Syntax and validation errors are shown in the Preview area.
- When you’re creating or editing an expression, select Cancel to return your expression to the initial state.
- Self-Service Analytics disables the Save button, preventing you from saving a derived field unless it has a successfully run expression.
-
When you close the editor with unsaved changes, Self-Service Analytics displays a confirmation message.
- Select Cancel to continue editing or changing the text of the label for your derived field.
- Select Discard to discard your changes. If you are editing an existing item, your last saved version remains in Self-Service Analytics.
- If you select Discard while creating a new expression, Self-Service Analytics returns you to the source work area.
- Access the Derived Field Editor from a Data Source
- Access the Derived Field Editor from the Metric Selection Dialog
- Access the Derived Field Editor from the Group Selection Dialog
- Access the Derived Field Editor from the Color Sidebar
- Access the Derived Field Editor from the Filters Sidebar
Access the Derived Field Editor from the Color Sidebar
Access the Derived Field Editor from the Color sidebar of a visual-
Select
 and then Color from the visual drop-down menu to access the Color sidebar.
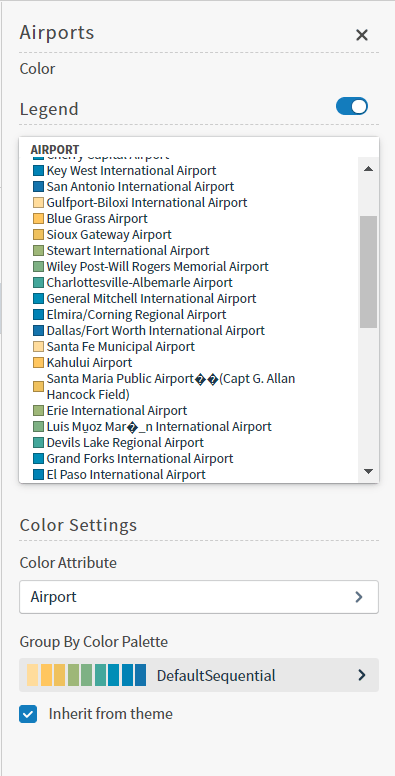
- Select the Color Attribute box on the Color sidebar. A list of attribute, number, and time fields you can select for the color attribute appears in the Color sidebar.
-
Select the add icon
 in the Attribute, Number, or Time fields section of the sidebar. A menu opens with two options: Add Derived Field and Add Custom Metric.
- Select Add Derived Field to access the Derived Field Editor and create a derived field.
-
Select and then Color from the menu to access the Color sidebar.
- Select the Color Metric box on the Color sidebar. A list of fields you can select for the color metric appears in the Color sidebar.
-
Locate a derived field listed on the Color sidebar and select the ellipsis () next to it. The following menu appears:
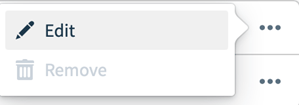
- Select Edit on the menu to edit the derived field. The Derived Field Editor appears.
Access the Derived Field Editor from the Filters Sidebar
Access the Derived Field Editor from the Filters sidebar of a visual, filter snippet, or dashboard-
Access the filter sidebar or the dashboard filter sidebar.
-
To access the filter sidebar, select the filter icon (
 ) on the visual or filter snippet, or select
  on the sidebar menu. If the visual is in a dashboard, select Settings from the menu (), then select on the sidebar menu.
-
To access the dashboard filter sidebar, select the dashboard filter icon (
 ) next to the dashboard title. The dashboard-level filter icon is available only when all the visuals are from the same data source.
-
To access the filter sidebar, select the filter icon (
-
Select the add icon at the top of the Attribute, Number, or Time sections on the Row or Group tab. A menu opens with two options: Add Derived Field and Add Custom Metric.
- Select Add Derived Field to access the Derived Field Editor and create a derived field.
- Select the filter icon to access the Filters sidebar.
- Select Add Filter.
-
Locate a derived field listed on the Filters sidebar and select the ellipsis () next to it. The following menu appears:
- Select Edit on the menu to edit the derived field. The Derived Field Editor appears, depending on the field you selected.
Access the Derived Field Editor from the Group Selection Dialog
Access the Derived Field Editor from the Group selection dialog of a visual-
On a visual, select the group label (x-axis label) to view the Group selection dialog.
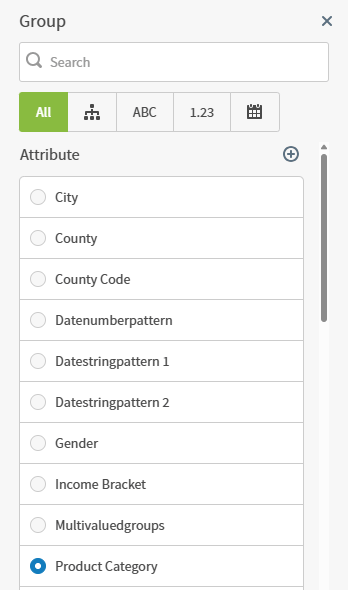
- Select the add icon in the Attributes, Number or Time section of the dialog. A menu opens with two options: Add Derived Field and Add Custom Metric.
- Select Add Derived Field to access the Derived Field Editor and create a derived field.
-
On a visual, select the group label (x-axis label) to view the Group selection dialog.
-
Locate a derived field listed on the Group selection dialog and select the ellipsis () next to it. The following menu appears:
- Select Edit on the menu to edit the derived field. The Derived Field Editor appears.
Access the Derived Field Editor from the Metric Selection Dialog
Access the Derived Field Editor from the metric selection dialog of a visual-
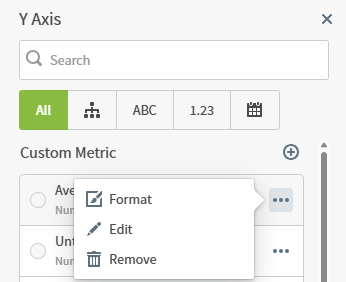
On a visual, select the metric label (y-axis label) to view the Metric selection dialog.
-
Select the icon in the Number or Custom Metric section of the dialog. A menu opens with two options: Add Derived Field and Add Custom Metric.
- Select Add Derived Field to access the Derived Field Editor and create a derived field.
-
On a visual, select the metric label (y-axis label) to view the Metric selection dialog.
-
Locate a derived field listed on the Metric selection dialog and select the ellipsis () next to it. The following menu appears:
- Select Edit on the menu to edit the derived field. The Derived Field Editor appears.
Access the Derived Field Editor from a Data Source
Access the Derived Field Editor from a data source- Edit the data source in the UI. See Edit a Data Source.
-
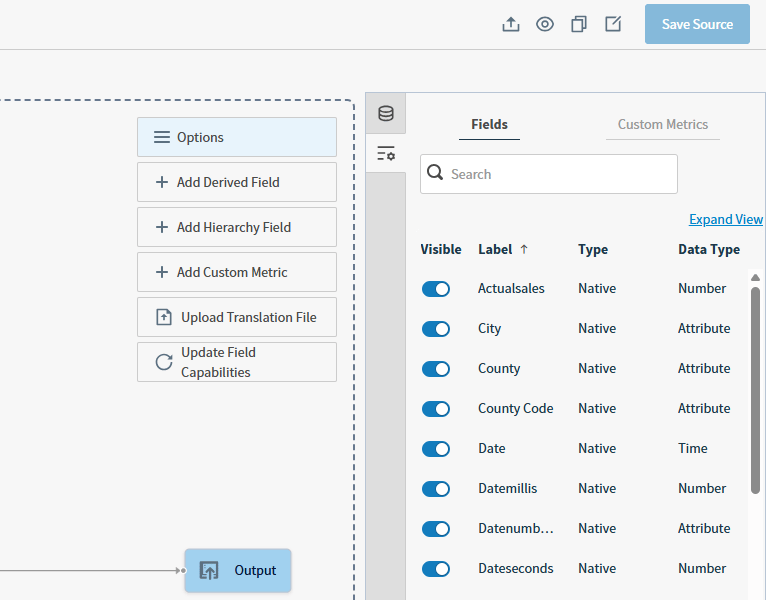
Access the Fields tab for your source by selecting the Output icon in the data source editing work area. Select Expanded View to expand the work area.
Alternatively, select the Output icon in the data source editing work area, then select Add Derived Field from the options presented on the canvas.
-
Select Add Derived Field at the top of the Fields table to add a derived field. To modify an existing derived field, select derived field then the edit (
 ) expression icon in the Settings side bar menu.
The Derived Field Editor appears.
) expression icon in the Settings side bar menu.
The Derived Field Editor appears.