
Self-Service Analytics supports only underscores and dashes in data store field names. No other special characters or white space are supported. If your data store uses special characters other than underscores and dashes in field names, please remove them before attempting to create a data source configuration.
You cannot save a data source with an invisible field, if the invisible field is referenced in a visual (charted or used in filters and keysets).
- Data Sources Page
- Search and Filter Lists
- About Source Permissions
- Define a Source
- Edit a Data Source
- Clear the Cache for a Data Source Configuration
- Import or Export Sources
- Restrict Access to Data Using Row and Column Security
- Restrict Access to Fields Using Column Security
- Delete a Data Source
Data Sources Page
Use Sources to create, import, export, search, view, review, and maintain your data sources. All users can view the Sources work area.- If you log in as a user who has not been granted permissions for any data sources, the Sources work area displays a message indicating that no sources are available.
- If you log in as a user who only has read permissions for one or more data sources, they are shown here, but Connection information is not available for the sources.
- If you log in as a user who belongs to a group that is granted the Create New Data Sources or Administer Sources privilege, you can create, import, export, search, preview, review, and maintain your data source configurations using this work area.
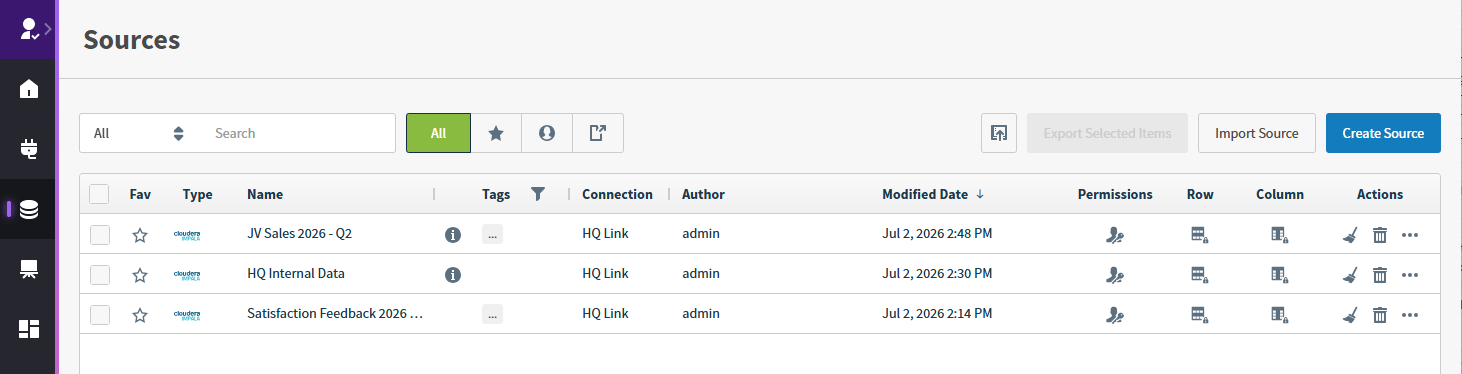
- Create Source: Select to create a new data source configuration. See Define a Source.
- Import Source: Select to import a new data source configuration and connection information. See Import or Export Sources.
- Export Selected Items: Export one or more data sources by selecting the checkbox for a source to export. The Export Selected Items button becomes active. Select to download the sources in JSON format. See Import or Export Sources.
- Embed Sources Inventory: Select
 to generate a code snippet to embed the sources inventory in your application. See Generate a Sources Inventory HTML Snippet.
 - A table that lists the data sources you can see, sort, and favorite.
- Options to modify source permissions, view and modify row and column security filters, refresh the cache, and manage Available Visual Types.
- A search bar at the top of the page you can use to search for a specific data source in the table.
- Log into Self-Service Analytics.
- Select the Sources card on your home page or Data Sources from the main menu.. The Sources work area appears.
Search Field
You can use the search field to filter the sources in this work area by source Name, Description (if provided), Connection, or Author. For example, if you type a C in the search box, only sources that include the letter C in the selected field searched are shown in the working area. See Search and Filter Lists.Buttons
The buttons on the page allow easy access to saved data sources, as well as other data sources created by other users in your Self-Service Analytics environment that you have been granted access to see. Use the options shown to create new sources, filter the data sources shown, as well as import, export, or create sources.| Button | Description |
|---|---|
| All | Removes any filters for the sources list and displays all sources available to you within your environment. |
 | Displays only the sources that you have marked as favorites. |
 | Displays only the sources that you created and saved. Sources created and saved by other users are hidden. |
 | Displays only the sources that other users shared with you. |
| Select to generate an embeddable sources inventory link. See Generate a Sources Inventory HTML Snippet. |
| Export Selected Items | Allows you to export multiple selected items. |
| Import Source | Allows you to import a source. See Import or Export Sources. |
| Create Source | Allows you to create a new source. See Define a Source. |
The Sources List
The sources list columns are described below. Several of these columns can be used to sort the list: select the column header to sort first to last and again to sort last to first. You can search for items by the contents of several columns. See Search and Filter Lists.| Column | Description |
|---|---|
| Select (not labeled) | Select one or more items to perform bulk actions, such as export, for your resources. |
| Fav | Mark the source as a favorite. |
| Type | An icon identifying the data store type for the data source. |
| Name | The name assigned during data source creation. |
| Description (not labeled) | The description icon is visible if a description associated with a source. You can search for a source by the contents of this field. |
| Tags | Content tags applied to the source. Select the filter icon to open a drop down list and select tags to filter your list or to narrow your search results. If several tags are associated with an item, hover over the ellipsis to see all tags for this resource. |
| Filter icon | Select to filter the work area’s contents by one or more content tags. |
| Connection | The display name of the data store connection definition connected to this data source. For flat files, you define a Display Name when you upload the file; this name is shown. |
| Author | The user name of the data source creator. |
| Modified Date | The time stamp when the data source configuration definition was last modified. |
| Permissions | Select the permissions icon for a data source to assign and manage its permissions. You can only define permissions for a data source if you are logged in as a user with the Administer Sources privilege, or as a user with the Manage Source Permissions privilege. |
| Row | Select the row security ( ) icon for a data source to define its row security for authorization groups. You can only define row security for a data source if you are logged in as a user with the Administer Sources privilege, or as a user with the Manage Source Permissions privilege. ) icon for a data source to define its row security for authorization groups. You can only define row security for a data source if you are logged in as a user with the Administer Sources privilege, or as a user with the Manage Source Permissions privilege. |
| Column | Select the column security ( ) icon for a data source to define its column security for different authorization groups. You can only define row security for a data source if you are logged in as a user with the Administer Sources privilege, or as a user with the Manage Source Permissions privilege. ) icon for a data source to define its column security for different authorization groups. You can only define row security for a data source if you are logged in as a user with the Administer Sources privilege, or as a user with the Manage Source Permissions privilege. |
| Actions | Shows icons you can select to perform actions for the data source.
See How Self-Service Analytics Caches Data and Clear the Cache for a Data Source Configuration. You can only clear the cache for a data source if you a user with the Administer Sources privilege, or a user with write permission for the data source. If a Custom Range has been defined for a field, the minimum and maximum fields used in filters remain unchanged when you refresh source data. These fields are shown with cache actions disabled on the Cache tab.
If you try to delete a visual, filter snippet, dashboard, self service report, dashboard link, source, or source field, Self-Service Analytics displays an error message naming any objects dependent on the item you’re trying to delete. You can delete the item after you’ve removed the association from the dependent object. See Fields Usage. |
 ) icon to delete a data source configuration. Before you delete a data source configuration, you must delete all the dashboards and visuals that use it. See
  ) icon to clear the data cache for a data source configuration. Select one or more cache options to clear:
 ) button to view the More menu for a data source configuration. Options include:
Define a Source
Sources define what data you and your users can access through a data connection or in an uploaded file. Use this data to create visuals, self service reports, and dashboards in your environment. You can create a source from an existing connection, uploaded files, or as a combination of data from multiple connections as joins or hierarchical data. Adjust the available content by selecting specific entities, associated schemas, or providing custom SQL.- If you are creating a fusion or hierarchical source, add multiple data entities and set up a join configuration. See Create a Fusion Source, Hierarchical Fields and Structures, and Define a Hierarchical Source.
- If you are adding a file as a data entity, some options may differ. See Manage File Uploads and Data Entity Details - From File.
- After you define a source, you can make a copy of the source to save time setting up a new source with a different schema, connecting to different fused sources, or other variations as needed. See Copy a Source.
In this release, when your admin enables the Enhanced Experience user interface, you will see changes to workflows you may have used in previous releases. If you are running an earlier release or your admin has not enabled the new interface, see Define a New Source (Earlier Releases).
Define a New Source
Define a new source- Log in as a user with the Administer Sources or Create New Data Sources privilege.
- Select the Sources card on your home page or Data Sources from the main menu. The Sources work area appears.
-
On the Sources page, select the Create Source button. A work area opens with the Source Creation tab selected.
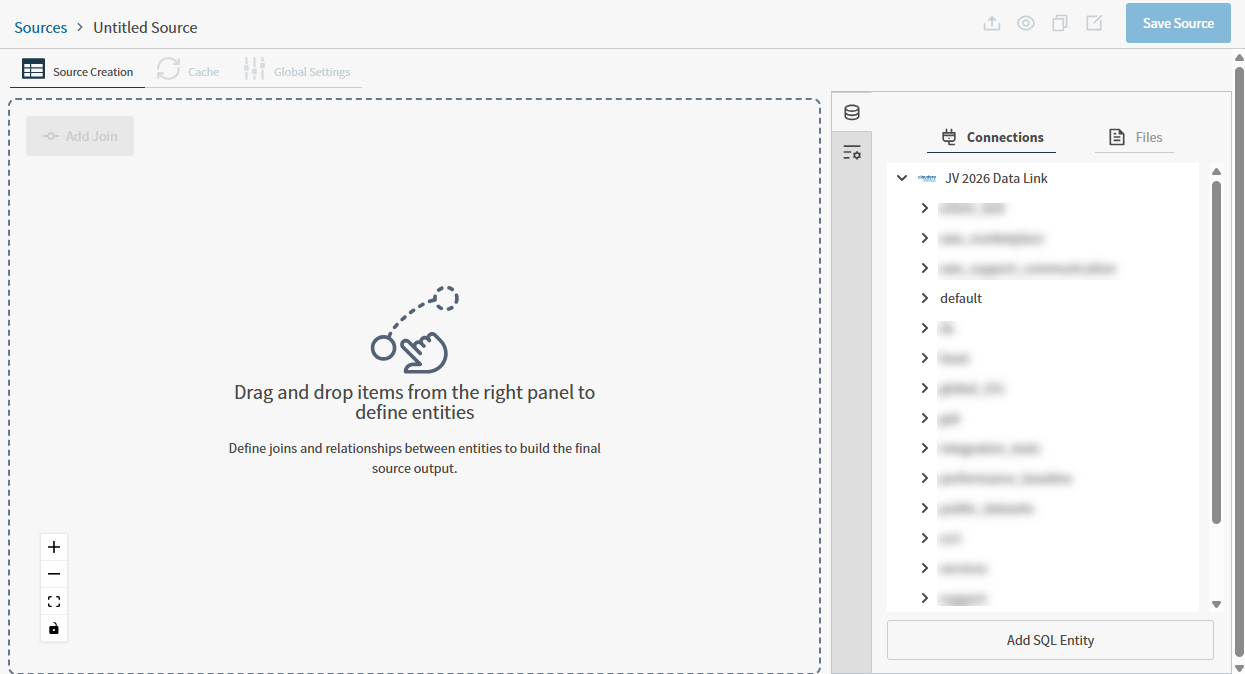
- Enter a unique name (replacing the default name, Untitled Source) for your source.
- Select and expand a connection from the right Connections panel to find a schema and entity in your selected connection. If using a Dundas BI (Managed) connection, see Define a New Source from a Dundas BI (Managed) Connection.
-
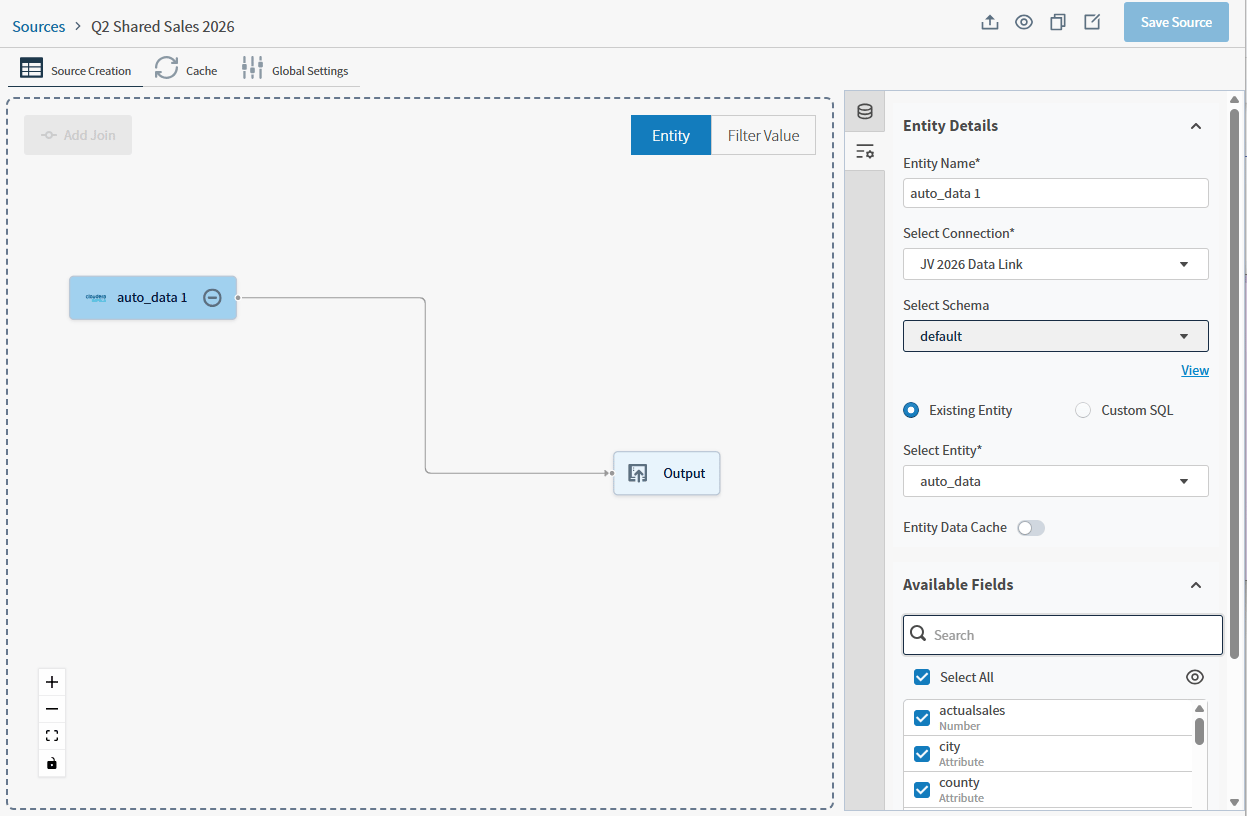
Drag and drop a selected entity from the right panel. This is added to your source work area as a connection node, linked to an output node. The default name is the same as the entity, appended with a number. After you save the source, you can select the connection node to rename the entity using the properties panel.
 If you need to delete a node, select the delete icon, or select it and delete it using the backspace key.
 -
Select Save Source to save your output and make further changes to your source. Optionally, edit the Description and Tags for this source.
Alternatively, select an item from the Files panel or select Add SQL Entity to define an entity and data to retrieve from a selected connection.
-
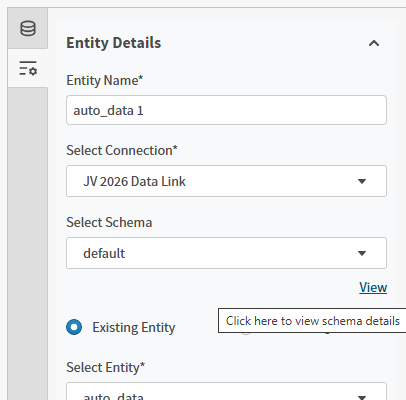
Select the connection node of entity you have added to view and edit information in the Properties panel. Use this panel to edit the Entity Name, change the Select Connection, change the schema in Select Schema, or to View see a visual layout of the entity’s schema. Optionally, adjust the Available Fields.
-
If you choose to use the Existing Entity, you can enable Entity Data Cache, and select which fields you want to include by expanding and making selections in the Available Fields list. The Preview icon in the Available Fields work area opens an Entity Preview dialog box. This preview includes all of the fields in the entity (no matter your selections) to help you decide what to include or exclude.
Alternatively, select Custom SQL to define the data to retrieve from your selected connection.
-
Select Apply to apply your changes, and Save Source, if needed. Once saved, your new source is added to the list on the Sources page.
There are two preview icons in the Source work area. The Preview icon in the Available Fields work area opens an Entity Preview dialog box. This preview includes all of the fields in the entity (no matter your selections) to help you decide what to include or exclude. The Preview Source icon next to the Save Source button opens a Source Preview. This preview includes only what fields you have made available after applying your field selections and saving your work.
- As needed, update the default settings on the Cache tab or Global Settings tab.
-
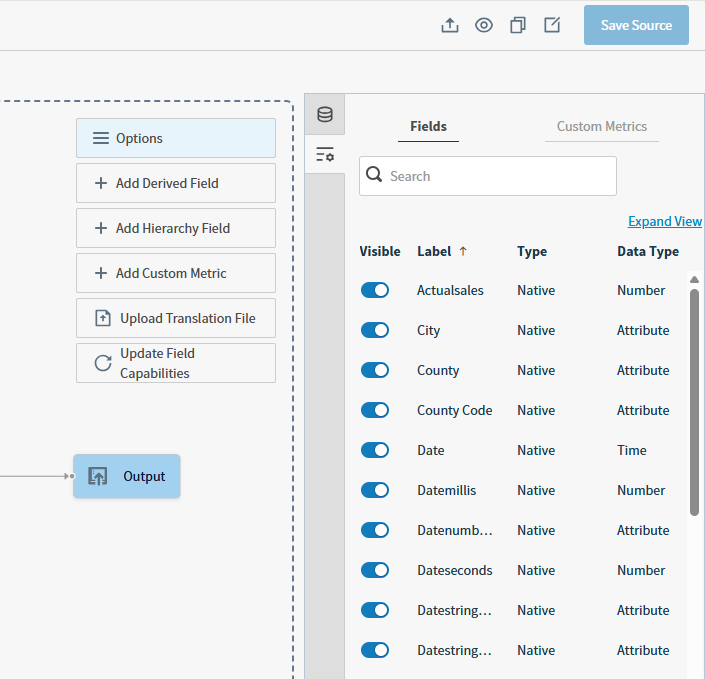
Manage the Fields and Custom Metrics in the Properties panel for this data source by selecting the Output icon in the work area. If you need a larger work area, select the Expand View link to open a larger work area. See Manage the Fields Work Areas.
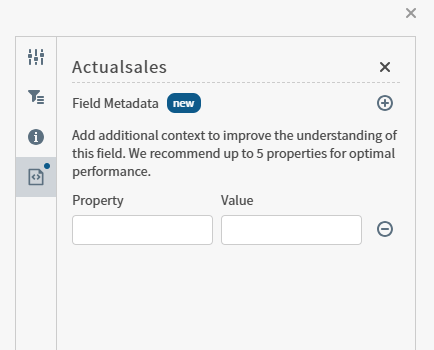
- As information consumed by an integrated AI tool: for example, Simba Intelligence or other tool can read the information and interpret it without adding it to the visual.
- As internal information for users who can view the data in your source.
https://<Self-Service Analytics-URL>/composer/swagger-ui.html.
View Relationships for a Schema in a Source
You can view the relationships for the schemas you add to your data sources to better understand the relationships present. Add a schema and select the view link to see how the data in your tables are connected. To add more relationships to a schema, edit it in the connection directly. Zoom in or out in this work area, or use the mini map to navigate among the various tables that make up your schema.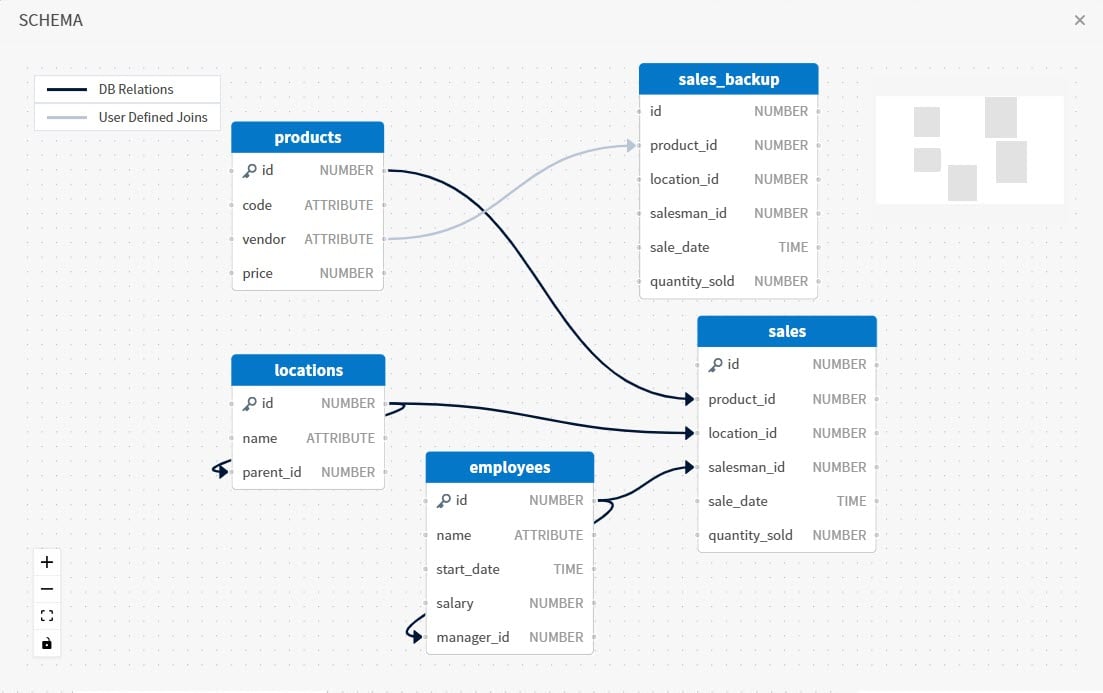
- Create or edit a source that uses a schema.
-
Select the View link next to your selected Schema. A schema work area opens you can use to view the tables and relationships of that schema. Larger data sets may take a few moments to load.
- View the existing relationships and any user defined joins to better understand the relationships present.
- Close the work area when you’re done viewing the schema information, and repeat for other schemas if needed.
For Postgres connections, both tables and data relationship information are read from the connection. Other supported connections include table information but do not read relationship information. See Connector Support for Schema Visualization. No information is provided for unsupported connections.
Copy a Source
After you have created a source, you can optionally make a copy of this source to use in your environment. Instead of creating a similar source from start to finish every time you want to create a source, you can make a copy of a working source and make the changes you need. Use this functionality to:- Select a different schema to use in the copied source
- Include an additional or different data connection for fused sources
- Allow access to a different group of users for internal testing or to separate groups more completely than by privileges alone
Define a New Source from a Dundas BI (Managed) Connection
- Log in as a user with the Administer Sources or Create New Data Sources privilege.
- Select Sources from the main menu. The Sources page appears.
- On the Sources page, select the Create Source button. The Source Creation work area opens.
- Enter a unique name (replacing the default name, Untitled Source) for your source in the Source Creation work area.
-
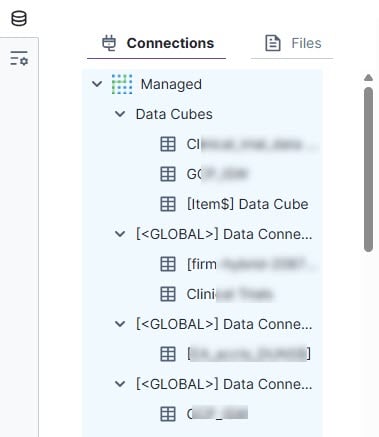
Select and expand a Managed connection from the right Connections panel. Select the appropriate entity from your available data cubes or shared data connectors.
- Drag and drop the entity to the source creation work area. This is added to your visual work area, linked to an output.
-
Select Save Source to save your output and make further changes to your source. Optionally, edit the Description and Tags for this source.
Alternatively, select an item from the Files panel.
- Select the entity you have added to view and edit information in the Properties panel. Use this panel to edit the Entity Name, change the Select Connection, or select a different folder in Select Folder.
-
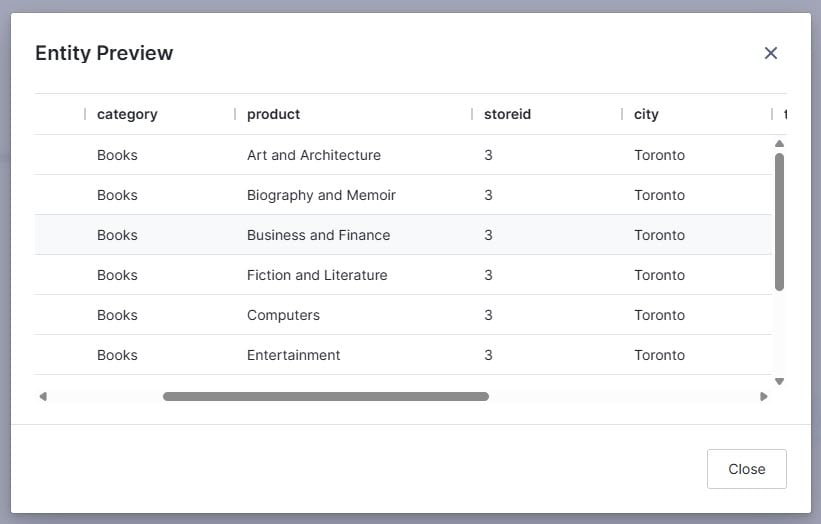
Existing Entity is enabled by default, and you can enable Entity Data Cache, then select which fields you want to include by expanding and making selections in the Available Fields list. The Preview icon in the Available Fields work area opens an Entity Preview dialog box. This preview includes all of the fields in the entity (no matter your selections) to help you decide what to include or exclude.
-
Select Apply to apply your changes, and Save Source, if needed. Once saved, your new source is added to the list on the Sources page.
There are two preview icons in the Source work area. The Preview icon in the Available Fields work area opens an Entity Preview dialog box. This preview includes all of the fields in the entity (no matter your selections) to help you decide what to include or exclude. The Preview Source icon next to the Save Source button opens a Source Preview. This preview includes only what fields you have made available after applying your field selections and saving your work.
- As needed, update the default settings on the Cache tab or Global Settings tab.
-
Manage the Fields and Custom Metrics in the Properties panel for this data source by selecting the Output icon in the work area. If you need a larger work area, select the Expand View link.
Edit a Data Source
You can only edit a data source configuration if you are logged in as a user with the Administer Sources privilege, or a user with read and write permission for the data source. You can add additional data entities to a source to convert into a fusion data source at any time. See Create a Fusion Source. Edit a data source configuration- Log in as a user with the Administer Sources privilege, or a user with read and write permission for the data source.
- Select the Sources card on your home page or Data Sources from the main menu. The Sources page appears.
- On the Sources page, locate and select the data source configuration you want to edit. The Source Creation work area opens.
-
Select and alter the settings on the tabs, as appropriate. Some changes can include, but are not limited to:
-
Source Creation Work Areas
- Add or change data entities, files, or connections. If fields from the original source are in use in a visual, you can make a change if the same field is present in the new entity, file, or connection.
- Add or remove fields. Fields can not be removed if in use in a visual, but can be hidden on the Fields tab.
-
Manage the Fields Work Areas
- Hide fields, edit Settings of fields, derived fields, and custom metrics.
- Upload a translation file.
- Update field capabilities for your fields in bulk.
- Add or edit derived fields and custom metrics.
- Add hierarchy fields.
- Manage Field Metadata.
-
Cache Tab
- Edit cache settings, including scheduling refresh jobs.
-
Global Settings Work Areas
- Make changes to new and existing visuals.
-
Source Creation Work Areas
- When your changes are complete, select Save Source.
When you add a new field to a data source, the scheduled refresh is not enabled for the new fields by default. Quickly enable scheduled refresh for all fields using the bulk update option in the Schedule Refresh menu on the Cache tab, or enable each field for scheduled refresh manually on the Cache tab.
- You remove the visuals using affected fields.
Delete a Data Source
You cannot delete a data source if it has been used in any visuals on any dashboard. You must first remove it from the visuals. In addition, you can only delete a data source if you are logged in as a user with the Administer Sources privilege, or a user with delete permission for the data source.In this release, when your admin enables the Enhanced Experience user interface, you will see changes to workflows you may have used in previous releases.
- Make sure you are logged in as a Self-Service Analytics a user with the Administer Sources privilege, or a user with delete permission for the data source.
- Select the Sources card on your home page or Data Sources from the main menu.. The Sources page appears.
- In the table on the Sources page, locate the row displaying the data source configuration you want to delete.
- Select the delete icon in the Actions column for the row. A warning dialog requests confirmation of your delete request.
- Select Delete on the warning dialog. The data source configuration is deleted.
Select a Connection for a Source
Data store connections are selected as part of creating sources. If you can modify and save sources, you can select or change the data store connections they use.You must be logged in as an administrator or as a user with the group privilege Manage Connections to select or change the data store connection for a data source.