
Manage Fields
In this release, when your admin enables the Enhanced Experience user interface, you will see changes to workflows you may have used in previous releases. If you are running an earlier release or your admin has not enabled the new interface, see Fields Tab (Earlier Releases).
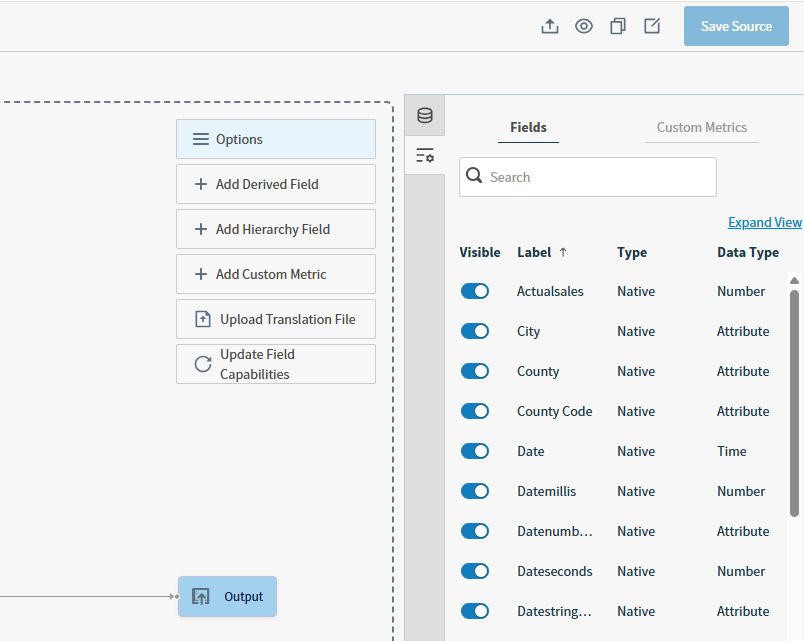
Expand View - Fields
When you expand the view of your fields or custom metrics into a larger work area, you can easily access the Settings, Filter Values (fields only), Info, and Field Metadata of a selected field to manage your fields data. Search fields, or use any of the options shown to Upload Translation File, Update Field Capabilities, Add Derived Field, or Add Hierarchy Field.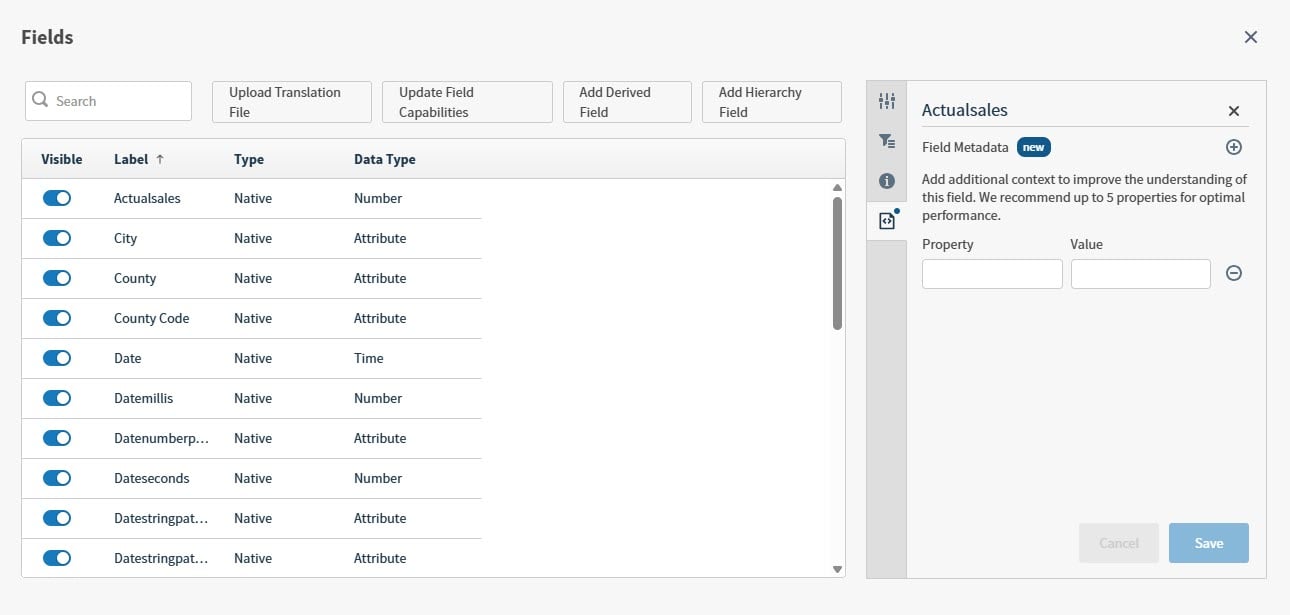
Fields Metadata is not available for Custom Metrics.
Fields Table
The Fields table lists all the fields in the records of the data source available in the Output you selected on the Source Creation tab. Use this work area to further configure them. To define the field metadata, 1,000 records are sampled.Use the Search field to find a field by Label name.
| Column | Description |
|---|---|
| Visible | By default, all fields are visible, and you can include data from these fields in your visuals. If you want to hide specific fields, select the toggle to hide the field. Hidden fields can be added to and used in derived fields and custom metrics, but not visuals. See Hide Fields. If a hidden native field is the default metric for a new visual, another metric is used in its place. |
| Label | By default, the name of the field as defined in the data source. To change, edit the Label field in the Settings side panel. |
| Type | Shows the field type. Fields from your data source are Native. Derived fields are Derived. |
| Data Type | The data type for each field is defined, by default, by Self-Service Analytics and shown here. If available, select Convert in the Data Details section of the Settings side panel to create a derived field of this data as another data type. Options include Time, Number, or Attribute. In environments where alternate calendars are enabled, a new Time derived field based on the selected calendar is created. See Fiscal Calendars. |
| Actions | Shows what actions, if any, you can take for this field. You can only delete derived fields here. If you try to delete a visual, filter snippet, dashboard, self service report, dashboard link, source, or source field, Self-Service Analytics displays an error message naming any objects dependent on the item you’re trying to delete. You can delete the item after you’ve removed the association from the dependent object. See Fields Usage. |
Settings Panel - Fields Tab
Select a field in the fields table to edit and update information for each field. Depending on the field selected, available options change. Select Save to save any changes you make here.| Setting | Description |
|---|---|
| Expression | The expression used to define this derived field. Select the edit  button to change. button to change. |
| Data Details | Depending on the Data Type of the field, different options are available you can adjust.
Your selection here also affects exported data. |
| Format | The number or time format for this field. Select the edit button to change the format type and edit display details for field.
|
| URL Formatting | Enable to display a hyperlink associated with this Attribute or Number field as a link in the Data Details table for a visual. When selected, the URL opens in a new browser tab. Select the Interpolated Expression add icon  and enter the link address, such as and enter the link address, such as https://www.website.com/${value}. |
| Partition | If you are using Cloudera Impala, Apache Drill, Hive, or Spark SQL as your data source, the Partition section shows if fields within your source are partitioned. Enable to optionally adjust the Partition Field and Partition Function of the partition. |
Filter Values Panel - Fields Tab
Select a field in the fields table to define filter values for each field. Choose a static override option if you want to specify Custom Value and Range. Depending on the field selected, available options change. Select Reset to clear unsaved changes and return to previously saved settings. Select Save to save any changes you make here.| Source of Filter Values | Setting | Description |
|---|---|---|
| Default | Select to inherit values from the data source. Select Reset to reset any changes you have made, even saved changes, to Default. | |
| Dynamic Override | Select values from predefined entities. Apply to Attribute, Number, or Time fields.
| |
| Static Override | Select to manually enter filter values. You can enable Custom Value, Custom Range, or both. If the values you define are invalid, you can not save your settings. | |
| Custom Range | Enable to define a custom range from available values. Apply to Number and Time fields. Adjust Min and Max to suit your needs. Applies to all visuals. These fields must defined. | |
| Custom Value | Enable to define custom values for this field at the source level. Apply to Attribute and Number fields.
|
Info Panel - Fields Tab
Select a field in the fields table to review information about or update the label for each field. Depending on the field selected, available options change. Select Save to save any changes you make here.| Setting | Description |
|---|---|
| Name | The name of the field as defined in the data from the data store. Unique. When you add a derived field, the software generates the Name using information in the Label field. The Name must be unique; the software appends a number if needed. This product supports underscores and periods in data store field Names. No other special characters or white spaces are supported. Names can start with a letter or an underscore, followed by letters, digits, underscores, and periods. |
| Label | The Label information for the field as defined in the data store, or that you define when you create a derived field. Edit as needed for use in your visuals and dashboards. 255 characters. The Label field does not need to be unique. |
| Data Entity Label | The name of the data entity source for this field. |
Field Metadata - Fields Tab
Select a field in the fields table to add, review, update contextual information for that field. Users with access to the source can see this information, and it can be consumed by artificial intelligence tools or other software you integrate into your environment. This information is exported when you export source, or dashboards and visuals information that Add, update, edit, or delete a paired Property and Value. Select Save to save any changes you make here.Manage Field Metadata
Optionally, add metadata at the field level stored as a keyed pair of Property and Value in your environment. Use in several ways:- As information consumed by an integrated AI tool: for example, Simba Intelligence or other tool can read the information and interpret it without adding it to the visual.
- As internal information for users who can view the data in your source.
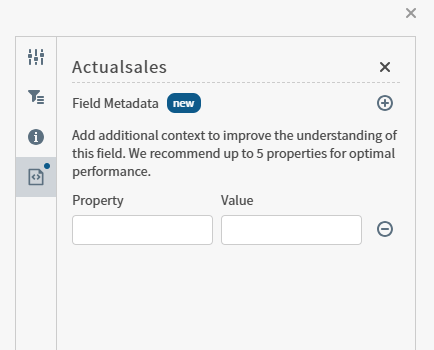
- Select Field Metadata in the expanded view of your source.
- Add a Property and Value pair to append to your data to add context for tools you use to explore and share your data.
- Select the plus (+) icon to add another pair, or the minus (-) icon next to an existing pair to remove it.
- Select Save to apply your changes. As needed, update or remove the fields you need.
https://<Self-Service Analytics-URL>/composer/swagger-ui.html.
Custom Metrics Table
The Custom Metrics table lists custom metrics you have defined for the data and allows you to define others. You can also select Add Custom Metric from the Options menu to add a custom metric to this table.- When you create a new source, Volume is presented as a custom metric, using the Count(*) expression. Edit or delete as needed to reflect your information as desired.
- When you upgrade from an older release, volume metrics for existing sources are converted to a custom metric.
Use the Search field to find a custom metric by Label name.
| Column | Description |
|---|---|
| Visible | By default, all the fields are selected and are visible. This means that you can visualize the data from these fields on your visuals. If you want to hide specific fields, select the toggle to hide the field. Hidden fields can be used in custom metrics. However, they cannot be used in dashboard visuals. See Hide Fields. If a hidden native field is the default metric for a new visual, another metric is used in its place. |
| Label | The Label information for the field you define when you create a custom metric. To change, edit the Label field in the Settings side panel. |
| Type | Shows the field type. Custom metrics are always Custom Metric. |
| Data Type | Shows the data type. For custom metrics, this is always Number. |
| Actions | Shows what actions, if any, you can take for this field. Generally, you can only delete custom metrics. |
Settings Panel - Custom Metrics Tab
Select a field in the custom metrics table to edit and update information for each metric. Select Save to save any changes you make here.Info Panel - Custom Metrics Tab
Select a field in the Custom Metrics table to review information about or update the label for each field. Depending on the field selected, available options may change. Select Save to save any changes you make here.| Setting | Description |
|---|---|
| Name | The name of the metric as you define during custom metric creation. Unique. When you add a custom metric, the software generates the Name using information in the Label field. The Name must be unique; the software appends a number if needed. supports underscores and periods in data store field Names. No other special characters or white spaces are supported. Names can start with a letter or an underscore, followed by letters, digits, underscores, and periods. |
| Label | The Label information for the field you define when you create a custom metric. Edit as needed use in your visuals and dashboards. 255 characters. The Label field does not need to be unique. |
Manage Field Metadata
Optionally, add metadata at the field level stored as a keyed pair of Property and Value in your environment. Use in several ways:- As information consumed by an integrated AI tool: for example, Simba Intelligence or other tool can read the information and interpret it without adding it to the visual.
- As internal information for users who can view the data in your source.
- Select Field Metadata in the expanded view of your source.
- Add a Property and Value pair to append to your data to add context for tools you use to explore and share your data.
- Select the plus (+) icon to add another pair, or the minus (-) icon next to an existing pair to remove it.
- Select Save to apply your changes. As needed, update or remove the fields you need.
https://<Self-Service Analytics-URL>/composer/swagger-ui.html.
Hide Fields
By default, all fields in a data source are visible and available for use in custom metrics, derived fields, self service reports, and in your dashboard visuals. However, there may be source fields, derived fields, or custom metrics in the data that you prefer to hide. Hidden fields can be used in custom metrics, dashboard visuals, and derived fields.When to Hide Fields
You can hide a field already used in a derived field, custom metric, or visual. The next time a user opens a visual that uses that hidden field, they are prompted to re-render the visual by selecting another available field.In this release, when your admin enables the Enhanced Experience user interface, you will see changes to workflows you may have used in previous releases. If you are running an earlier release or your admin has not enabled the new interface, see How to Hide a Field (Earlier Releases).
How to Hide a Field
Hide source fields, derived fields, or custom metrics using the Properties panel of a data source. Hide a field- Make sure you are logged in as a user with the Administer Sources privilege, or a user with read and write permission for the data source. Open the source you want to edit.
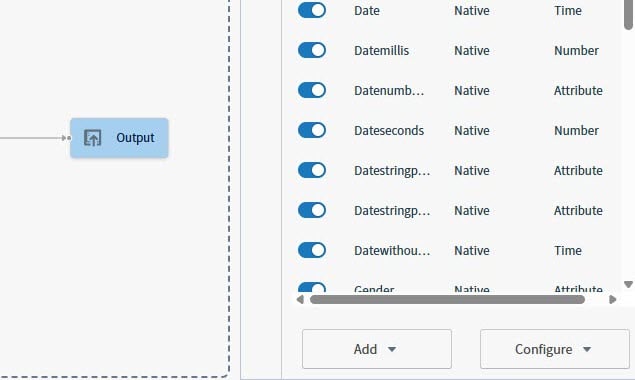
- Select the Properties panel for this data source by selecting the Output icon in the work area. If you need a larger work area, select the Expand View link to open a larger work area.
- To hide a field or derived field, disable (toggle off) the corresponding Visible toggle in the Fields table. By default, all included fields for a data source are enabled and visible.
-
To hide a custom metric, disable (toggle off) the corresponding Visible toggle in the Custom Metrics table. By default, all custom metrics for a data source are enabled and visible.
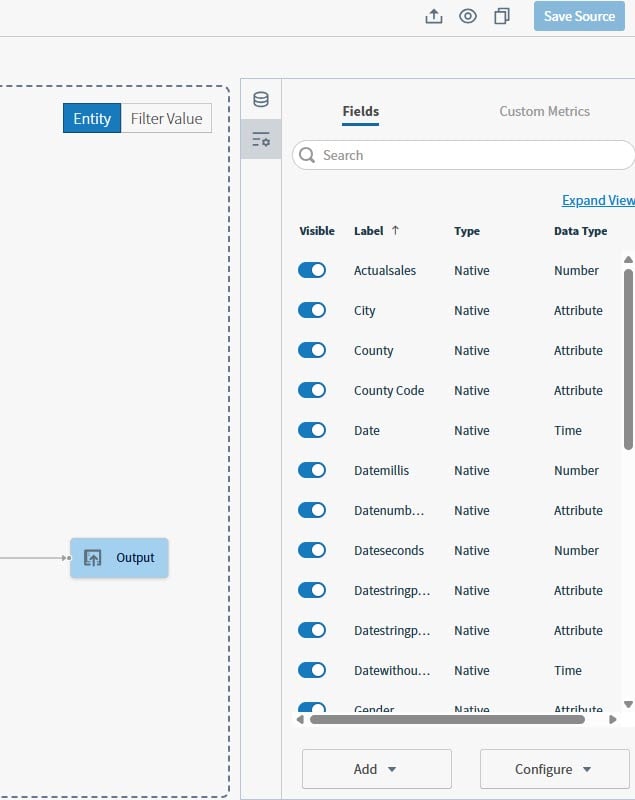
- Exit the source data configuration work area when you have finished defining field visibility.
Upload a Translation File For a Source
Provide localization support by uploading metadata dictionaries for your data sources by uploading a translation file in CSV format for each data source you create. Use this translation file to define label translation for fields and custom metrics for your users in their preferred language.In this release, when your admin enables the Enhanced Experience user interface, you will see changes to workflows you may have used in previous releases. If you are running an earlier release or your admin has not enabled the new interface, see Upload or Replace a Translation File (Earlier Releases).
Translation File Prerequisites
- Build your metadata dictionary as a comma separated values file (.csv) as shown below, using appropriate Locale labels for each language.
- Include as many or as few of the fields as you need from your data source, in any order. Self-Service Analytics displays the appropriate translation with each included field in the language defined by the user’s settings. If no translation is provided, the original field name is shown.
- Provide a translation entry for each language represented. If your file is missing a language entry for a field, Self-Service Analytics rejects the file upload.
If you import an exported source that has an associated translation file, you must re-upload the translation for that source.
Upload or Replace a Translation File
Upload a translation file- Log in as a user with the Administer Sources privilege, or a user with read and write permission for the data source.
-
Select the Output for your source, then select Upload Translation File from the Add menu. Self-Service Analytics prompts you to upload your file from your system.
-
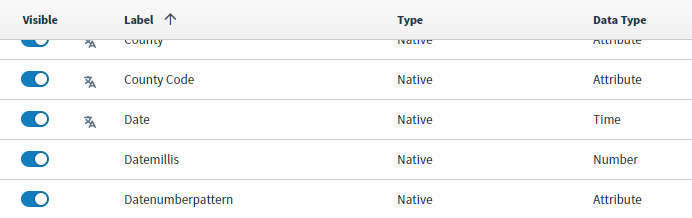
Browse to your file, then select Open. Self-Service Analytics returns a success message. Translated fields are indicated by the translation icon (
 ) in the appropriate table.
- Log in as a user with the Administer Sources privilege, or a user with read and write permission for the data source.
- Select the Fields tab for the source, then select Upload Translation File. Self-Service Analytics prompts you to upload your file from your system.
- Browse to your revised file, then select Open. Self-Service Analytics overwrites the existing metadata dictionary and returns a success message. Translated fields are indicated by the translation icon () in the appropriate table.
Field Capabilities
When you create your source or create fields in a source, Self-Service Analytics defines default field capabilities for your data. You can adjust the predefined capabilities of native and derived fields on the Fields tab of your source, enabling or disabling capabilities as needed. If you update a source, any field capabilities you set remain unchanged.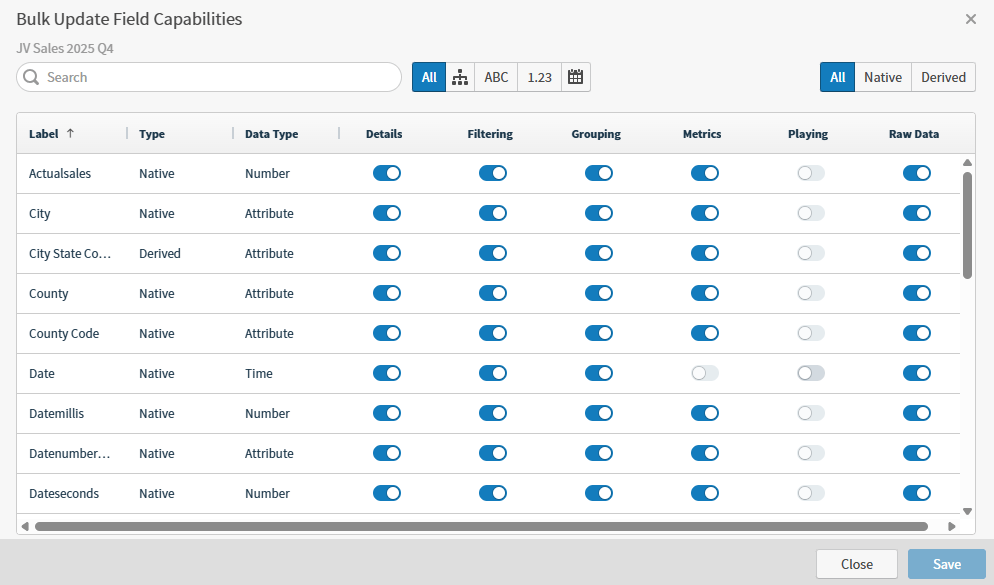
- Filter by data type: Show All data type fields: Attribute (ABC), Number (1.23) or Time (
 ).
). - Filter by type: All, Native, or Derived.
You can only update the fields you have made visible in this source.
If your source data does not contain enough data for a field capability, enabling or disabling it will have no effect on the field. For example, insufficient data can prevent display of details in detailed data views, even if the Details option is enabled.
Field Capabilities Options
| Capability | Description |
|---|---|
| Details | When enabled, the field is visible in detailed data views.
|
| Filtering | When enabled, you can filter data using this field in filters and filter snippets. When disabled, you can not use this field in filters. You can use this field to filter data in filter snippets when you pair it with a Display Column. This also masks the data users see, and masks the data in exports of the data. See Filter Data With Masked Fields.
|
| Grouping | When enabled, the field can be included in grouping.
See Using the Raw Data Capability for more information on using Grouping and Raw Data together. |
| Metrics | When enabled, metrics are provided for this field.
|
| Playing | When enabled, the data can be played in the visual.
|
| Raw Data | When enabled, the data is displayed in table visuals and can be exported with the visual to CSV and XLSX formats, using the Raw Data export option in visuals and details menus. When disabled, field data is hidden and not included in any raw data exports, including dashboard reports, and cannot be included in keysets. See Using the Raw Data Capability for more information.
Not supported by hierarchical fields. |
Meta flags are defined by the connector for each field during source creation. The connector performs data sampling to define some technical details and create the flags. These flags are not visible in the user interface. Manage using
/api/sources/{sourceId}/fields.Using the Raw Data Capability
Use the Raw Data option to control the visibility of raw data for your fields. This allows you to prevent export or use of specific fields that may contain sensitive information. It’s enabled by default; disable to prevent export, views, and use of data fields as needed.If you disable Raw Data for a field used in an existing visual, the field remains visible in the visual, but cannot be exported with the visual in any format. Once you remove a field from a visual that has Raw Data disabled, you can not add it back in.
| Field Capability Options | Field Behaviors |
|---|---|
| Raw Data: Enabled | Fields are available for use and access in:
|
| Raw Data: Disabled | Fields are hidden from:
Keysets:
Calculation Builder:
|
| Raw Data: Disabled Grouping: Disabled | When Grouping and Raw Data is disabled on a field, the field is additionally hidden from:
|
Update Field Capabilities
When you create your source or create fields in a source, Self-Service Analytics defines default field capabilities for your data. You can adjust the predefined capabilities of native and derived fields on the Fields tab of your source, enabling or disabling capabilities as needed.In this release, when your admin enables the Enhanced Experience user interface, you will see changes to workflows you may have used in previous releases. If you are running an earlier release or your admin has not enabled the new interface, see Update the field capabilities for your source (earlier releases).
- Access the Fields tab for your source.
-
Select the Output, then select Update Field Capabilities from the Options menu. The Bulk Update Field Capabilities work area opens.
- Filter by data type: Show All data type fields: Attribute (ABC), Number (1.23) or Time ().
- Filter by type: All, Native, or Derived.
Select the toggle for any of the available options to enable or disable the field capabilities for that field. See Manage the Fields Work AreasYou can only update the fields you have made visible in this source. - Filter by data type: Show All data type fields: Attribute (ABC), Number (1.23) or Time (
- Only visible fields are shown in this work area. Search for an individual field by name, or filter the fields by data type (attribute, numeric, date) or type (native, derived).
- Enable or disable the field capabilities for all visible fields in the source. Capabilities include: Details, Filtering, Grouping, Metrics, Playing, and Raw Data. See Field Capabilities Options.
- Save your changes.
Fields Usage
does not allow you to remove a field from a source definition if any objects rely on this field. For example, if your native fieldfield_1 is used in a derived field expression such as year_to_time(field_1), you can not remove it from the source.
The table below is a list of objects where a field can be used.
If you try to delete a visual, filter snippet, dashboard, self service report, dashboard link, source, or source field, Self-Service Analytics displays an error message naming any objects dependent on the item you’re trying to delete. You can delete the item after you’ve removed the association from the dependent object. See Manage the Fields Work Areas.
Source Field Migration
When you upgrade from an earlier version of Logi Composer to v7.10 or later, several field types in your existing sources are migrated and converted to supported field types. Self-Service Analytics no longer supports implicit field type conversions: when you change the field type for a field, you effectively create a new derived field. See Create and Modify Derived Fields.Field Type Conversion: Previous Releases to Current Release
Scenario: You have adate_year field defined as an integer in your original database.
-
Logi Composer (previous releases):
date_yearis defined as a number or integer (dependent on your version).- You set the
typeas Time with Custom Patternyyyy. - Composer treats the field as a
timefield.
-
Self-Service Analytics, on upgrade, will now have two fields for each affected field in your source.
- Field 1:
date_year_original. The Label text is appended withOriginal. The field type is set tonumberand the field is not visible (Visible toggle disabled in the Fields tab). - Field 2:
date_yearas in your original source. The Label text and other settings are unchanged. This is a derived field, using the expressionyear_to_time(date_year_original)
- Field 1:
If you create a new data source that uses the
date_year integer from your source, you can create a derived field to change the number into time, using the expression year_to_time(date_year).| Data Type conversion | Derived Field Expression | Requires Derived Field Support |
|---|---|---|
| ATTRIBUTE to NUMBER | text_to_num(field_name) | Yes |
| ATTRIBUTE to TIME | text_to_time(field_name, 'pattern') | Yes |
| NUMBER to TIME | year_to_time(date_year)ms_to_time(date_milliseconds)unix_time_to_time(date_seconds) | No |
| NUMBER to ATTRIBUTE | num_to_text(field_name) | Yes |
| TIME to NUMBER | time_to_unix_time(field_name) | Yes |