
User definitions can be manually created or imported via the LDAP security protocol. In addition, if using SAML single sign-on protocol, users and groups may be automatically provisioned in Self-Service Analytics (account level synchronization). For more information, see Supported Authentication Tools.
Add Users
The system admin users or a user who has been assigned to a group with user management privileges can add users to your environment. If you use tenants to manage access to resources and data, the supplied admin user and users belonging to the Supervisor group can add users to one or more tenants during user creation as well.In this release, when your admin enables the Enhanced Experience user interface, you will see changes to workflows you may have used in previous releases.
When Logged In as Member of the Supervisors Group
Members of the Supervisors group can add new users to your environment, with the following caveats:- The new user is not assigned to any groups. Only the supplied admin user or a user who has been assigned to a group with user management privileges can assign groups to users. If you use tenants to manage access to resources and data, a tenant admin or a user who has been assigned to a group with user management privileges can assign groups to users in the tenant.
- The Require password change switch on the Info tab is always on (set to Yes) to require users to change their password when they first log into Self-Service Analytics. Change to No if needed.
- If you use tenants to manage access to resources and data, new users are created in your environment with no tenant membership. Members of the Supervisors group or any system admin user can add new users to tenants as required.
- Log in as a system admin user or a member of the Supervisors group. Select Users from the Administration menu (formerly System Users) to open the Users work area and list all users in your environment. In environments where the enhanced-experience toggle has been enabled, the menu option System Users has been removed from the main menu UI. Users with appropriate privileges can instead access users using the User menu option, and groups using the Groups menu option.
- Select New User. A New User work area opens with three tabs: Info, Tenant(s), and Regional Settings.
- On the Info tab, enter the user login name, full name, email, and password values. Adjust the Require password change switch (Yes by default) as needed. See Specify General User Information.
- Select Save to save the new user. Until you save the user, you can not access the Tenants(s) and Regional Settings tabs for this user.
- Select the user you just created from the user list. Assign the user to one or more tenants on the Tenant(s) tab, and optionally select a Current Tenant if they are assigned to multiple tenants. See Assign and Remove Users in Tenants.
- On the Regional Settings tab, select a regional language for the user definition. See Specify A User’s Regional Settings.
- Select Save to save the user.
When Logged In as an Administrator or a Group User with User Management Privileges
Add a user (admin user or user with user management group privileges)- Log in as an administrator or a user who has been assigned to a group with user management privileges. If the user name you log in with is also associated with other Self-Service Analytics tenants, verify that the correct tenant is selected. See Switch Tenants.
- Select Users from the Administration menu (formerly Users and Groups). The Users work area appears, listing all defined users in this tenant.
- Select New User. A New User work area opens with three tabs: Info, Custom Attributes, and Regional Settings.
- On the Info tab, enter the user login name, full name, email, and password values. Optionally, adjust the Require password change switch (Yes by default) as needed. See Specify General User Information. Optionally, add the user to available groups.
- Select Save to save the new user. Until you save the user, you can not access the Custom Attributes and Regional Settings tabs for this user.
- On the Custom Attributes tab, specify custom attributes for the user. See Specify Custom User Attributes.
- On the Regional Settings tab, select a regional language for the user definition. See Specify A User’s Regional Settings.
- Select Save to save the user.
Modify Users
Self-Service Analytics administrators, tenant administrators, or a user who has been assigned to a group with user management privileges can modify user accounts.In this release, when your admin enables the Enhanced Experience user interface, you will see changes to workflows you may have used in previous releases.
Modify a User (Supervisors Group Members)
In this release, when your admin enables the Enhanced Experience user interface, you will see changes to workflows you may have used in previous releases.
-
Log in as the supplied admin user or a user in the Supervisors group. Select Users from the Administration menu (formerly System Users) to open the Users work area and list all users in your environment. If you are logged in as a tenant admin, verify you’re in or switch to the appropriate tenant.
In environments where the enhanced-experience toggle has been enabled, the menu option System Users has been removed from the main menu UI. Users with appropriate privileges can instead access users using the User menu option, and groups using the Groups menu option.
- On the left side of the Users work area, select the name of the user you want to modify. The user information appears on the right side of the work area.
-
On the Info tab, modify the values for the user login name, full name, email, and password, as needed. See Specify General User Information and Change Passwords.
You cannot change the groups to which a user is assigned. Groups can only be assigned by tenant administrators or tenant users who have been assigned to groups with user management privileges.
- On the Tenant(s) tab, adjust the tenants to which the user is assigned or change the user’s current tenant, as needed. See Assign and Remove Users in Tenants.
- On the Regional Settings tab, change the regional language for the user as needed. See Specify A User’s Regional Settings.
- Select Save to save the user.
Modify a User (Administrator Group Members, Group Members with User Management Privileges)
- Log in as an administrator or a user who has been assigned to a group with user management privileges. If you are logged in as a tenant admin, verify you’re in or switch to the appropriate tenant. If the user name you log in with is also associated with other tenants, verify that the correct tenant is selected. See Switch Tenants.
-
Select Users from the Administration menu (formerly Users and Groups) to open the Users work area and list all users in your environment. If you are logged in as a tenant admin, verify you’re in or switch to the appropriate tenant.
In environments where the enhanced-experience toggle has been enabled, the menu option System Users has been removed from the main menu UI. Users with appropriate privileges can instead access users using the User menu option, and groups using the Groups menu option.
- On the left side of the work area, select the name of the user you want to modify. The user information appears on the right side of the work area.
- On the Info tab, supply values for the user login name, full name, email, password, and assigned groups, as needed. See Specify General User Information. You can also use this tab to disable a user definition in the account. See Enable and Disable Users .
- On the Custom Attributes tab, specify or change custom attributes for the user as needed. See Specify Custom User Attributes.
- On the Regional Settings tab, change the regional language for the user as needed. See Specify A User’s Regional Settings.
- Select Save to save the user.
Delete Users
Administrators or a user who has been assigned to a group with user management privileges can delete users in your environment or individual tenants.In this release, when your admin enables the Enhanced Experience user interface, you will see changes to workflows you may have used in previous releases. If you are running an earlier release or your admin has not enabled the new interface, see Delete a User (Previous Releases).
Delete a User
Applies to: Supplied Admin user or Supervisors Group member- Log in as the supplied admin user (System Administrator) or a member of the Supervisors group.
- Select Users (formerly Users and Groups) from the Administration section of the main menu. A Users work area opens, listing all users defined for your environment (single tenant environment) or the tenant you have selected to work in (multiple tenant environment).
- Select the name of the user you want to delete and select its delete (-) icon. A warning dialog opens.
- Select Delete to remove the user. The user is removed from your instance. See also Assign and Remove Users in Tenants.
Modify a User
Applies to: Admin Group members, Group members with User Management privileges- Log in as an administrator or a user who has been assigned to a group with user management privileges.
- Select Users from the Administration section of the main menu. A Users work area opens, listing all users defined for the tenant.
- Select the name of the user you want to delete and select its delete (-) icon. A warning dialog opens.
- Select Delete to remove the user. The user is removed from your instance. See also Assign and Remove Users in Tenants.
List and Review Users
A system admin user and users who are assigned to a group with user management privileges can review users in Self-Service Analytics and tenants.List and Review All Users in Your Environment (Supervisors Group Members)
- Log in as a member of the Supervisors group, and select Users (formerly System Users) from the Administration menu. The Users work area opens, listing all users in your environment, from all tenants. In environments where the enhanced-experience toggle has been enabled, the menu option System Users has been removed from the main menu UI. Users with appropriate privileges can instead access users using the User menu option, and groups using the Groups menu option.
-
Select a user name on the left side of the page. A work area opens that includes three tabs of user details you can edit as needed.
You can:
- Modify the user information on the Info tab. See Specify General User Information.
- Review and assign the user to specific Self-Service Analytics tenants and select a primary tenant for this user on the Tenants(s) tab. See Assign and Remove Users in Tenants.
- Specify regional settings for the user on the Regional Settings tab. See Specify A User’s Regional Settings.
- Select any of the tabs in the work area to review the user settings.
List and Review all Users in Your Environment (System Administrator or a User with User Management Privileges)
- Log in as a user who has been assigned to a group with user management privileges. If the user name you log in with is also associated with other Self-Service Analytics tenants, verify you are using the Visual Data Discovery tenant to see all users, or a specific tenant to see only the users in that tenant. See Switch Tenants.
- Select Users (formerly Users and Groups) from the Administration menu. The Users work area opens, listing all users in your environment, from all tenants.
-
Select a user name on the left side of the page. A work area opens that includes three tabs of user details you can edit as needed.
You can:
- Modify the user information on the Info tab. See Specify General User Information.
- Review and assign the user to specific Self-Service Analytics tenant and select a primary tenant for this user on the Tenants(s) tab. See Assign and Remove Users in Tenants.
- Specify regional settings for the user on the Regional Settings tab. See Specify A User’s Regional Settings.
- Select any of the tabs in the work area to review the user settings.
Import Users
You can import users from Lightweight Directory Access Protocol (LDAP) or Active Directory if either protocol has been set up. Authorized users created and stored in these directories can be imported into your environment. You can import all users or select specific ones to add. Self-Service Analytics can connect to an organization’s Active Directory (AD) and OpenLDAP directory services using configured LDAP settings. See Use Lightweight Directory Access Protocol (LDAP).Self-Service Analytics supports the auto-provisioning of users via the SAML single sign-on protocol. When auto-provisioning is set up, the user is automatically added when they first log in. For instructions on automatic provisioning of users and groups via SAML, see Configure Self-Service Analytics to Support SAML.
When a user is imported from Active Directory or if user provisioning is enabled and a new Active Directory user is added, the corresponding user definition is automatically added. However, when a user is removed from Active Directory, the corresponding user is not automatically removed. Authentication does not occur for the removed user, but you will need to manually remove the user. See Delete Users .
Import User Definitions into Self-Service Analytics from LDAP or Active Directory
- Log into Self-Service Analytics as a system admin, or member of the Supervisors group and verify that LDAP or Active Directory have been set up. See Use Lightweight Directory Access Protocol (LDAP). Save the settings, then log out.
- Log in as an administrator or a user who has been assigned to a group with user management privileges. If the user name you log in with is also associated with other tenants, verify that the correct tenant is selected. See Switch Tenants.
- Select Users (formerly Users and Groups) from the Administration section of the main menu. A Users work area opens, listing all users defined for your environment (single tenant environment) or the tenant you have selected to work in (multiple tenant environment).
- Select Import Users. Upon successful access to your organization’s secure directory, a new tab appears listing all the available users that can be imported. You have the option to either select all users or individual users.
-
On the Import Users tab, select the users to be imported.
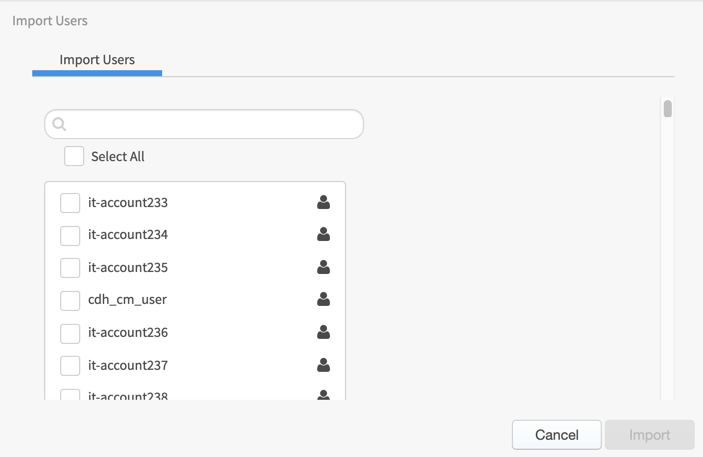
- Select Import. When the import completes, you will see the users added to the user list.
- On the Info tab of the user editor, select groups for each user. See Specify General User Information. Do not change the user login name as this may cause conflicts when reconnecting to the LDAP or Active Directory are attempted. If you have enabled the auto-creation of groups, Self-Service Analytics creates the groups that user is assigned to if they do not already exist.
- Select Save to save the user.
Enable and Disable Users
You can enable or disable a user when you add a new user or modify an existing user. New users are enabled by default. When you disable a user, the user is not removed from Self-Service Analytics, but the user no longer has access to the tenant in which they were disabled. If a user belongs to more than one tenant, they can still log into , but only to the tenants in which their user account is enabled. If their user account is disabled in all tenants, they can no longer log into Self-Service Analytics. Enable or disable a user on the Info tab of the user. Enable and disable users in a tenant if you are logged in as an administrator for the tenant or as a user who is assigned to a group in the tenant with user management privileges.Disable a User
- Access the Info tab for a user as a member of a group with user management privileges. See Add Users or Modify Users.
- Select (check) the Disable User checkbox at the bottom of the tab.
- Select Save to save the user.
Enable a User
- Access the Info tab for a user as a member of a group with user management privileges. See Add Users or Modify Users.
- Clear (uncheck) the Disable User checkbox at the bottom of the tab.
- Select Save to save the user.
Specify General User Information
When you add or modify a user, you can specify the following general information:- The login name for the user
- The user’s full name
- The user’s email address
- The user’s password
- Groups to which the user is assigned
- Whether the user is enabled or disabled
- Assign and Remove Users in Tenants
- Specify Custom User Attributes
- Specify A User’s Regional Settings
- Enable and Disable Users
The default supervisor user is no longer installed; add users to the Supervisors group instead.
| Tab Field | Required? | Default | Description |
|---|---|---|---|
| Login Name | Yes | --- | The login name for the user. This is also the name for the user definition. The login name must be unique in all accounts in the Self-Service Analytics instance. It must include at least one alphanumeric character. The login name is used to log into Self-Service Analytics. See Log Into the User Interface. |
| Full Name | No | --- | The full name of the user. Specify up to 40 characters of the user’s given name. |
| No | --- | The email address of the user. Specify up to 254 characters of the user’s email. | |
| Change Password | Yes | --- | Select to expand the Info tab and see the Password and Confirm Password fields. |
| Password | Yes | --- | The password associated with this user name. The password must contain at least nine characters and must include one lowercase, one uppercase, one numeric, and one special character. Special characters include these characters: !@#$%^&**()-_=+,.:;<> |
| Confirm Password | Yes | --- | The password associated with this user name. Use this text box to retype the password you specified in the Password text box when you initially create the user definition and when you change the password for the user. |
| Require password change | No | Yes | Use the Require password change switch to indicate whether the user should be prompted to change their password when they log on for the first time (or the first time after their password was set or changed). When you create a new user, the Require password change switch on the Info tab is always on (set to Yes), but can be changed to No. |
| Add Groups | No | --- | Select this button to assign the user to one or more groups in the account. The Add Group(s) dialog appears.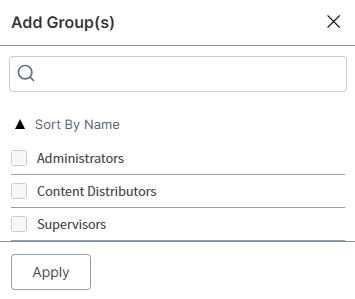 If your user ID is not assigned the Administer Groups privilege or is not an administrator, you cannot add users to a group. Only administrators can assign users to the Administrators group. Use the search box at the top of the dialog to locate a group name in the list. You can also sort the group names in ascending or descending order using the Sort By Name arrows. After selecting (checking) one or more groups for the user definition, select Apply to assign the user to the groups and close the Add Group(s) dialog. Users who belong to the Supervisors group do not have this field on the Info tab. Update their group membership in the group directly. Navigate to the menu option Groups, then select the Members tab to add or remove the user from a specific group in a specific tenant. |
| Disable User | No | not checked | This option appears only for administrators or users who are assigned to a group with user management privileges. Use the Disable User checkbox to disable the user. See Enable and Disable Users . |
Specify A User’s Regional Settings
Set regional settings for a user to determine the language of each user and the format of numeric fields in a data source. For example, a user based in the United States sees number fields formatted for Italian currency differently than a user based in Italy. See Number Formatting for Data Sources for more information. These settings can be changed by an administrator or a user who has been assigned to a group with user management privileges. The user locale can be set using the Regional Settings tab, as well. To access the Regional Settings tab, see Add Users or Modify Users. For information on the user settings that can be changed on other tabs for a user, see:- Assign and Remove Users in Tenants
- Specify General User Information
- Specify Custom User Attributes
- Enable and Disable Users
Set the User Locale for a User
- Navigate to the Regional Settings tab for a user. See Add Users or Modify Users.
- Select the location for the user in the drop-down list of the Regional Presets box.
- When all values have been specified, select Save to save the user.
Assign and Remove Users in Tenants
You can assign or remove users in Self-Service Analytics tenants as a system admin user or a user in the Supervisors group.Assign a User to a Tenant
- Log in as a system administrator or a member of the Supervisors group.
- On the left side of the Manage Users work area, select the name of the user you want to modify. The user information appears on the right side of the work area.
- Select the Tenant(s) tab. This tab lists all the tenants to which the user is assigned and the number of groups to which the user is assigned in each tenant.
- Select Add Tenant(s). The Select Tenants(s) dialog appears.
- Select (check) the tenants to assign the user to those tenants. If you clear (uncheck) the checkbox associated with a tenant here, user is removed from the tenant.
- Select Apply when finished. The list of tenants on the Tenant(s) tab updates to reflect your changes.
- Optionally, select a tenant for the user to use the next time they log in from available tenants in the Current Tenant field. See Set the Current Tenant for a User.
- Select Save to save the user.
Remove a User from a Tenant
- Log in as a system administrator or a member of the Supervisors group.
- On the left side of the Manage Users work area, select the name of the user you want to modify. The user information appears on the right side of the work area.
- Select the Tenant(s) tab. This tab lists all the tenants to which the user is assigned and the number of groups to which the user is assigned in each tenant.
-
You can remove the user from tenants in one of two ways:
- Select the remove (
 ) icon next to the tenant you want to remove the user from. Select Delete when prompted to remove the user from this tenant.
 - Select Add Tenant(s). The Select Tenants(s) dialog appears. Clear (uncheck) the checkbox associated with a tenant here, user is removed from the tenant. Select Apply: the list of tenants on the Tenant(s) tab updates to reflect your changes.
- Select the remove (
- Optionally, select a tenant for the user to use the next time they log in from available tenants in the Current Tenant field. See Set the Current Tenant for a User.
- Select Save to save the user.
Set the Current Tenant for a User
If a user has access to multiple Self-Service Analytics tenants, you can specify the tenant they should use the next time they log in. After logging in, they can switch tenants, as needed. After a user switches tenants, the most recent tenant they worked in is remembered and used the next time they log in. If a user is assigned to only one tenant, that tenant is always the current tenant.The default supervisor user is no longer installed; add users to the Supervisors group instead.
Set the Current Tenant for a User
-
Log in as a system admin user or a user in the Supervisors group. Select Users from the Administration menu (formerly System Users) to open the Users work area and list all users in your environment.
In environments where the enhanced-experience toggle has been enabled, the menu option System Users has been removed from the main menu UI. Users with appropriate privileges can instead access users using the User menu option, and groups using the Groups menu option.
- On the left side of the Users work area, select the name of the user whose tenants you want to modify. The user information appears on the right side of the work area.
- Select the Tenant(s) tab. This tab lists all the tenants to which the user is assigned and the number of groups to which the user is assigned in each tenant.
- Select a tenant for the user to use the next time they log in from available tenants in the Current Tenant field.
- Select Save to save the user.
Change Passwords
Only users who are members of the Administrators group or the Supervisors group, or belong to a group that includes the Administer Users privilege can change an existing user’s password or require them to change their password the next time they log in.
Change or Reset a Password
- Log in as user who has been assigned to a group with user management privileges.
- Select Users (formerly Users and Groups) from the Administration menu. A work area opens you can use to add and manage users.
- Select the user from the list of users whose password you want to reset. The account details for that user appear on the right side of the page.
- On the Info tab, select Change Password.
-
Type the new password in the Password and Confirm Password boxes.
Optionally, change the Require password change switch from the default No to Yes. If you change this to Yes, the user is prompted (and forced) to change their password when they next attempt to log in.
- Select Save to save your changes.
- The next time the user logs in, they can use the new password you set. They are prompted to change this password if Require password change was set to Yes.
Supplied Users and User Groups
Self-Service Analytics supplies one user: admin. The admin is the default system administrator, who can define other users and tenants, enable security features, and define user groups and privileges. To add more system administrators, create or add users to the Administrators group, Supervisors group, and Content Distributors group. When they belong to all three groups, they can perform all of the same functions as the default system admin. After you have install and deployed Self-Service Analytics in your operating environment, access the application as the admin user from a web browser (see System Requirements for details).admin User
The supplied admin user is defined as a system administrator and is a member of the Administrators group, the Supervisors group, and the Content Distributors group for the supplied tenant. The admin user cannot be deleted. The first time you log into the UI as the admin user, you are prompted to change the admin user password. Thereafter, you can change the password for the admin user only if you are logged into the UI as an administrator. See Change Passwords. Other users can be defined as administrators or can be assigned to groups with some administrator privileges. See Add Users, About Supplied Groups, and Group Privilege Reference.Administrators Group
Administrators group members include the default admin user, who is a system administrator associated with the Visual Data Discovery tenant (formerly the superaccount). Assign users to the Administrators group to give them administrative privileges to perform actions such as:- Create and manage users and groups.
- Manage connectors.
- Create and manage custom charts.
- Access actions.
The Administrators group is an integral part of Self-Service Analytics management. Users in the group can be system administrators, and tenant admins for one or more tenants.
Management of the supplied Administrators group can only be performed by a member of that group or by a user in a group with all the following privileges: Administer Users, Administer Groups, and Administer Dashboards.
Administrators Group (Tenant Admins)
Administrators group members in tenants can:- Create and manage users, groups, and content in their tenants.
- Define custom charts in their tenants.
- Perform Console and Actions related tasks.
- Self-Service Analytics users can be added as system admins and tenant admins in your environment.
Supervisors Group
The Supervisors group is designed to give you a group of users who can perform specific functions without giving them access to all tasks members of the Administrators group can perform in Self-Service Analytics. Assign users to the Supervisors group to allow those users to:- Manage tenants, including creating, removing, enabling, and disabling tenants. Except when initially creating a tenant, supervisors cannot change or assign administrators to the tenant.
- Manage the look and feel of your software environment.
- Manage product licenses.
- Manage connectors.
- Enable security privileges, and more.
Content Distributors Group
All system admins are automatically added to this group. No further action is needed. The Content Distributors group is part of the Visual Data Discovery tenant. Members can create, maintain, and distribute content and objects such as sources and connections to all tenants in your environment. If you would like a user to be a full system admin, add them to this group and the Supervisors group as well. See About Supplied Groups.Why can not I Recreate Users that Previously Existed?
Users may notice that if they delete a user while logged in as an administrator, they cannot recreate users with the same username. When you delete users while logged in as an administrator, the user is not completely removed from the system. Instead, it is no longer assigned to the account. This happens to ensure that we do not delete a user who has been assigned several accounts by an administrator who has no authority to see the other accounts. So, the user remains in the system and cannot be recreated. To completely delete a user, log in as the supervisor and delete the user there. The user will be completely removed from the system and you can then create a user with the same user name. See Manage Users.Specify Custom User Attributes
You can define custom attributes for a user’s definition if you are logged in as a Self-Service Analytics system administrator, tenant administrator, or a user who is assigned to a group with user management privileges. Use custom attributes to store values that can be used as parameters, or variables, in connection definitions, data source row security filters, and in custom SQL. A primary use of custom attributes is for user credential pass-through. Add credentials to a user’s custom attributes so users with access to a particular data source connected to your instance can use these saved credentials to maintain access privileges for that source within Self-Service Analytics.User attributes set for users via the UI or using LDAP user definitions are encrypted when stored in metadata. To specify the encryption modes, see Encryption.
${User.<custom-attribute-name>}.
This section covers the following topics:
- Supplied Context Variables
- Add A Custom Attribute for a User
- Remove a Custom Attribute from a User
- Specify Multivalue (Array) Custom Attributes
- Specify Numeric Values in Custom Attributes
- Specify Time Values in Custom Attributes
Supplied Context Variables
The following context variables are provided with Self-Service Analytics.${User.composerUserName}: include to insert the name of the user who is currently logged in.${User.accountId}: include to insert the user account ID of the user who is currently logged in.${User.credentials}: include to pass the session ID or trusted access token (in embedded environments) of the user.
Add A Custom Attribute for a User
Add a custom attribute for a user- Access the Custom Attributes tab for the user. See Add Users or Modify Users.
- Select Add Custom Attribute. A blank line is added to the Custom Attributes tab.
-
Supply values for the attribute, as described in the following table:
- When you have specified all values, select Save to save the user.
Remove a Custom Attribute from a User
Remove a custom attribute from a user- Access the Custom Attributes tab for the user. See Add Users or Modify Users. The defined custom attributes are listed.
- Select the delete button corresponding to the attribute you want to remove.
- When are done removing your specific attributes, select Save to save the user.
Specify Multivalue (Array) Custom Attributes
For multivalue user attributes (arrays), the elements must be comma-separated and contain no redundant white spaces between elements. These multivalue custom attributes should only be used as arrays in INCLUDE and EXCLUDE filter operations. With all other filter operations, the custom attribute values are used as-is. For example, an INCLUDE or EXCLUDE row security filter that uses a multivalue custom attribute containing the array (["apples", "oranges", "bananas"]) will interpret the values as three separate values, splitting the values on commas.
However, an EQUAL or NOT EQUAL row security filter using the same multivalue custom attribute would interpret the array values as a single value ("apples,oranges,bananas").
Null values in multivalue custom attributes are processed as a special text marker - [Null].
Specify Numeric Values in Custom Attributes
Numeric value in custom attributes are supported as integers or floating-point values represented as text.Specify Time Values in Custom Attributes
For date-time values, the following formats are supported:- ISO-8601 format with optional milliseconds (but no timezone):
yyyy-MM-ddTHH:mm:ss[.SSS] - Self-Service Analytics’s default API time format:
yyyy-MM-dd HH:mm:ss.SSS, milliseconds required.
start_date and end_date). The dates can be specified as static date-time values, dynamic time patterns, or single-value user attributes.
Specifications such as [${User.date_array}], with the date_array attribute containing two elements are not supported.