
SAML and LDAP groups that are automatically created in Self-Service Analytics must be manually assigned group data source access and privileges.
- Self-Service Analytics tenants: Use to separate product resources as necessary. Assign users to multiple tenants to allow access to each tenant’s resources. You can further set up different groups, data connections, data sources, dashboards, and visuals for each tenant. See Manage Tenants.
- User accounts: Define access for individual users in Self-Service Analytics. Assign users to one or more groups to give them access to data sources and product features. Users can belong to multiple groups in multiple tenants.
- Groups: Use to assign privileges to groups of users. Groups are most useful when a number of users require the same access restrictions. Users can be assigned to multiple groups. See Manage User Groups.
Manage User Groups
Use groups to assign privileges to groups of users. Groups are most useful when a number of users require the same access restrictions. Users can be assigned to multiple groups.SAML and LDAP groups that are automatically created in Self-Service Analytics must be manually assigned privileges.
- Add, edit, or remove groups
- Assign and remove users in a group
- Authorize users in the group to perform specific functions
Add User Groups
In this release, when your admin enables the Enhanced Experience user interface, you will see changes to workflows you may have used in previous releases. If you are running an earlier release or your admin has not enabled the new interface, see Add Groups (Earlier Releases).
Add Groups
System administrators and users who are assigned to a group with group management privileges can add groups to your instance or a tenant.- Log in as a system administrator or a user who has been assigned to a group with group management privileges. If the user name you log in with is also associated with other tenants, verify that the correct tenant is selected. See Switch Tenants.
- Select Groups (formerly Users and Groups) from the Administration menu. The Groups work area appears, listing all defined groups for this tenant.
-
Select New Group to open a New Group work area, with three tabs: General,Members, and Privileges.
Add a group name on the General tab, then save the new group to access the other tabs.
- Specify a group name on the General tab in the Group Name field. Optionally provide a short description of the group in the Description field.
- Select Save to save the new group. The group is now defined, but has no members and only default assigned privileges.
- Select the Members tab and assign users to the group. See Add and Remove Members of a Group for more information.
- Select the Privileges tab and select privileges for the group. Any you add here grant permissions to all members of the group to perform specific actions or access specific features. See Group Privilege Reference.
- When you’re done adding members and setting privileges, select Save to save your changes to the group.
Modify User Groups
System administrators and users who are assigned to a group with group management privileges can modify groups in a tenant.In this release, when your admin enables the Enhanced Experience user interface, you will see changes to workflows you may have used in previous releases. If you are running an earlier release or your admin has not enabled the new interface, see Modify a Group (Earlier Releases).
Management of the supplied Administrators group can only be performed by a member of that group or by a user in a group with all the following privileges: Administer Users, Administer Groups, and Administer Dashboards.
Modify a Group
- Log in as a system administrator or a user who has been assigned to a group with group management privileges. If the user name you log in with is also associated with other tenants, verify that the correct tenant is selected. See Switch Tenants.
- Select Groups (formerly Users and Groups) from the Administration menu. The Groups work area appears, listing all defined groups for this tenant.
- In the list of groups, locate the name of the group you want to modify. The group editor work area opens.
- Select the General tab to change the group name in the Group Name box. Optionally update the description of the group in the Description box.
- Select the Members tab and assign and remove users in the group. See Add and Remove Members of a Group for more information.
- Select the Privileges tab and update the privileges for the group. Privileges allow the administrator to grant permission to perform specific functions to all members of a group. See Group Privilege Reference for more information.
- After members and privileges have been updated for the group, select Save to save the group.
Delete User Groups
In this release, when your admin enables the Enhanced Experience user interface, you will see changes to workflows you may have used in previous releases. If you are running an earlier release or your admin has not enabled the new interface, see Delete Groups (Earlier Releases).
Delete Groups
System administrators and users who are assigned to a group with group management privileges can delete groups in a tenant.- Log in as a system administrator or a user who has been assigned to a group with group management privileges. If the user name you log in with is also associated with other tenants, verify that the correct tenant is selected. See Switch Tenants.
- Select Groups (formerly Users and Groups) from the Administration menu. The Groups work area appears, listing all defined groups for this tenant.
-
In the list of groups, locate the name of the group you want to delete and select its associated remove (
 ) icon. A warning dialog appears that prompts you to confirm that you want to delete the group.
- Select Delete on the warning dialog to remove the group.
List and Review User Groups
You can list and review groups in a tenant when you are logged in as a system administrator or as a user who has been assigned to a group with group management privileges.In this release, when your admin enables the Enhanced Experience user interface, you will see changes to workflows you may have used in previous releases.
- Log in as an administrator or a user who has been assigned to a group with group management privileges. If the user name you log in with is also associated with other tenants, verify that the correct tenant is selected. See Switch Tenants.
- Select Groups (formerly Users and Groups) from the Administration menu. The Groups work area appears, listing all defined groups for this tenant.
- In the list of groups, locate the name of the group view. A work area for this group opens with three tabs: General,Members, and Privileges.
Add and Remove Members of a Group
You can add, remove, or delete users from a group when you are logged in as a system administrator or as a user who has been assigned to a group with group management privileges.In this release, when your admin enables the Enhanced Experience user interface, you will see changes to workflows you may have used in previous releases. If you are running an earlier release or your admin has not enabled the new interface, see Add or Remove Members (Earlier Releases).
Add or Remove Members
Management of the supplied Administrators group can only be performed by a member of that group or by a user in a group with all the following privileges: Administer Users, Administer Groups, and Administer Dashboards.
- Log in as a system administrator or a user who has been assigned to a group with group management privileges. If the user name you log in with is also associated with other tenants, verify that the correct tenant is selected. See Switch Tenants.
- Select Groups (formerly Users and Groups) from the Administration menu. The Groups work area appears, listing all defined groups for this tenant.
- Select the group to which you want to add or remove members. The group editor work area opens.
- Select the Members tab.
- Select Add Members. An Add Member(s) work area appears.
- Select (check) the names of the users you want to add to the group. To remove members, clear (uncheck) the checkboxes for the user names you want to remove from the group. If all users should be added or removed in the group, select the Select All option. You can sort the user list by name in ascending or descending order to help you locate the user names you need. Use the search bar to easily locate a specific user in longer lists.
-
After making your changes, select Apply. The selected user(s) are added or removed in the editor, but the group must still be saved.
You can remove users from the group on this screen by selecting the remove ( )icon next to a user name, and select Delete on the resulting confirmation dialog.
- Select Save to save the group and the membership changes. The selected user(s) are added or removed to the group. A save confirmation message displays.
About Supplied Groups
Several default groups are supplied with Self-Service Analytics. Add users to these groups to allow them to perform specific tasks related to the tenant(s) they may belong to in your environment . You can not delete, rename, or edit the privileges of these default groups. Add users as needed to each group, or add more groups to accommodate your organization’s needs.- Administrators - Group members include the default admin user, who is a system administrator assigned to the Visual Data Discovery tenant. If your environment includes tenants, each tenant includes an Administrators group: all tenant admins belong to that group.
- Supervisors - Add users as group members to allow them to perform specific functions without giving them access to reserved administrator tasks. Only the supplied admin user or other system administrator can add users to this group.
- Content Distributors - Add users as group members to allow them to create, maintain, and distribute content to any tenant.
Administrators Group (System Admins)
Administrators group members include the default admin user, who is a system administrator associated with the Visual Data Discoverytenant. Assign users to the Administrators group to give them administrative privileges to perform actions such as:- Create and manage users and groups.
- Manage connectors.
- Create and manage custom charts.
- Access actions.
The Administrators group is an integral part of Self-Service Analytics management. Users in the group can be system administrators, and tenant admins for one or more tenants.
Management of the supplied Administrators group can only be performed by a member of that group or by a user in a group with all the following privileges: Administer Users, Administer Groups, and Administer Dashboards.
Administrators Group (Tenant Admins)
Administrators group members in tenants can:- Create and manage users, groups, and content in their tenants.
- Define custom charts in their tenants.
- Perform Console and Actions related tasks.
- Self-Service Analytics users can be added as system admins and tenant admins in your environment.
Supervisors Group
The Supervisors group is designed to give you a group of users who can perform specific functions without giving them access to all tasks members of the Administrators group can perform. All system admins are automatically added to this group. No further actions related to this group are needed to create system admins. Add non-admin users to this group if needed. Assign users to the Supervisors group to allow those users to:- Manage tenants, including creating, removing, enabling, and disabling tenants. Except when initially creating a tenant, supervisors cannot change or assign administrators to the tenant.
- Manage the look and feel of data analytics environment.
- Manage product licenses.
- Manage connectors.
- Enable security privileges, and more.
Content Distributors Group
If you would like a user to be a full system administrator, add them to this group and the Supervisors group as well. The Content Distributors group is part of the Visual Data Discovery tenant. Members can create, maintain, and distribute content to all tenants in your environment. Members of the Content Distributors group can:- Import and export sources directly, or as part of importing and exporting dashboards.
- Import and export local and visual gallery visuals when importing and exporting dashboards.
- Import and export visual gallery visuals.
- Import and export dashboards.
- Import and export connections.
Group Privilege Reference
Group privileges are specified on the Privileges tab for a group. Privileges allow a member of the Administrators group to grant permission to perform specific functions to all members of a group.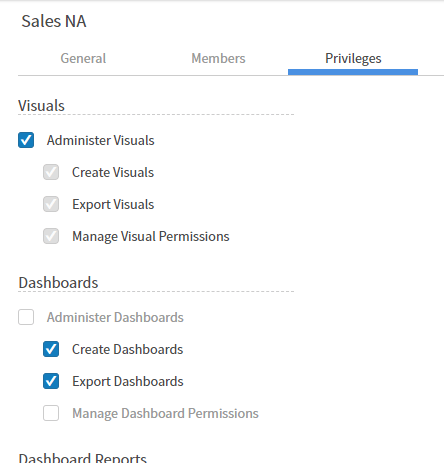
| UI Privilege Name | Assign this privilege to allow group members to… | Enabled by default in these groups: |
|---|---|---|
| Administer Visuals ROLE_ADMINISTER_VISUALS | Create, read, update, and delete visuals from dashboards or from the Visual Gallery in the account. When the Administer Visuals Privilege is granted, the privileges Create Visuals, Export Visuals, and Managed Visual Permissions are automatically granted. In addition, users with the Administer Visuals privilege are automatically granted read, write, and delete permissions to all visuals in the account. However, if they do not also have Data Access permission for the data source associated with a visual, they cannot see any data on the visual. |
|
| Create Visuals ROLE_CREATE_VISUALS | Create visuals. Users must also have Read permission for the data source selected for the visual. When the Administer Visuals privilege is granted, this privilege is also granted. |
|
| Export Visuals ROLE_EXPORT_VISUALS | Import and export visuals. Users must also have Read permission for the data source selected for the visual. When the Administer Visuals privilege is granted, this privilege is also granted. |
|
| Manage Visual Permissions ROLE_PERMISSION_VISUALS | Assign permissions to a visual. When the Administer Visuals privilege is granted, this privilege is also granted. If this privilege is not granted, the  icon and the Permissions column in the Visual Gallery do not appear in the UI. icon and the Permissions column in the Visual Gallery do not appear in the UI.See About Visual Permissions. |
|
| Administer Dashboards ROLE_ADMINISTER_DASHBOARDS | Add, modify, or remove dashboards in the account, including dashboards created by other users. When this privilege is granted, the Create Dashboards, Export Dashboards, and Manage Dashboard Permissions privileges are automatically granted. |
|
| Create Dashboards ROLE_CREATE_DASHBOARDS | Create dashboards and reports. If this privilege is not granted, your users:
When the Administer Dashboards privilege is granted, the Create Dashboardsprivilege is automatically granted. |
|
| Export Dashboards ROLE_EXPORT_DASHBOARDS | Export dashboard configuration JSON files. If this privilege is not granted, users in the group can still export dashboards as screenshots (PNG) or PDF files, but they cannot export the dashboard configuration. When the Administer Dashboards privilege is granted, this privilege is automatically granted. |
|
| Manage Dashboard Permissions ROLE_PERMISSION_DASHBOARDS | Assign permissions to a dashboard. If your user has the Administer Dashboards privilege, they automatically have this privilege as well. If this privilege is not granted, the permissions ( ) icon and the Permissions column on the Library page do not appear in the UI.See About Dashboard and Self Service Report Permissions. |
|
| Administer Scheduled Reports ROLE_ADMINISTER_DASHBOARD_REPORTS | Create, edit, and delete all scheduled dashboard reports. Grant Read access for dashboards to users who receive reports. |
|
| Create Scheduled Reports ROLE_CREATE_DASHBOARD_REPORTS | Create, edit, and delete only your own scheduled dashboard reports. |
|
| Administer Tags ROLE_ADMINISTER_TAGS | Create, assign, remove, and delete all content tags. |
|
| Create Tags ROLE_CREATE_TAGS | Create, assign, and remove tags. Delete your own content tags. |
|
| Administer Sources ROLE_ADMINISTER_SOURCES | Create, import, export, modify, review, and remove data source configurations in the account. When this privilege is granted, the Create New Data Sources, Manage Source Permissions and Edit Calculations privilege are also granted. In addition, users with the Edit Calculations privilege are automatically granted read, write, and delete permissions to all sources in the account. |
|
| Create New Data Sources ROLE_CREATE_SOURCES | Create new data source configurations. When the Administer Sources privilege is granted, this privilege is also granted. |
|
| Manage Source Permissions ROLE_PERMISSION_SOURCES | Assign permissions to a data source configuration and manage data source row and column security filters. If your user has the Administer Sources privilege, they automatically have this privilege as well. If this privilege is not granted, the icon and the Permissions column on the Sources page do not appear in the UI. See About Source Permissions. |
|
| Edit Calculations ROLE_EDIT_FORMULAS | Add or edit custom metrics and derived fields. Users with Read permission for a source and Edit Calculations can create and edit custom metrics and derived fields for the source. Users with Write permission for a source can create and edit custom metrics and derived fields for the source. |
|
| Administer Alerts ROLE_ADMINISTER_ALERTS | Add, modify, or remove alert definitions in the account, including alerts created by other users. When this privilege is granted, the Create Alerts privilege is automatically granted. |
|
| Create Alerts ROLE_CREATE_ALERTS | Create alert definitions. When the Administer Alerts privilege is granted, this privilege is also granted. |
|
| Manage Connections ROLE_MANAGE_CONNECTIONS | Add, modify, or remove the data store connection definitions used by connectors and the query engine to connect to your data stores. |
|
| Manage File Uploads ROLE_MANAGE_UPLOADS | Remove unused files uploaded for a data source if they are not used by any other sources. When the Manage Connections privilege is granted, this privilege is also granted. |
|
| Manage Action Templates ROLE_MANAGE_ACTION_TEMPLATES | Add, modify, or remove the action templates required to integrate Self-Service Analytics visual and dashboard data into your third-party applications. Action templates define your third-party application to Self-Service Analytics. |
|
| Invoke Actions ROLE_INVOKE_ACTIONS | Invoke an action template from a visual. |
|
| Administer Themes ROLE_ADMINISTER_THEMES | Create, read, update, delete, list, activate, and otherwise manage themes for the UI. |
|
| Administer Users ROLE_ADMINISTER_USERS | Administer other user definitions. When this privilege is granted, group users can:
This privilege does not allow group members to update groups or the groups to which a user is assigned. If your user ID is not assigned the Administer Groups privilege or is not an administrator, you cannot assign groups to a user. In addition, only administrators can assign users to the Administrators group. |
|
| Administer Groups ROLE_ADMINISTER_GROUPS | Administer other group definitions. When this privilege is granted, group users can:
This privilege does not allow group members to add or otherwise maintain user definitions. |
|
| Save Filters ROLE_SAVE_FILTERS | Save (and share) filters created in visuals and dashboards. When this privilege is not granted, the Save Filter privilege does not appear on Filter dialogs in the UI. |
|
| Manage Custom Charts ROLE_MANAGE_VISUALIZATION_TYPES | When you have this privilege, you can use the CLI to create custom charts, and manage custom charts using the Self-Service Analytics UI. |
|
| Generate Embed Code ROLE_GENERATE_EMBED_CODE | Generate an embeddable dashboard or visual gallery snippet for a dashboard in the dashboard library or the visual gallery. See Embed Components Into Your Application. |
|
| Administer Initial Visuals ROLE_ADMINISTER_INITIAL_VISUALS | Users with this privilege have permission to update the list of available visualizations for a source. See Available Visual Types. |
|
| Administer Calendars ROLE_ADMINISTER_CALENDARS | Users with this privilege can create, update, and delete alternative fiscal calendars. See Fiscal Calendars. |
|
| ROLE_DISTRIBUTE_CONTENT | Users who belong to the Administrators group or Content Distributors group can make content available to your users and tenant users. |
|
Add and Remove Supervisors
The default supervisor user is no longer installed: add users to the Supervisors group instead. If you upgrade from an earlier version, the Supervisor user becomes a member of the Supervisors group in the Visual Data Discovery (formerly superaccount) tenant.
Add a User to the Supervisors Group
- Log in as the supplied admin user or a member of the Administrators group in Visual Data Discovery.
- Select Users (formerly Users and Groups) from the Administration menu. The Users work area opens.
- Select the user from the list of users you want to add to the Supervisors group. The account details for that user appear on the right side of the page.
-
On the Info tab, select Add Group(s). The Select Account(s) dialog appears.
If the user is already a member of the Supervisors group, this option is not shown.
- Select (check) the group or groups you want to add this user to. When you add a user to the Supervisors group, they have full access to the supervisory functions. See About the Supplied Self-Service Analytics Tenant.
- Select Apply when finished.
- Select Save to save the user.
Remove a User from the Supervisors Group
You can remove a user from the Supervisors group by removing them from the Supervisors or by simply deleting their user account. See Delete Users .- Log in as the supplied admin user or a member of the Administrators group in Visual Data Discovery.
- Select Groups (formerly Users and Groups) from the Administration menu. The Groups work area opens.
- Select the Supervisors group from the list of groups. The details for that group appear on the right side of the page.
- Select the Members tab. This tab lists all members of the Supervisors group.
- Remove the user from the group by selecting the remove icon () next to the user’s name. Confirm your deletion in the confirmation modal.
- Select Save when finished. The list of users on the Members tab adjusts to show your changes.
Disable the Supplied Supervisor User
The default supervisor user is no longer installed; add users to the Supervisors group instead.
Disable the Supplied Supervisor User
- Log into Self-Service Analytics as a member of the Supervisors group who is not the supplied supervisor user (make sure you have selected the tenant superaccount or Visual Data Discovery).
- On the left side of the page, select the supervisor user. The supervisor user information appears on the right side of the page.
- Select (check) the Disable User checkbox at the bottom of the Info tab.
- Select Save to save the supervisor definition.
Change a Supervisor Password
The default supervisor user is no longer installed with Self-Service Analytics: add users to the Supervisors group instead. If you upgrade to Self-Service Analytics from an earlier version, the Supervisor user becomes a member of the Supervisors group in the Visual Data Discovery (formerly superaccount) tenant.
Change a Password for Supervisor Group Members
Only a system administrator or users who are members of a group with user management privileges can change a password or force a password change for a member of the Supervisors group.
- Log in as user who has been assigned to a group with user management privileges.
- Select Users (formerly Users and Groups) from the Administration menu. A work area opens you can use to add and manage users.
- Select the user from the list of users whose password you want to reset. The account details for that user appear on the right side of the page.
- On the Info tab, select Change Password.
-
Type the new password in the Password and Confirm Password boxes.
Optionally, change the Require password change switch from the default No to Yes. If you change this to Yes, the user is prompted (and forced) to change their password when they next attempt to log in.
- Select Save to save your changes.
- The next time the user logs in, they can use the new password you set. They are prompted to change this password if Require password change was set to Yes.