
Configure Number Formatting
Formats for Number attributes are set at the source. You can override source formats by changing a visual directly, without affecting the underlying source format. For information on other settings that may apply to Number attributes, see Configure Number Formatting - Data Sources.You can also override formatting for the Time attribute at the visual level. See Configure Date and Time Formatting.
Configure Formatting - Number Attributes
- Select the visual with time attributes you want to format in a dashboard or the visual gallery.
-
Select a Metric, X or Y axis, Group, Color, Trend line, size, or other available measure. A dialog for your selection opens.
-
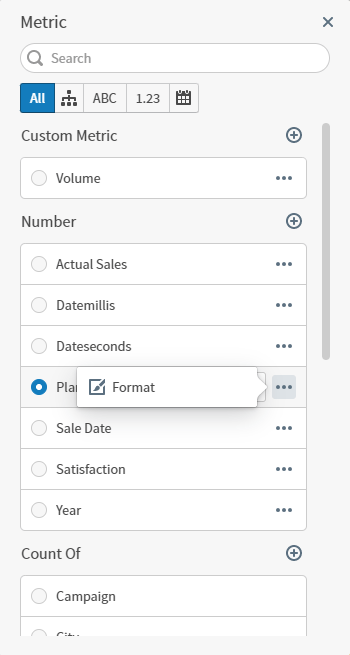
Locate your number field using Search, or navigate to the field or fields you want to format. Select the menu
 for a field, then select Format. The Format: <field> work area opens.
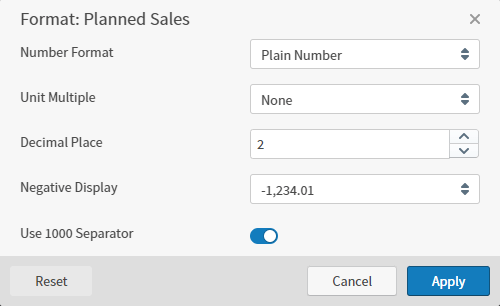
- Define your format options, and select Apply to apply to this field.
-
Repeat for all fields you want to modify.
To clear your applied changes to a field, open the formatting work area and select Reset.
Format Options Number Attributes
Select one of the following number formats in the drop-down list in the Number Format box. The other fields on the Format dialog change based on the number format you select.-
Plain Number: Select this format to display the field as plain number values. Additional format information you can select includes:
-
Percentage: Select this format to display the field as percentage values. Additional format information you can select includes:
-
Money: Select this format to display the field as currency values. Additional format information you can select includes:
-
Storage: Select this format to display the field as computer storage values. Additional format information you can select includes:
-
Scientific Notation: Select this format to display the field as scientific decimals. Additional format information you can select includes:
Configure Date and Time Formatting
Date and time formats for Time attributes are set at the source. You can override source formats by changing a visual directly, without affecting the underlying source format. For information on other settings that may apply to Time attributes, see Configure Date and Time Formatting - Data Sources.You can also override formatting for the Number attribute at the visual level. See Number and Date Formatting for Visuals.
Configure Formatting - Time Attributes
- Select the visual with time attributes you want to format in a dashboard or the visual gallery.
-
Select a Metric, X or Y axis, Group, Color, Trend line, size, or other available measure. A dialog for your selection opens.
-
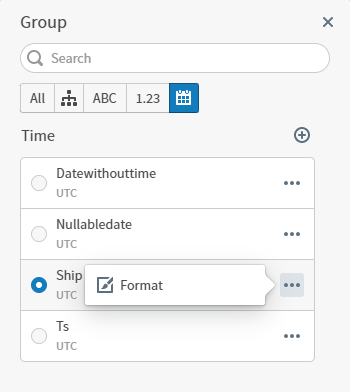
Locate your time field using Search, or navigate to the field or fields you want to format. Select the menu for a field, then select Format. The Format: <field> work area opens.
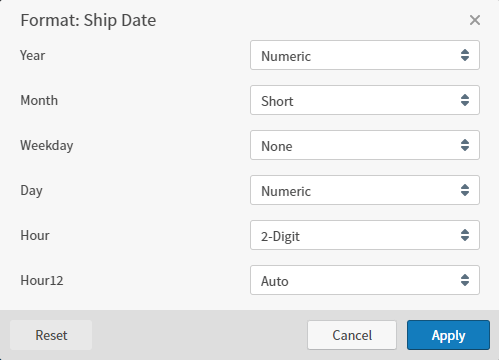
- Define your format options, and select Apply to apply to this field.
-
Repeat for all fields you want to modify.
To clear your applied changes to a field, open the formatting work area and select Reset.
Format Options Time Attributes
When you configure formatting at the visual level, you may not see all the options listed below, depending on the visual you’re updating and the available time segments included in the source data.| Format Option | Description |
|---|---|
| Second | Select Numeric (0-59) or 2-Digit (00-59). |
| Minute | Select Numeric (0-59) or 2-Digit (00-59). |
| Hour | Select Numeric (1-24) or 2-Digit (01-24). |
| Hour12 | Select a 12 or 24 hour format option for Hour12.
|
| Day | Select Numeric (1-7) or 2-Digit (01-07). |
| Month | Select Numeric (1-12), 2-Digit (01-12), Long (January, March), Short (Jan, Mar), or Narrow (J, M). |
| Weekday | Select Long (Friday, Sunday), Short (Fri, Sun), Narrow (F, S), or None. The default is None, to show no day of the week. |
| Quarter | Select Range, Narrow, Numeric (1-4), or 2-Digit (01-04). Set Granularity to Quarter; you can define Quarter formatting after the visual reloads with Quarter granularity. |
| Year | Select Numeric (2022) or 2-Digit (22). |