
- Log in as an administrator.
- Select Tools > Console from the Administration menu. The Console of Refreshing Jobs page appears. It shows a table of refresh jobs that are in progress or that have completed.
| Column | Description |
|---|---|
| Data Source | The name of the data source configuration to which the job applies. |
| Job Type | The type of refresh job that was run. Possible types are Source Refresh (the data source metadata and all fields were refreshed) and Field Refresh (an individual field was refreshed). Field refresh jobs also identify the field that was refreshed in the job type (for example, Field Refresh [condition_code] indicates that the condition_code field was refreshed). |
| Status | The status of the job. Possible statuses include:
|
| Last Finished | The date and time when the most recent job completed. |
| Next Run | The date and time when the next job is scheduled. |
| Job History | Select  in this column to list all the completed refresh jobs of the selected refresh job type that have been run for the selected data source. The list appears on a pop-up dialog. The dialog shows the start time, finish time and status of the refresh jobs. in this column to list all the completed refresh jobs of the selected refresh job type that have been run for the selected data source. The list appears on a pop-up dialog. The dialog shows the start time, finish time and status of the refresh jobs. |
Set Up a Data Source Refresh Job
Data source refresh jobs are defined on the Cache tab of a data source configuration. Only one refresh job can be defined for a data source, however you can manually trigger refresh jobs on the Cache tab of the data source configuration. See Trigger Refresh Jobs. A refresh job requires you to specify a schedule for the job and, optionally, identify fields for the refresh. By default, no data refresh jobs are scheduled for a data source. Select Schedule Refresh Settings on the Cache tab to set up Periodic or Advanced refresh jobs. An initial data source refresh job is run after the data source has been successfully created and saved. After that, no additional refreshes of the data occur, although you can manually trigger a refresh of the field data. See Trigger Refresh Jobs.- Periodic: Select this option to define a refresh job that runs at standard periods.
- Advanced: Select this option to define a refresh job using cron expressions. Use this option to define refresh jobs that run on a more complicated schedule.
- Configure a Periodic Refresh Job
- Configure an Advanced Refresh Job
- Identify Specific Fields for a Refresh Job
Configure a Periodic Refresh Job
You can configure a periodic refresh job for the data cached for a data source configuration. Configure a periodic refresh job for a data source configuration- Log in as a user with the Administer Sources privilege, or a user with read and write permission for the data source.
- Select the Sources card on your home page or Data Sources from the main menu. The Sources page appears.
- On the Sources page, locate and select the data source configuration you want to edit. The Source Creation work area opens.
-
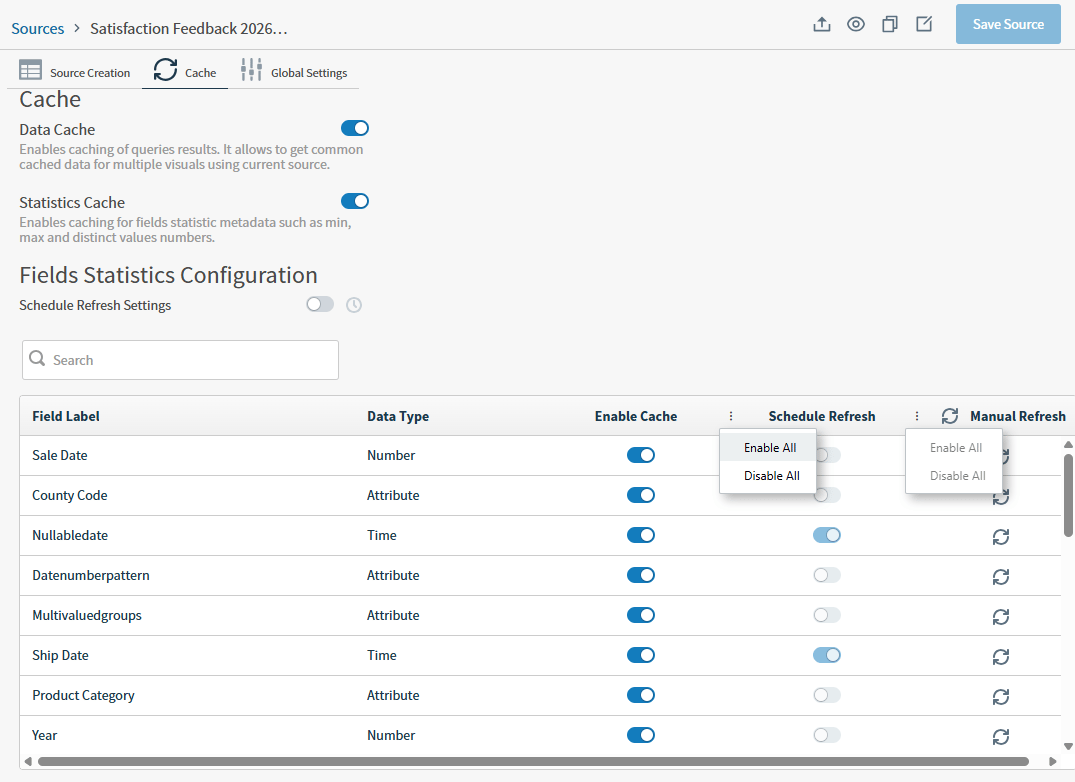
Select the Cache tab. All the fields from your data source are listed.
-
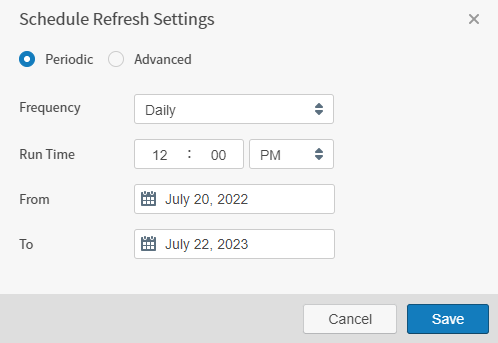
Select to enable Schedule Refresh Settings and select Periodic in the pop up. The settings work area for a periodic refresh job appear.
-
Select the time interval for the job to be run using the Frequency list. Options Daily, Weekly, and Monthly. Depending on the Runs option you select, corresponding options become available in the Run every section:
Runs Selection Run every Specification Daily Specify the time of day in Run Time, and a start and end date for daily runs at that time using the calendar options in From and To.
The first job runs on the date and time at which you save the data source.
Subsequent jobs continue daily until the last date and time occur.Weekly Select the day of the week for the job to be run in Run on, time of day in Run Time, and a start and end date for weekly runs at the time using the calendar options in From and To.
The first job runs on the date and time at which you save the data source.
Subsequent jobs continue weekly until the last date and time occur.Monthly Specify the number of months between job runs in Run on, time of day in Run Time, and a start and end date for monthly interval runs at the time using the calendar options in From and To.
The first job runs on the date and time at which you save the data source.
Subsequent jobs run at the Run Time time after the number of months you specify have passed.
For example, if you set your job to run every three months and the Start on time is April 4, 2024 at 5:00 a.m., the subsequent job runs on July 4, 2024 at 5:00 a.m. - Select Save to save your changes, then exit the source data configuration when you have finished defining your periodic refresh jobs. A summary of the configuration appears below Schedule Refresh Settings.
If you disable Schedule Refresh Settings, any schedule you had set up previously is deleted.
Configure an Advanced Refresh Job
Using cron expressions, you can specify a more complicated schedule for refresh jobs for the data cached for a data source configuration.In this release, when your admin enables the Enhanced Experience user interface, you will see changes to workflows you may have used in previous releases.
- Log in as a user with the Administer Sources privilege, or a user with read and write permission for the data source.
- Select the Sources card on your home page or Data Sources from the main menu. The Sources page appears.
- On the Sources page, locate and select the data source configuration you want to edit. The Source Creation work area opens.
-
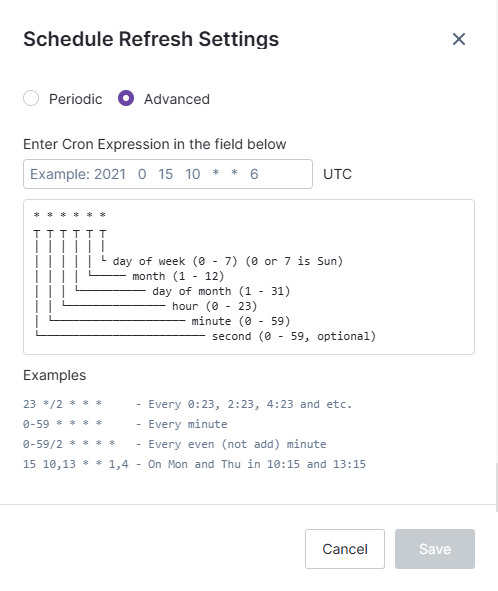
Select the Cache tab, then enable Schedule Refresh Settings and select Advanced in the pop up. The settings work area for an Advanced refresh job appear.
-
In the box provided, enter a cron expression that sets the schedule using a string of six fields, each separated by a blank space. The format for the cron expression is:
The standard values supported by each field include:When creating the cron expression, keep the following requirements in mind:
-
Specifying
<seconds>is optional, but defaults to zero seconds, which ensures that only one refresh job is run. If you specify seconds, the refresh job is rerun after that number of seconds has elapsed. -
Either the
<days of the month>or<days of the week>field is needed, but both should not be specified. If one of these fields is marked with an asterisk (*), the other is automatically set to a question mark in the cron expression. In addition, an error is returned if you try to specify both of these fields.If you save an existing data source configuration that has both fields specified, no error is returned, but warnings are written to the log when Self-Service Analytics starts. -
Names for the
<month>and<days of the week>fields are not case sensitive. For example,FRIandfriare both acceptable formats.
The following table provides some cron expression examples:Special Character What It Means * All values. Represents all the values within the specified field. In the following example, an asterisk is used in the <minutes> field, indicating that the job will run every minute: ? No specific value. Used as a placeholder when no value is needed in the field. In the following example, the <months> field value is 6 (June) and the <days of the week> field value is a question mark, indicating that job runs in June, regardless of the day of the week: - Used to specify a range of values. For example, specifying 3-6in the <hours> field (as shown in the following example) means the job will run at 3:00, 4:00, 5:00 and 6:00 am:, Used to specify a series of values. Use the comma to identify all the values for the field. In the following example, a comma is used in the <days of the week> field to run the job on Wednesdays, Thursdays, and Fridays: / Used to specify the starting time value and the incremental increase of time. In the following example, specifying 0/5 in the <minutes> field means that the job runs immediately and then every 5 minutes. L Last. Used only in the <days of the month> and <days of the week> fields.
When this character is used standalone, it indicates the last day of the month or the last day of the week (Saturday).
However, when it is used with a value (such as 5L) in the <days of the month> field, it means the last Friday of the month (5 is Friday, L indicates the last Friday).W Weekday. Used only in the <days of the month> and <days of the week> fields.
Identifies the weekday closest to the given day. For example, 15W means the closest weekday to the 15th of the month. The following results are possible:- If the 15th falls on a Saturday, the result returned would be Friday the 14th
- If the 15th falls on a Sunday, the result is Monday the 16th
- If the 15th falls on a weekday, that specific day is returned.
# Number sign. Used only with the <days of the week> field.
Identifies the specific day of the month. For example, bothWed#2and3#2identify the second Wednesday of the month.cron Expression Meaning Noon every day 8:30 p.m. every night Every 10 minutes starting at 5 p.m. and ending at 5:50 p.m., every day Every minute starting at 8:15 p.m. and ending at 8:30 p.m., every day 8:45 p.m. every Monday, Wednesday and Friday 8 p.m. every 3 days in every month, starting on the third day of the month -
Specifying
- Select Save to save your changes, then exit the source data configuration when you have finished defining your periodic refresh jobs. A summary of the configuration appears below Schedule Refresh Settings.
If you disable Schedule Refresh Settings, any schedule you had set up previously is deleted.
Identify Specific Fields for a Refresh Job
You can select specific fields to be refreshed by a data source refresh job using the Configuration section of the Refresh tab.In this release, when your admin enables the Enhanced Experience user interface, you will see changes to workflows you may have used in previous releases.
- Log in as a user with the Administer Sources privilege, or a user with read and write permission for the data source.
- Select the Sources card on your home page or Data Sources from the main menu. The Sources page appears.
- On the Sources page, locate and select the data source configuration you want to edit. The Source Creation work area opens.
-
Select the Cache tab. All the fields from your data source are listed.
- To refresh all the fields in your data source, select the refresh button for Manual Refresh to trigger a manual refresh for all fields.
- Otherwise, select the refresh button for specific fields. Exit the source data configuration when you have finished triggering all of your manual refreshes.
Trigger Refresh Jobs
Self-Service Analytics maintains data source metadata and, optionally, a cached result set of the data from the data store for each data source configuration you define. When you initially connect to your data store using a data source configuration, a sampling of the data is collected to determine:- Distinct values for all fields with ATTRIBUTE and NUMBER field types.
- The minimum and maximum values for all fields with number or time data types for which Custom Ranges have not been defined.
| Refresh Type | Trigger | Activities |
|---|---|---|
| Source Refresh | An initial connection to a data source is saved. See Define a Source. | The Self-Service Analytics cache is cleared and the minimum and maximum values for non-attribute fields and distinct values for attribute and number fields are refreshed. |
| Changes to the Source Creation Work Areas or Fields tab in the data source configuration are saved. See Edit a Data Source. | ||
| The scheduled refresh time (set on the Cache tab in the data source configuration) occurs. See Set Up a Data Source Refresh Job. | ||
| Field Refresh |
| The minimum and maximum for non-attribute fields and distinct values for attribute and number fields are refreshed. |
| After Cache Cleanup | When a user selects an available Cache Cleanup option from the Actions column for a data source on the Sources page. See Clear the Cache for a Data Source Configuration. | The data is freshly loaded into the Self-Service Analytics cache the next time it is requested from the data source. |
 ) button for Manual Refresh in the table heading to trigger a manual refresh for all fields. This triggers a manual refresh of all the field data.
If a Custom Range has been defined for a field, the minimum and maximum fields used in filters remain unchanged when you refresh source data. These fields are shown with cache actions disabled on the Cache tab.
When you add a new field to a data source, the scheduled refresh is not enabled for the new fields by default. Quickly enable scheduled refresh for all fields using the bulk update option in the Schedule Refresh menu on the Cache tab, or enable each field for scheduled refresh manually on the Cache tab.