
- The connector is installed but is not enabled. For more information, see Manage Connectors and Connector Servers.
- The connector was not installed and needs to be downloaded separately. For more information, see Obtain Additional Connector Servers.
- The connector requires you to provide a licensed JDBC driver. For more information, see Add a JDBC Driver.
Self-Service Analytics supports only underscores and dashes in data store field names. No other special characters or white space are supported. If your data store uses special characters other than underscores and dashes in field names, please remove them before attempting to create a data source configuration.
Manage Connectors and Connector Servers
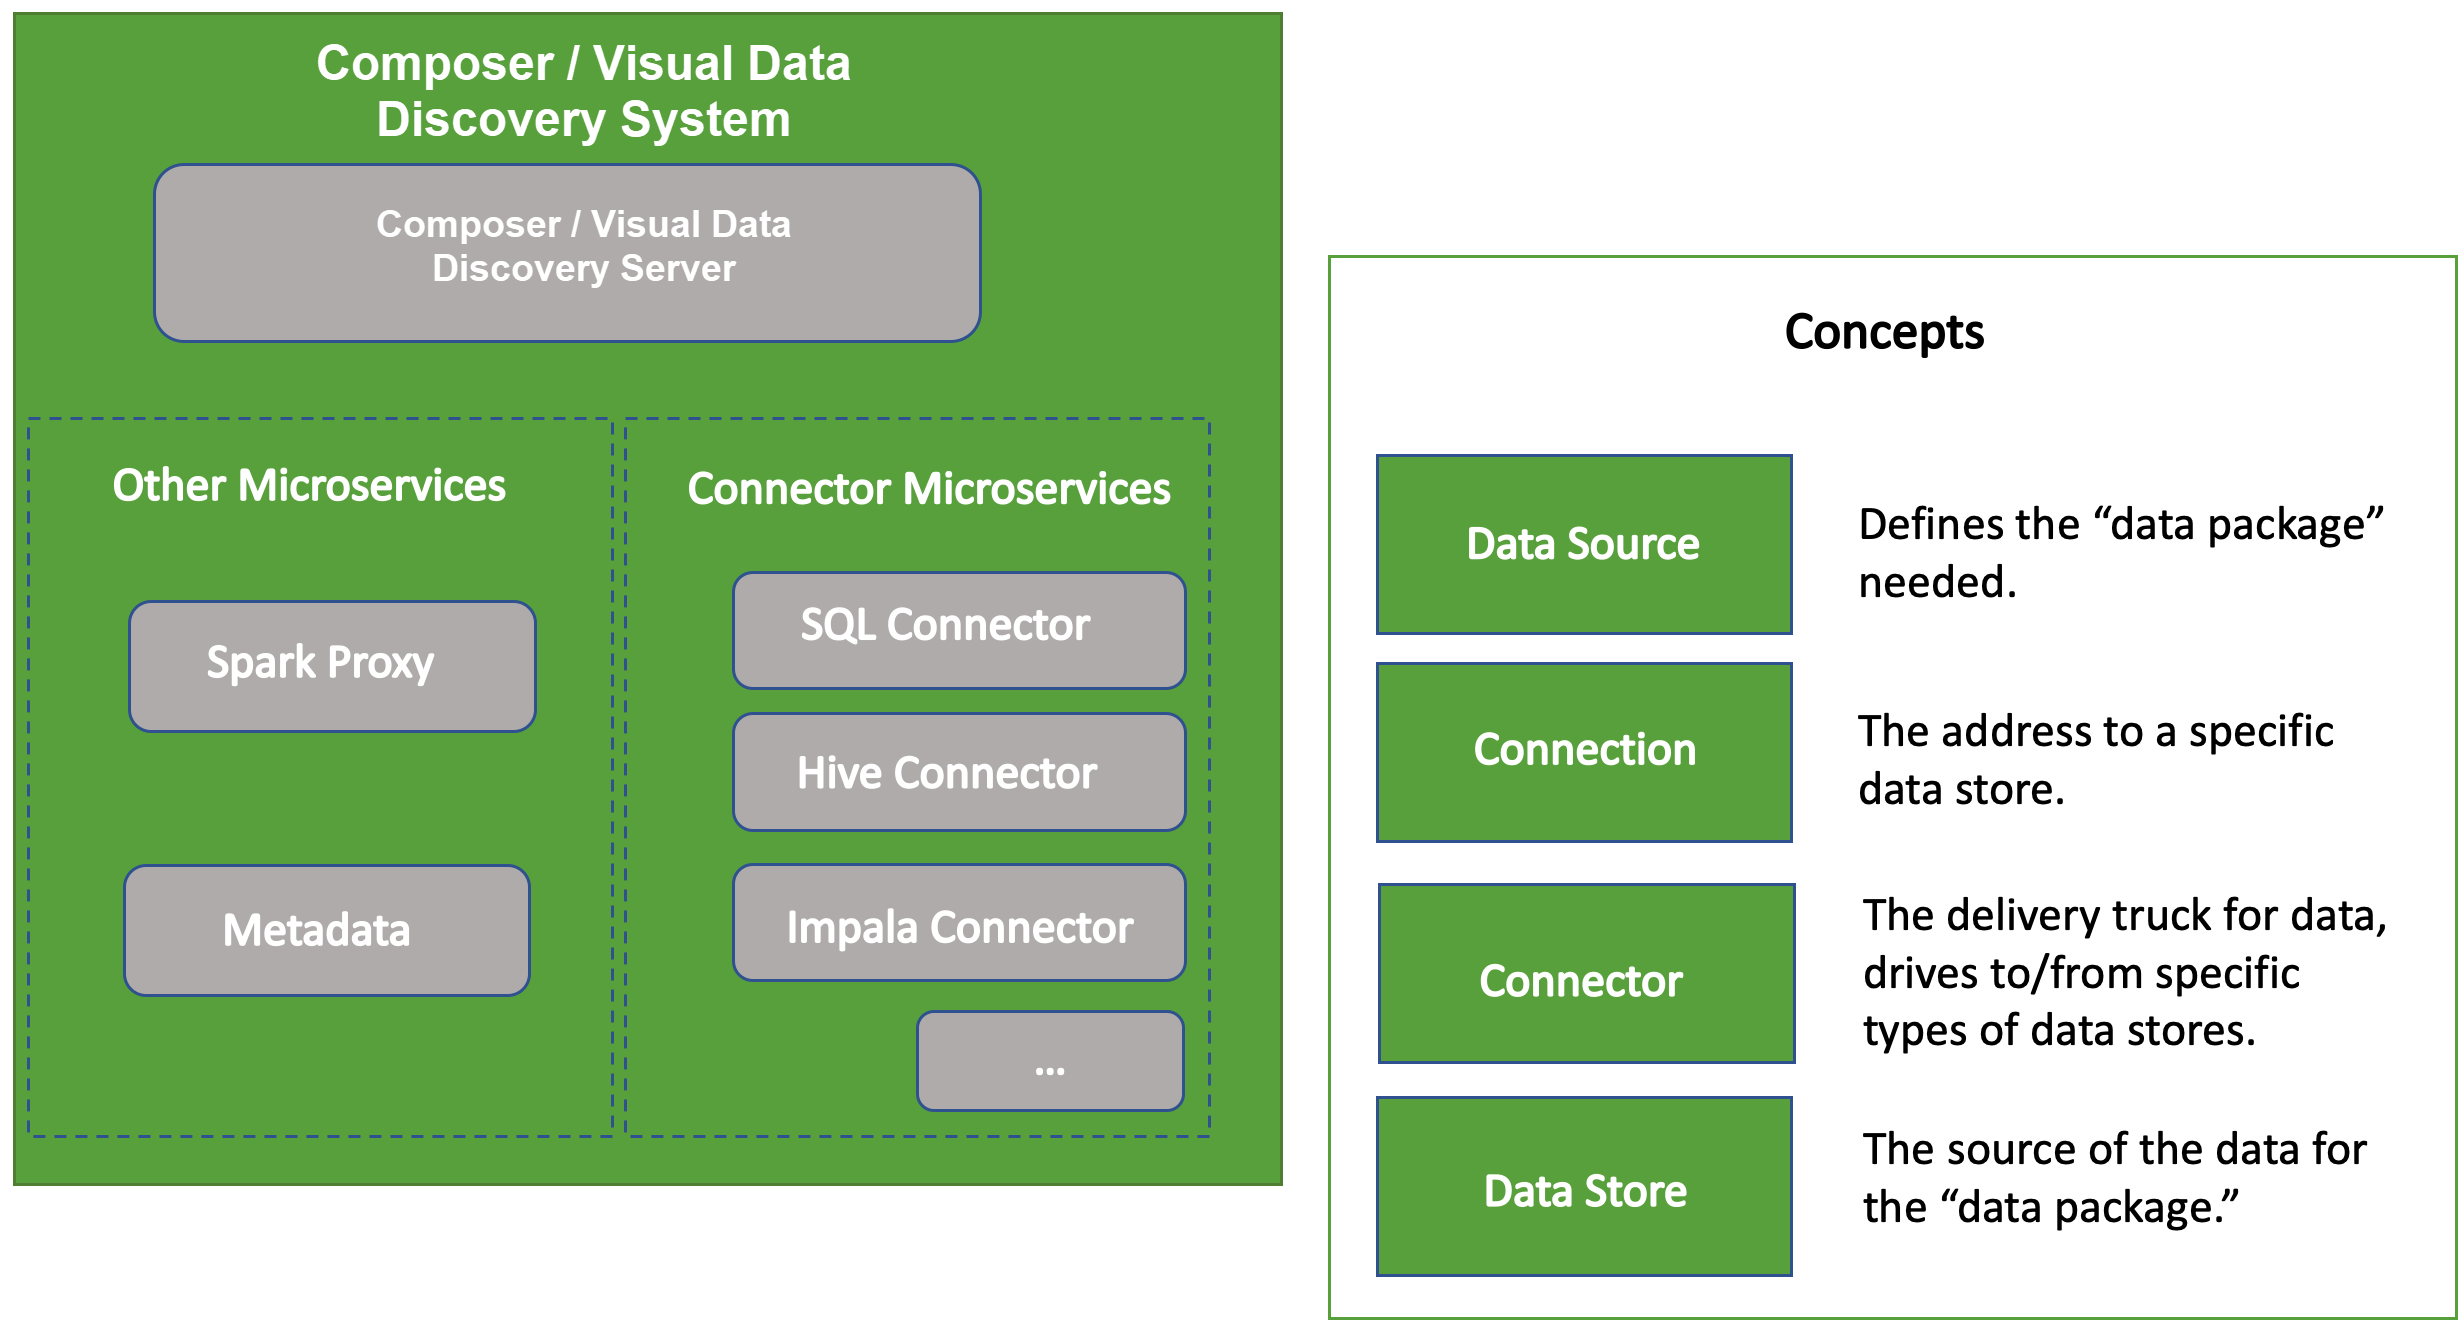
Self-Service Analytics connects to a wide array of data sources available in the marketplace today—from modern databases (including Hadoop, Search, Streaming, and NoSQL) to traditional sources like SQL-based stores. Self-Service Analytics comes prepackaged with connectors that are automatically installed during the Self-Service Analytics installation process. JDBC drivers for a few of the connectors are no longer included in the installation package. This means that if you use one of these connectors, you also need to configure a JDBC driver before it can be enabled and accessible from Self-Service Analytics. For additional details, including the list of connectors, see Add a JDBC Driver. If the connector you are looking for is not shown, it may be because:- The connector is installed but is not enabled. For more information, see Enable and Disable Connectors.
- The connector was not installed and needs to be downloaded separately. For more information, see Obtain Additional Connector Servers.
- The connector requires you to provide a licensed JDBC driver. For more information, see Add a JDBC Driver.
- Connector Servers
- Connectors
If you try to delete a visual, filter snippet, dashboard, self service report, dashboard link, source, or source field, Self-Service Analytics displays an error message naming any objects dependent on the item you’re trying to delete. You can delete the item after you’ve removed the association from the dependent object. See Fields Usage.
- Obtain Additional Connector Servers
- Register a New Connector Server
- Modifying a Connector Server
- Delete a Connector Server
- Define a New Connector
- Modify a Connector
- Enable and Disable Connectors
- Delete a Connector
- Connector Graceful Shutdown
Manage Connector Services Page
Connector Servers
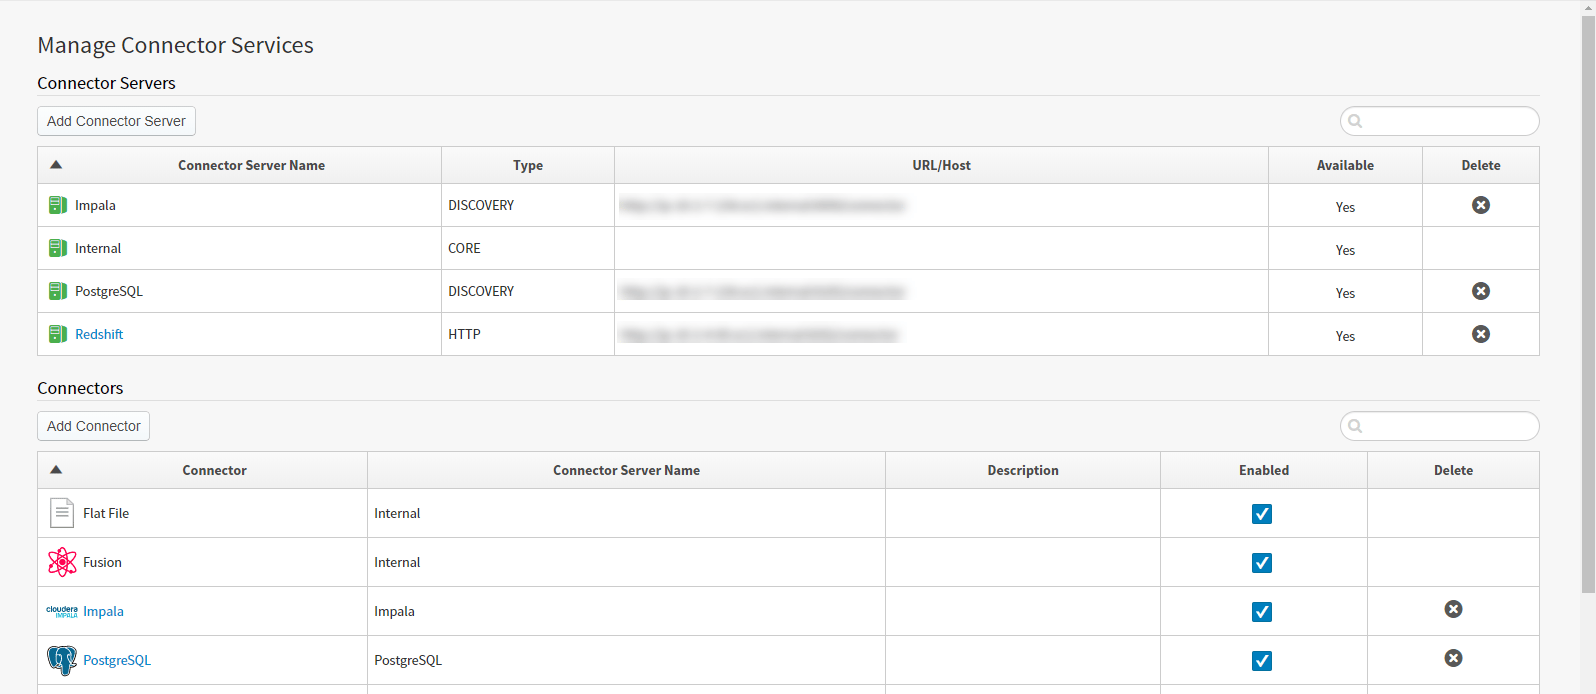
The Connector Servers section lets the Self-Service Analytics admins and supervisors group users register and delete the connector servers available in the Self-Service Analytics environment. See Obtain Additional Connector Servers for information about setting up a connector server.The default supervisor user is no longer installed; add users to the Supervisors group instead.
| Column Title | Description |
|---|---|
| Connector Server Name | The name of the connector server (data store) definition. |
| Type | The type of connector server. The following types are supported:
Type Core connectors , including flat files as well as HDFS and S3 buckets, do not require a dedicated connector server. These types of connectors are always available. This means they are always on, and do not require any additional network resources to keep them on. |
| URL/Host | The URL or host name of the connector server (data store). If more than one instance of a connector server is running, the URLs for each instance are shown, separated by commas. |
| Available | Indicates whether the connector server (data store) is available or not. |
| Delete | Provides an option to delete a connector server definition from the Self-Service Analytics instance. This option is not available for Core type connector servers because they are built into Self-Service Analytics and cannot be deleted. You can delete a connector server that you manually configured. However, you must first delete the connection definitions for the server and the data source configurations that use the connection definitions (see Delete a Data Source and Delete Data Store Connections). Then you need to delete the connector (see Delete a Connector). When the connections and the connector are all deleted, you can then delete the connector server. |
- Obtain Additional Connector Servers
- Register a New Connector Server
- Modifying a Connector Server
- Delete a Connector Server
Connectors
The Connectors section lists the connectors that are defined in the Self-Service Analytics environment. You can use these connectors to connect to a specific type of data store (such as Impala or Elasticsearch). You can use this section to add and remove connectors and to enable and disable them. A connector that is listed in this table and is enabled is visible on the Connections page in the UI (when you are logged in as a non-supervisory user or administrator and have been assigned appropriate privileges). The Connectors table provides the following information.| Column Title | Description |
|---|---|
| Connector | The name of the connector definition. |
| Connector Server Name | The name of the connector server (data store) associated with the connector. If the connector server is a Core-type connector, the connector server name shows as Internal. |
| Description | An optional description of the connector. You can provide this description when you add a connector definition. |
| Enabled | A switch that enables or disables the connector definition in the Self-Service Analytics instance. An enabled connector is visible on the Connections page; a disabled connector is not. |
| Delete | Provides an option to delete the connector definition from the Self-Service Analytics instance. This option is not available for Internal connectors (Core type connector servers) because they are built into Self-Service Analytics and cannot be deleted. You can delete a connector that you manually configured. However, you must first delete the connection definitions for the server and the data source configurations that use the connection definitions. See Delete a Data Source and Delete Data Store Connections. |
Define a New Connector
Connector definitions make a connector server available to authorized users on the Sources page. They make it possible for you to connect to a specific type of data store (such as Impala or Elasticsearch). More than one connector definition can be created for a connector server. Define a new connector in your environment.- Log in as a system admin or a member of the Supervisors group.
- Select Tools > Connectors from the menu. The Managed Connector Services work area opens.
- In the Connector Servers section of the Manage Connector Services page, verify that a connector server has been registered for the type of connector you want to define. If it has not, register one. See Obtain Additional Connector Servers and Register a New Connector Server.
-
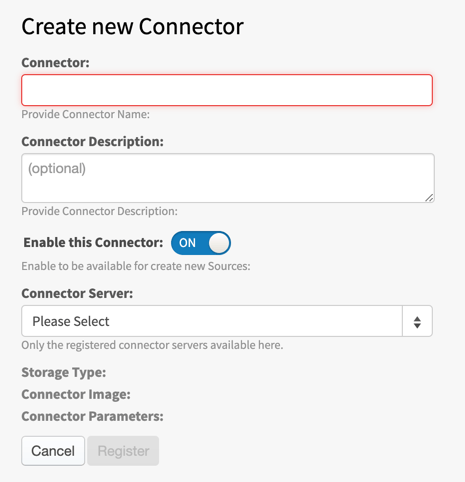
In the Connectors section of the Manage Connector Services page, select Add Connector Server The Create New Connector page appears.
-
On the Create New Connector page, specify the following information in the input boxes.
Input Box Description Connector Specify a unique name for the new connector. A short name is recommended due to the limited space on the Sources page to display the icon and name. Connector Description Optionally, specify a description of the connector. Enable this Connector Slide this switch on or off to enable or disable the connector on the Sources page. Connector Server Select the connector server definition that should be used for this connector. Storage Type This value is automatically set by Self-Service Analytics after you have selected the connector server. Connector Image The default image is retrieved from the connector server. If you want to change the image, select Choose File to select a custom icon for the connection type. The requirements for the icon are as follows: - PNG or SVG format
- Resolution (min/max): 72 x 72 px or 160 x 160 px
- Max file size: 50 Kb
Select Restore Default to restore the image to the default image for the connector server type.Connector Parameters The connector parameter information is generated from the selected connector server.
Configure or customize the connection parameters, as needed. These are the values that appear on the Connections page or Connection tab when a user defines a new connection or a new data source configuration or edits an existing one.
The following fields help you customize the parameters to meet your needs:- Order: Use the arrows to move the parameters up or down and change the order in which the parameters are listed on the Connections page (connection definition) or Connection tab (data source configuration).
- Required: Select this checkbox to make the parameter required for validating the connection. Clear the checkbox if the parameter is not required.
- Visible: Select this checkbox to show optional parameters on the Connections page or Connection tab. Clear the checkbox to hide the parameter.
- User Attribute: Select this checkbox to use custom attributes for the parameter when you set up connections using this connector. See Use User Attributes for Connection Parameters.
- Parameter: The internal parameter name. No changes can be made.
- Parameter Type: The type of parameter. No changes can be made.
- Label: Specify the label for the parameter. This is the field name that will be used for the parameter on the Connections page or Connection tab.
- Help Text: Provide help text for the parameter. It will be displayed when you select the help icon associated with the input box for the parameter.
Select Restore Default to restore the connector parameters to the defaults for the connector server type. - When you have made the required changes, select Register. The new connector displays in the Connector section of the Manage Connector Services page. If you enabled it, it is also visible on the Sources page where you maintain data source configurations.
Modify a Connector
Modify a connector definition in your environment- Log in as a system admin or a member of the Supervisors group.
- Select Tools > Connectors from the main menu. The Managed Connector Services work area opens.
- In the Connectors section of the Manage Connector Services page, locate the connector you want to modify and select its name. The Edit <connector-name > Connector page appears.
- On the Edit <connector-name> Connector page, change the connector settings. These settings are described in Define a New Connector.
- When you have made the required changes, select Save. The new connector changes are saved and display, as appropriate, in the rest of the user interface.
Delete a Connector
Delete a connector from your environment- Log in as a system admin or a member of the Supervisors group.
- Select Tools > Connectors from the main menu. The Managed Connector Services work area opens.
- In the Connectors section of the Manage Connector Services page, locate the connector you want to delete,
- Select the delete icon in the Delete column for the connector. The connector is removed from the Self-Service Analytics instance.
If you try to delete a visual, filter snippet, dashboard, self service report, dashboard link, source, or source field, Self-Service Analytics displays an error message naming any objects dependent on the item you’re trying to delete. You can delete the item after you’ve removed the association from the dependent object. See Fields Usage.
Enable and Disable Connectors
A connector can be enabled or disabled at any time. Selecting or clearing the checkbox in the Enabled column for the target connector determines whether its representative icon appears on the Data Source page. The switch is instantaneous, removing or adding the icon on the Sources page. Existing connected data sources can still be accessed and used.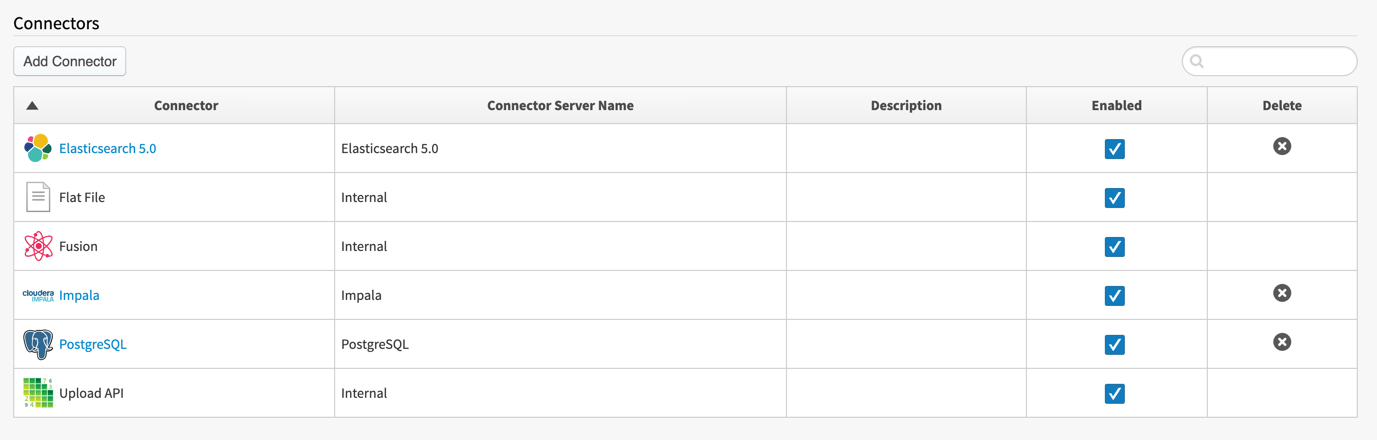
Connector Graceful Shutdown
supports the graceful shutdown of connectors. When a connector is shut down, it gracefully completes queries that are in-flight and notifies clients that it is terminating. Three connector properties in each connector property file support graceful shutdown:connector.graceful.shutdown.enabledindicates whether or not graceful shutdown processing should occur. Valid values aretrue(perform graceful shutdown processing) orfalse(do not perform graceful shutdown processing). The default istrue.connector.graceful.shutdown.event.propagation.timeout-secspecifies how long (in seconds) the connector will wait to allow clients to receive the information that it is out of service. The default is 35 seconds.connector.graceful.shutdown.force.kill.timeout-secspecifies the maximum number of seconds that the connector will wait for the number of its active tasks to reach zero. The default is 30 seconds. When this time has elapsed, the connector will stop.
Register a New Connector Server
Before you can register a new connector server, be sure that you have obtained and installed it. See Obtain Additional Connector Servers and contact insightsoftware Technical Support to obtain the connector server code. Connector servers are started and run as separate processes, and accept requests on a specific TCP/IP port.Register a New Connector Server in Your Environment
- Log in as a system admin or a member of the Supervisors group.
- Select Tools > Connectors from the main menu. The Managed Connector Services work area opens.
-
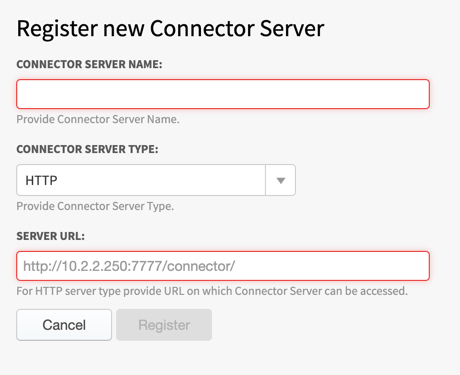
In the Connector Servers section of the Manage Connector Services page, select Add Connector Server. The Register New Connector Server page appears.
-
On the Register New Connector Server page, specify the following information in the input fields.
- Select Register.
Register the Dundas BI (Managed) Connection Server
To use this connector, you must make the user interface available in your instance. Disabled by default, you can enable the user interface option as part of your post installation or post upgrade tasks. See Server-Level Variables. After you have made this interface available, you can then register the server by providing the following information:| Input Field | Description |
|---|---|
| Connector Server Name | Specify a unique name for this connector server. |
| Connector Server Type | Add the connector server using HTTP or Socket protocols. Select either HTTP or Socket from drop-down menu. |
| Server URL |
http://dundasbi-dundas-bi-edc:8013/connectorDepending on how your environment is set up, this may default to port 8013. Depending on your configuration, this may be set to 8080. Verify the exact port in use in the environment hosting the data source. |
Modifying a Connector Server
The only way to modify a connector server on the Manage Connector Services page is to delete and re-register the connector server. See Delete a Connector Server, Obtain Additional Connector Servers, and Register a New Connector Server.Delete a Connector Server
You can delete a connector server that you manually configured. However, before deleting it, you must first delete the connections to the server from the Sources page. Then you need to delete the connector (at the bottom of the Manage Connector Services page). When the connections and the connector are deleted, you can delete the connector server. Delete a connector server from your environment- Log in as a system admin or a member of the Supervisors group.
- Select Tools > Connectors from the main menu. The Managed Connector Services work area opens.
- On the Manage Connector Services page, locate the connector server you want to delete in the Connector Servers table.
- Select the delete icon for the connector server.
- The connector server is removed from the Self-Service Analytics instance.
If you try to delete a visual, filter snippet, dashboard, self service report, dashboard link, source, or source field, Self-Service Analytics displays an error message naming any objects dependent on the item you’re trying to delete. You can delete the item after you’ve removed the association from the dependent object. See Fields Usage.
Obtain Additional Connector Servers
Several data connector servers are installed by default in your Self-Service Analytics environment, but a number of other connector servers are also available. The new connector server can be added via HTTP or Socket protocols. For a complete list of all supported connector servers, see Data Connector Reference. Obtain one or more of these connector servers- Contact insightsoftware Technical Support. You will receive a
yumoraptcommand that downloads and sets up the connector server in the Self-Service Analytics environment. After running the command, the connector microservice is installed and enabled in the Self-Service Analytics environment, allowing it to be discoverable as a new connector microservice. - Register the connector server. Connector servers are started and run as separate processes, and accept requests on a specific TCP/IP port. See Register a New Connector Server.
Enable User Delegation
You can use user delegation to run queries on behalf of users using a single set of credentials for a number of connectors. This allows you to share a single connection configuration among all users. User delegation can be established on a per-user or a per-group basis. User delegation is currently supported by the following connectors: Apache Drill, Cloudera Impala, Cloudera Search, and Hive. The Oracle connector supports user delegation only via user credential pass-through.The supervisor group members enables user delegation via a custom user attribute. Self-Service Analytics administrators enable and apply user delegation to the data connection definition for a data source.
-
Log in as a system admin or a member of the Supervisors group.
The default supervisor user is no longer installed; add users to the Supervisors group instead.
-
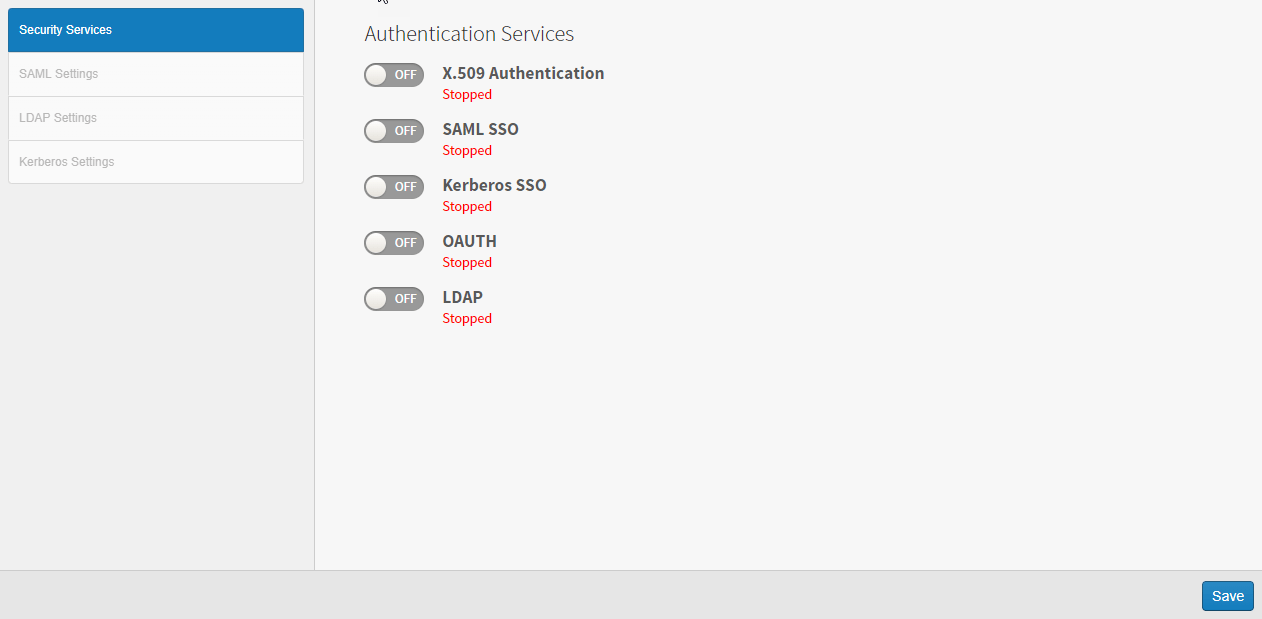
Select Tools > Security from the menu. The security tabs display.
-
Select the LDAP Settings tab. The LDAP Settings tab has five sections: General Settings, LDAP Server, User Provisioning, Mappings, and Mappings to Custom User Attributes.
If the LDAP tab cannot be selected, verify that the LDAP security service is enabled. See Use Lightweight Directory Access Protocol (LDAP).
- In the Mapping to Custom User Attributes section, select Add Custom User Attribute.
- Type any meaningful name for the custom attribute name.
- Match the new attribute to any LDAP attribute (for example, cn, sAMAccountName, name). This should be provided by an Impala administrator. The only requirement is that this attribute match the configuration in Sentry.
-
Select Save to save the attribute.
The custom user attribute is referenced by its name, prefaced by the word
User. For example, if your custom user attribute is namedXXXUserName, you would reference it asUser.XXXUserName. This reference name is shown in the Usage column. - Select Connectors on the supervisor menu. The Manage Connector Services page appears. This page has two tables: one for Connector Servers and one for Connectors.
-
Scroll down to the Connectors table and select the appropriate connector from the list. The connector settings page displays.
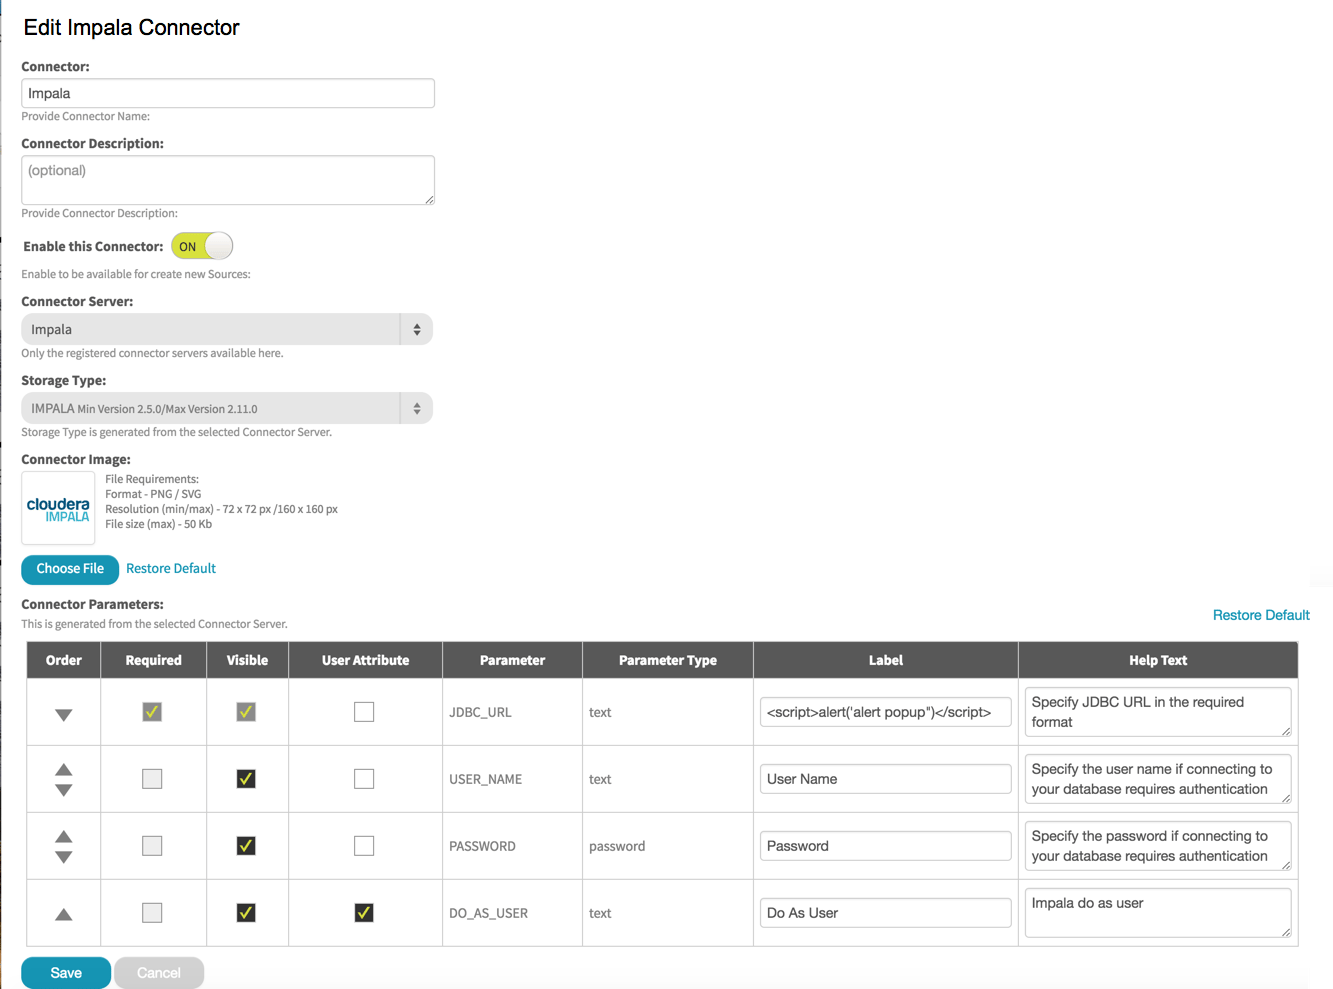
- Scroll down to the Connector Parameters and verify that the checkbox in the User Attribute column for the DO_AS_USER parameter is selected. This ensures that the DO_AS_USER parameter is visible and can be set in your Impala connection.
- Select Save.
Apply User Delegation to a Connection
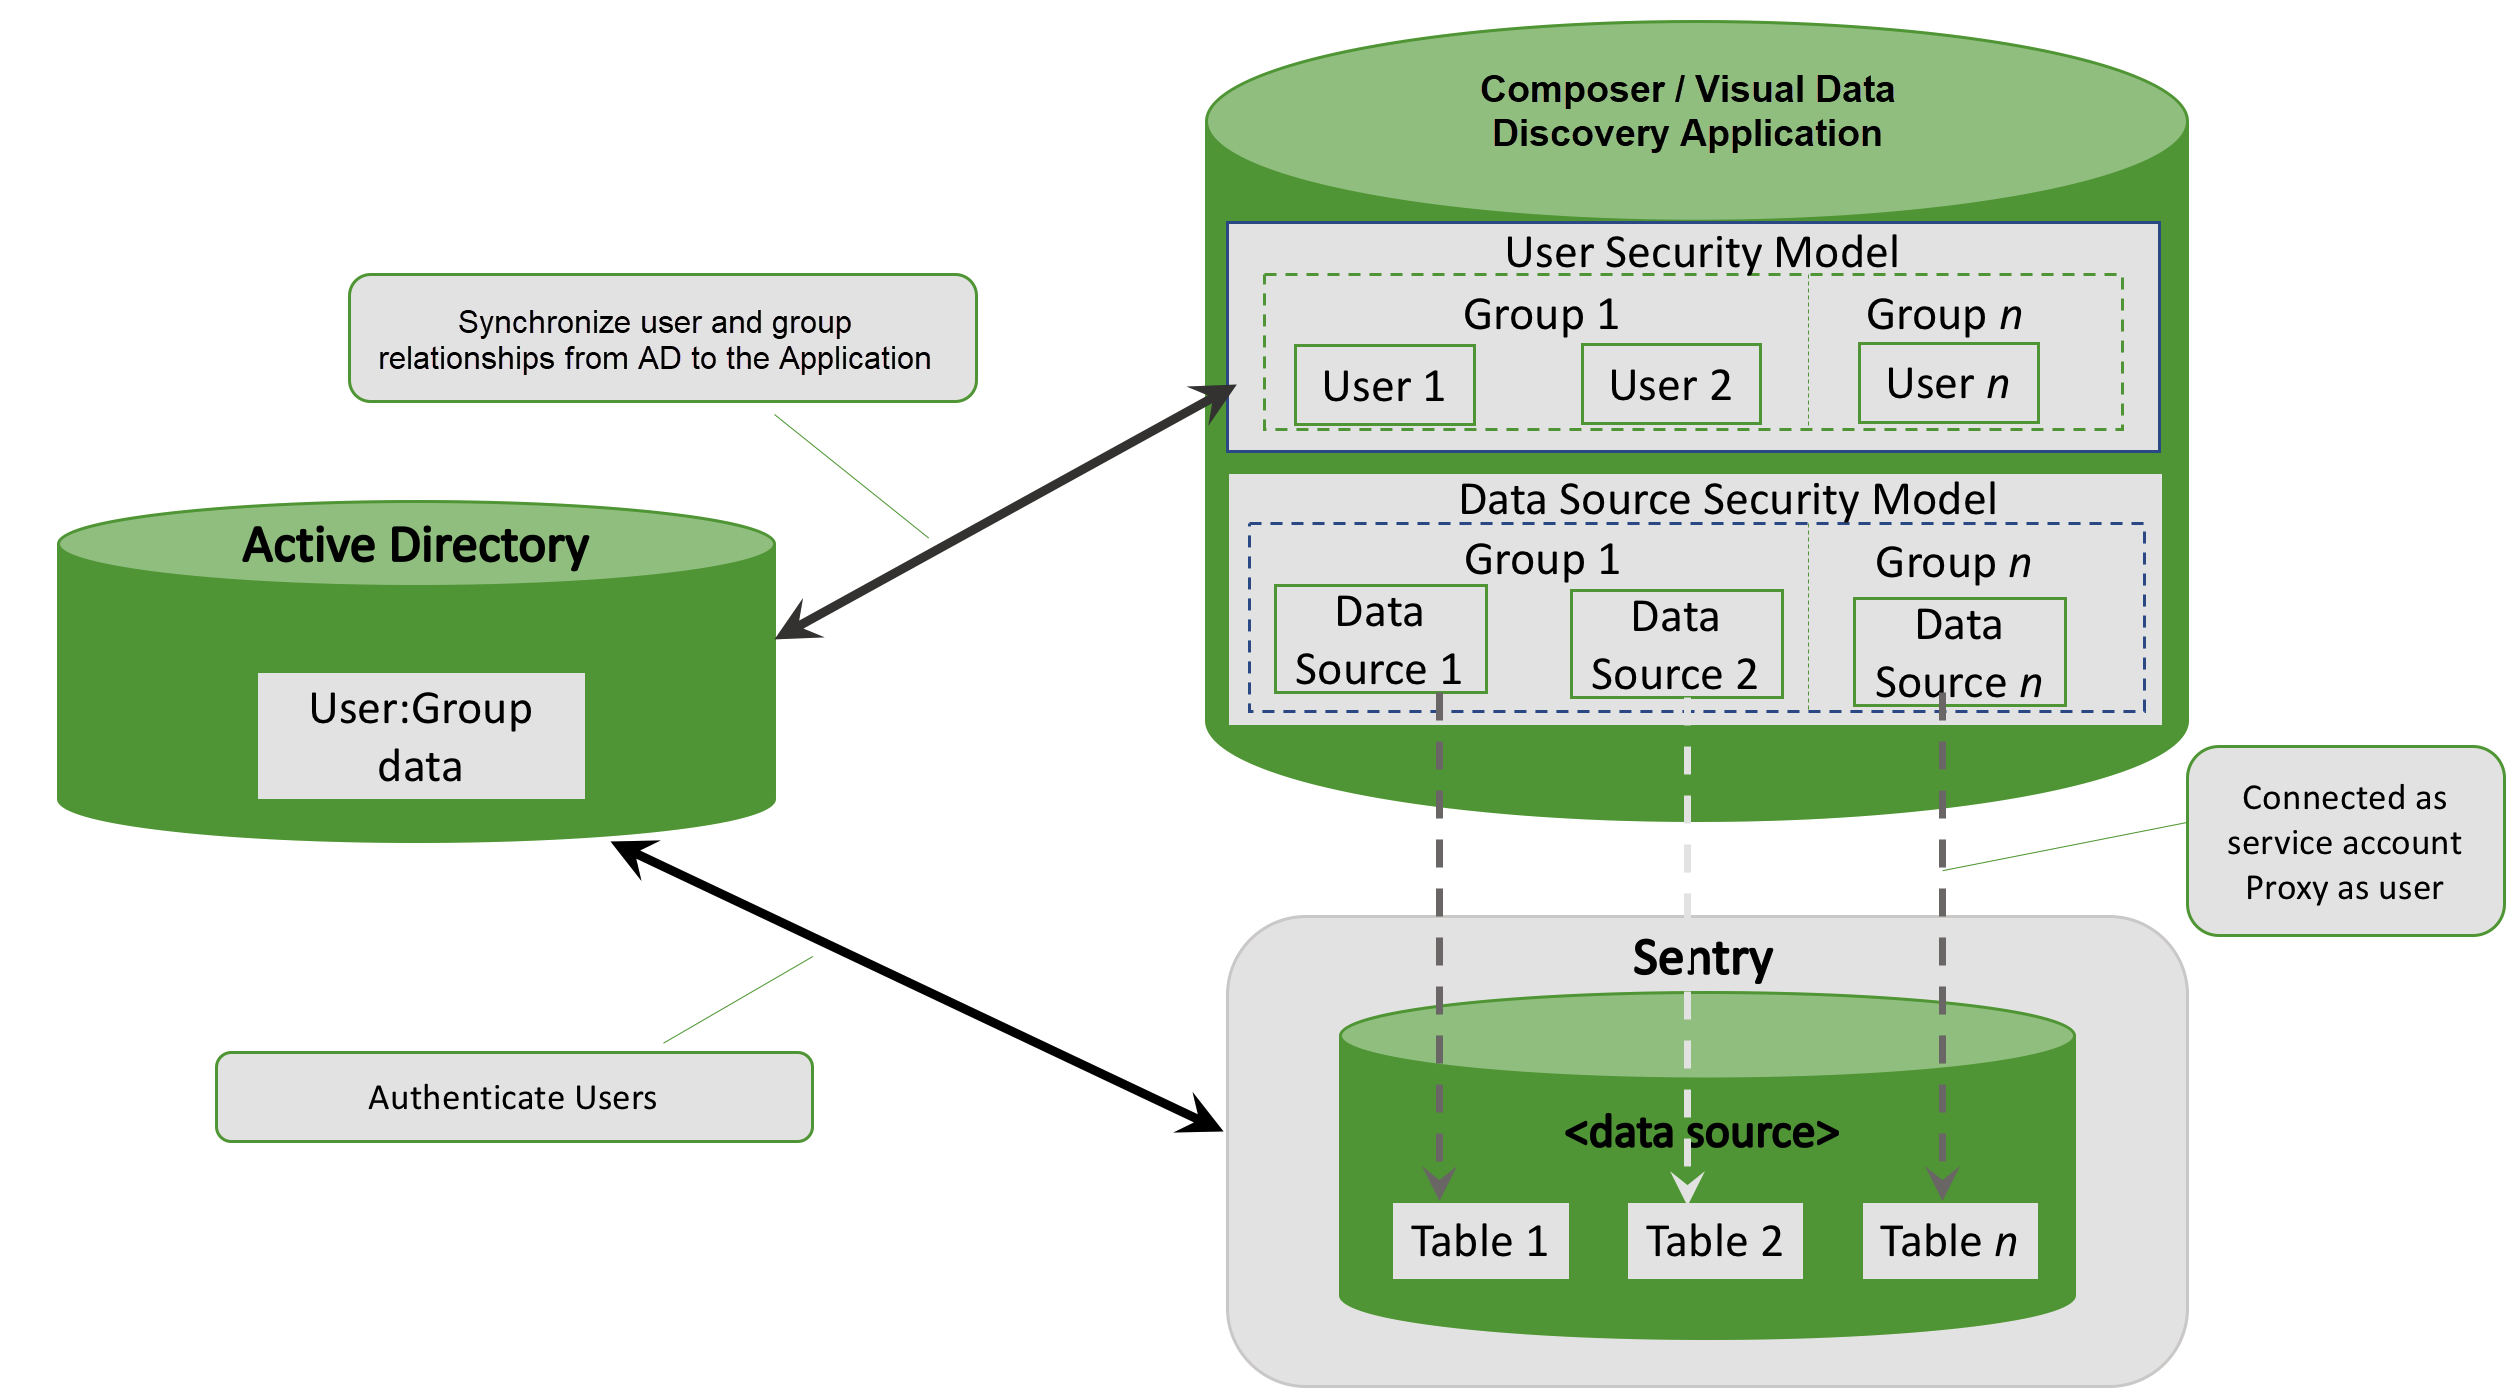
Applying user delegation to a Self-Service Analytics data source connection definition involves setting the Do As User parameter in the connection definition and setting up proxy user features in your data store. Any authentication mechanism (Kerberos or LDAP) and group mapping (file system or LDAP-based) method can be used by the data store or Self-Service Analytics, as long as the user name assigned to the Do As User connector parameter is allowed appropriate authorizations (delegation) in the data store configuration.Supervisors group members enables user delegation via a custom user attribute. Administrators enable and apply user delegation to the data connection definition for a data source.
-
The Self-Service Analytics supervisor group member or administrator assigns any LDAP attribute (for example,
cn,sAMAccountName,name) to a custom user attribute. This should be provided by your data store administrator. The only requirement is that this attribute must match the configuration in Sentry. See Enable User Delegation. The Self-Service Analytics custom user attribute is referenced by its name, prefaced by the wordUser. For example, if your custom user attribute is namedXXXUserName, you would reference it asUser.XXXUserName. -
The Self-Service Analytics administrator references the custom user attribute in the appropriate data source connection definition using the connection’s Do As User box. For example:
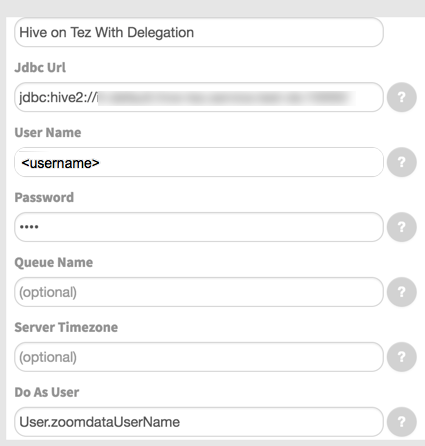
- When a user submits a query using the data source, the Self-Service Analytics connector sends the user identified by the Do As User parameter (or as interpreted by the setting in that parameter) to the data store when it connects on behalf of the query. Assuming user proxy (user delegation) features are set up properly on the data store, the data store runs the query on behalf of the user. For information on setting up user proxy, user impersonation, or user delegation features in each data store, see the following links.