
Create a Saved Filter
When you have created filters and applied them to a dashboard, they are listed under Active Filters on the Filter dialog. You can save these filters to be applied later to visuals or filter snippets from the same data source. A saved filter can include the settings from one or more filters.Cross-visual filters that have been applied from same-source and cross-source links are not saved when filters are saved for a visual. Saved filters only include row-level filters for the visual.
-
Select the filter icon on the visual, filter snippet, or dashboard to access the appropriate filter sidebar.
- To access the filter sidebar, select its filter icon (
 ) or select Settings from the menu (
 ) and then select
  on the sidebar menu.
 - To access the dashboard filter sidebar, select its filter icon (
 ). The dashboard-level filter icon is available only when all the visuals are from the same data source.
- To access the filter sidebar, select its filter icon (
-
Select Save Filters on the Filters sidebar. The Save Filter Set dialog appears.
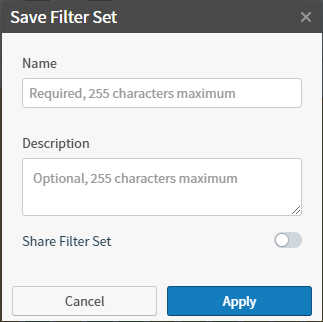
- Supply a name for the saved filter in the Name field.
- Optionally, provide a description for the saved filter in the Description field.
- If you want to share this set with other users, select Share Filter Set.
- Select Apply. The Save Filter Set dialog closes and the filter is saved. You can see the saved filter on the Saved Filters tab of the filters dialog in other visuals that use the same data source.
- Save the dashboard.
Example
Suppose you want to create a saved filter for different jewelry sales.- On your sales visual, sales filter snippet, or sales dashboard (if all the visuals on the dashboard are using the same sales data source), open the Filters sidebar.
-
On the Filters sidebar, create and apply a filter for jewelry sales. See Apply Row-Level Filters.
- Select the Row tab on the Filters sidebar.
- Depending on how the data in your data source is organized, select whatever attribute you use to identify a jewelry sale (for example, Category).
- On the next page of the Filters sidebar, select jewelry types in the possible attribute values (for example, for the Category attribute, you might select rings, earrings, pendants, and bracelets).
- Select Apply to apply the filter. You visual, visuals linked to a filter snippet, (or dashboard) now shows all sales data for jewelry. The first page of the Filters sidebar appears again.
-
Select Save Filter on the Filters sidebar. The Save Filter Set dialog appears.
- Enter a name for the saved filter (for example, Jewelry Sales) and, optionally, a description. If you want to share your filter, slide the Share Filter Set switch on (to the right). This shares the filter with other users when they view dashboards created using that same source.
- Select Apply to save the Jewelry Sales filter.
Edit a Saved Filter
You can edit saved filters that apply to the data source used by a visual or filter snippet on your dashboard. Changes that you make are only applied to the dashboard, visual, or filter snippet where you made the change and not to other objects that have already applied the saved filter. Edit a saved filter-
Select the filter icon on the visual, filter snippet, or dashboard to access the appropriate filter sidebar.
- To access the filter sidebar, select its filter icon () or select Settings from the menu () and then select on the sidebar menu.
- To access the dashboard filter sidebar, select its filter icon (). The dashboard-level filter icon is available only when all the visuals and filter snippets are from the same data source.
- To access the filter sidebar, select its filter icon (
- Select the Saved tab.
- Select the name of the saved filter that you want to edit. The saved filter is applied appropriately.
- Alter the filter as needed. See Apply Row-Level Filters and Remove a Filter from a Visual, Filter Snippet or Dashboard.
- Optionally, save the altered filter. It will be saved separately from the original saved filter. You are required to enter a unique name for the saved filter.
- Save the dashboard.
Delete a Saved Filter
When you delete a saved filter, it is deleted for every visual, filter snippet, and dashboard that uses the same data source. Delete a saved filter-
Select the filter icon on the visual, filter snippet, or dashboard to access the appropriate filter sidebar.
- To access the filter sidebar, select its filter icon () or select Settings from the menu () and then select on the sidebar menu.
- To access the dashboard filter sidebar, select its filter icon (). The dashboard-level filter icon is available only when all the visuals are from the same data source.
- To access the filter sidebar, select its filter icon (
- Select the Saved tab.
-
Locate the saved filter you want to delete and select
 . A warning dialog appears.
- Click Delete. The filter is deleted, but its filter settings are still applied to your current dashboard, visuals, and filter snippets.
- Save the dashboard.
Apply a Saved Filter to a Visual, Filter Snippet, or Dashboard
You can apply row-level filters for the data in visuals and filter snippets. When all the visuals and filter snippets in a dashboard use data from the same data source, you can apply row-level filters for all the visuals and filter snippets in the dashboard. Apply a row-level filter to a visual or dashboard-
Select the filter icon on the visual, filter snippet, or dashboard to access the appropriate filter sidebar.
- To access the filter sidebar, select its filter icon () or select Settings from the menu () and then select on the sidebar menu.
- To access the dashboard filter sidebar, select its filter icon (). The dashboard-level filter icon is available only when all the visuals are from the same data source.
- To access the filter sidebar, select its filter icon (
- Select the Saved tab and then select the save filter you want to use. If none are listed, you must create one. See Create a Saved Filter.