
- Describing the data on your dashboard in context
- Link external resources, such as user guides, or images
- Use Self-Service Analytics to generate a visual summary for one or more visuals in a dashboard
When you create a rich text snippet, it is linked to the dashboard you have added it to. If you delete a dashboard, the snippet is deleted as well.
- Add Rich Text Snippets to a Dashboard
- Format Rich Text Snippets
- Edit Rich Text Snippets
- Copy Rich Text Snippets
- Export Rich Text Snippets
- Delete Rich Text Snippets
- Use the Rich Text Snippet Menu
Add Rich Text Snippets to a Dashboard
When you create a dashboard or edit an existing dashboard, you can add rich text snippets to provide context to the visuals for your users. You can fully author your own rich text snippet, or have Self-Service Analytics generate visual description and add it to your dashboard in a rich text snippet.When you create a rich text snippet, it is linked to the dashboard you have added it to. If you delete a dashboard, the snippet is deleted as well.
Blank Rich Text Snippet
Create a blank rich text snippet-
Create or edit a dashboard.
- To add a snippet to an existing dashboard, log in as a user with
READandWRITEpermissions for the dashboard. - If you are creating a new dashboard, log in as a user with the Create Dashboards or Administer Dashboards group privilege.
- To add a snippet to an existing dashboard, log in as a user with
-
Select
 on the dashboard icon bar. A blank, new rich text snippet is added in a widget on the dashboard, ready to edit.
- Add text or other information in the snippet, using the snippet format tools to adjust the look and layout of your text, or add images and links. As you add and update your text, use keyboard shortcuts to undo and redo formatting changes. If you employ custom attributes in your environment, incorporate them as needed.
-
When you have added the information you need, select the edit icon (
 ) to hide the format tools and put the snippet in view mode.
- Save the dashboard.
Describe Visual (Generate Visual Summary Description)
Generate and insert a rich text snippet with a visual summary description-
Create or edit a dashboard with one or more visuals.
- To add a snippet to an existing dashboard, log in as a user with
READandWRITEpermissions for the dashboard. - If you are creating a new dashboard, log in as a user with the Create Dashboards or Administer Dashboards group privilege.
- To add a snippet to an existing dashboard, log in as a user with
-
Select the visual drop-down menu, and choose Describe Visual > Create Snippet and Insert. A new rich text snippet is added in a widget on the dashboard with the text of the visual summary description, ready to edit. Other options include:
- Describe Visual > Copy Visual Summary: This copies the summary to your clipboard. You can add it to an existing rich text snippet, or use it outside of the Simba Self-Service Analytics environment as needed.
- Describe Visual > Create Snippet and insert: This creates a new snippet for this visual summary description, or the first snippet for this dashboard.
-
Describe Visual > Insert into [Existing Snippet Name]: This inserts the visual summary description into the selected snippet when a rich text snippet that exists is selected.
If more than one rich text snippet widget exists, you can select the appropriate snippet from a list.
- Add more text or other information in the snippet, using the snippet format tools to adjust the look and layout of your text, or add images and links. As you add and update your text, use keyboard shortcuts to undo and redo formatting changes. If you employ custom attributes in your environment, incorporate them as needed.
-
When you have added the information you need, select the edit icon () to hide the format tools and put the snippet in view mode.
- Save the dashboard.
Visual Description is a menu option available for most, but not all visuals.
Any changes you make to a visual will be reflected in the generated visual summary description after you save your work with the updates.
Edit Rich Text Snippets
Edit rich text snippets quickly and easily in a dashboard. Update links, reformat text, or add images as needed. Edit a rich text snippet- Select the snippet on the dashboard. A blue border appears around the snippet widget.
- Select the edit pencil () in the widget, or
 Edit from the drop-down menu (
 ). The rich text snippet opens for editing.
 - Make your content and format changes.
- When you have finished making changes to the snippet, select the edit pencil () to hide the format tools and put the snippet in view mode.
- Save the dashboard.
Copy Rich Text Snippets
Make a copy of a selected rich text snippet by selecting Copy on the rich text snippet drop-down menu. This creates a copy of the last saved version of the snippet on your dashboard. Copy a rich text snippet- Select the snippet on a dashboard. A blue border appears around the widget.
- Select Copy on the rich text snippet drop-down menu. A copy of the rich text snippet appears on the dashboard in its own widget. Its initial name is the same as the original snippet, with an incremented number added to the end of the name. For example, if the original name was Sales Data Parameters, the initial name of the first copied snippet is Sales Data Parameters (1).
When you create a rich text snippet, it is linked to the dashboard you have added it to. If you delete a dashboard, the snippet is deleted as well.
Delete Rich Text Snippets
You can remove rich text snippets from dashboards if you no longer need it. Remove a rich text snippet from your dashboard- Edit the dashboard. See Edit a Dashboard.
- Select the rich text snippet to be removed.
- Select Remove Widget on the rich text snippet drop-down menu. A removal confirmation dialog opens.
- Select Delete on the warning dialog to confirm the deletion.
Export Rich Text Snippets
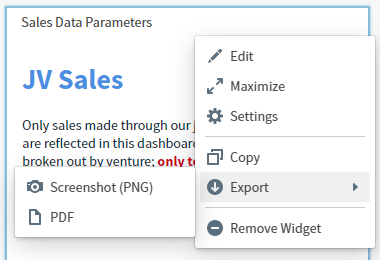
You can export your rich text snippet as a screenshot or as a PDF to share with others. Rich Text Snippets can be exported in the following formats:- PNG Screenshot (as an image)
- PDF file (as an image)
-
Select Export from the rich text snippet drop-down menu. A submenu opens: select an export format.
-
Select a format on the submenu.
- If you select Screenshot (PNG), the screenshot is prepared and automatically downloaded.
-
If you select PDF, the Export as PDF dialog opens.
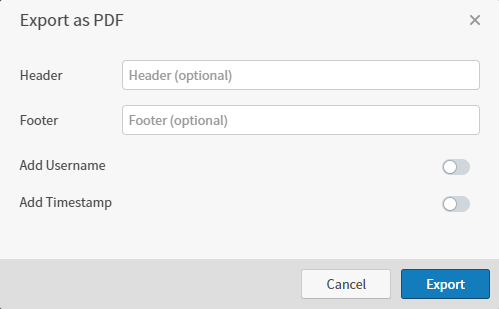
- Optionally, specify a header and footer for the PDF. Slide the Add Username switch on (to the right) to add a user name to the PDF. Slide the Add Timestamp switch on (to the right) to add a time stamp to the PDF. Then select Export. The PDF is prepared and automatically downloaded.
Format Rich Text Snippets
Use rich text snippets to enhance your users’ dashboard experience by describing the data on your dashboard in context, linking external resources such as user guides, or adding images. Format rich text snippets to give your dashboard a smoothly integrated look and feel, using colors and images to complement your visual data. As you add and update your text, use keyboard shortcuts to undo and redo formatting changes. If you employ custom attributes in your environment, incorporate them as needed.
| Formatting Option | Description |
|---|---|
| Text Style (Paragraph Level Format) | Three text style options are available for formatting the text of your snippet at the paragraph level. After making a selection, you can apply additional format options as needed.
|
| Text Color | Apply a color to selected text. There are five ways to select a color:
|
| Background Color | Apply a background color to selected text. There are five ways to select a background color:
|
| Align | Align your paragraphs. There are four alignment options:
|
| Bold | Apply bold formatting to selected text, if the default text style is not bold. |
| Italic | Apply italic formatting to selected text. |
| Underline | Underline the selected text. |
| Bullet List | Select to start a bulleted list. Alternatively, select text and convert it to a bulleted list of body text. |
| Numbered List | Select to start a numbered list. Alternatively, select text and convert it to a numbered list of body text. |
| Add Link | Select to insert a link to an external website. Opens the Add Link work area.
Formatting applied to link text is converted to the browser’s default link and visited link colors. On hover, an underline is shown under the link text. To edit or remove the link, select the link while you are in edit mode and choose the Edit or Remove option. |
| Add Image | Select to insert an image. Opens the Add Image work area.
|
| Clear Formatting | Select to clear color and font formatting (bold, italic, underline) from a paragraph. |
Use the Rich Text Snippet Menu
The rich text snippet menu includes options that help you modify and use rich text snippets in your dashboard. Access it by selecting in the upper right corner of a rich text snippet widget.
The menu options are described in the following table.
| Option | Description |
|---|---|
| Copy | Select to make a copy of the saved version of the selected rich text snippet. See Copy Rich Text Snippets. |
| Edit | Select to open the selected rich text snippet for editing, or if it is open for editing, put it in view mode. |
| Export | Export the selected rich text snippet. See Export Rich Text Snippets. |
| Maximize | Select to maximize the selected rich text snippet on the dashboard for optimal viewing. |
| Minimize | Select to minimize the selected rich text snippet so you can see other visuals and rich text snippets on the dashboard. |
| Settings | Open the sidebar menu for the selected rich text snippet. Edit the display name, optional description, and to define header behavior. The default Header setting is Show; this displays the header at all times. Show on Hover hides the header in Viewer mode unless users perform a hover action over the widget where the header is temporarily hidden. Hide completely hides the header from visibility in Viewer mode. |
| Remove Widget | Remove the selected rich text snippet from the dashboard. See Delete Rich Text Snippets. |