
zoomdata.log file.
Specific prerequisites must be met to schedule reports. For more information, see:
- Scheduled Self Service Reports and Dashboard Report Prerequisites
- Schedule a Self Service Report or Dashboard Report
- Configure Recipient Rules
- Update a Scheduled Report
- Delete a Scheduled Report
- Scheduled Reports Permissions and Behavior
- Scheduled Report Properties
- Disable Sending Scheduled Reports to External Users
By default, you can send scheduled reports to both users with Self-Service Analytics accounts, and email addresses outside of Self-Service Analytics. Work with Technical Support if you need to disable this functionality in your environment. See Disable Sending Scheduled Reports to External Users.
Scheduled Self Service Reports and Dashboard Report Prerequisites
Before users can schedule and send self service reports and dashboard reports, configure:- Mail server information
- SFTP information (if enabled in your environment) to deliver reports to your environment users at the defined SFTP location.
- Confirm memory settings
- Optionally adjust the screenshot resolution based on your users’ needs
- Limit each scheduled report to fewer than 10 users, and plan time gaps between consecutive runs
Configure Mail Server Settings
Add JavaMail API properties to thezoomdata.properties file to identify the mail server and other mail properties required to send the scheduled reports. This can include mail.smtp.auth, mail.smtp.host, mail.smtp.port, mail.imap.host, and mail.imap.port). Self-Service Analytics supports both IMAP and SMTP protocols. Complete descriptions of IMAP and SMTP protocol JavaMail properties can be found at these links:
- IMAP: https://javaee.github.io/javamail/docs/api/com/sun/mail/imap/package-summary.html
- SMTP: https://javaee.github.io/javamail/docs/api/com/sun/mail/smtp/package-summary.html
zoomdata.properties file.
Send to an SFTP Location [File Drop]
When enabled in your environment, you can define the remote directory to which scheduled self service reports and scheduled dashboard reports are delivered to your users. You can define these attributes at the instance level for al users. Alternatively, define for specific tenants or users.- Use tenant attributes to pass these configuration properties to your instance. Use the
accountsendpoint to define or verify settings for your desired tenants. - For users, pass these configuration properties to your instance using their user attributes. Use the
userendpoint to define or verify settings for your desired users.
- sftp.host
- sftp.password
- sftp.port
- sftp.remoteDirectory
- sftp.strictHostKeyChecking
- sftp.user
- email.replyToAddress
- email.senderDisplayName
https://<Self-Service Analytics-URL>/composer/swagger-ui.html.
Containerized Environments
You can make changes to the appropriate helm chart value overrides. For example, using your own information (default port is 2222):Confirm Memory Settings
If you plan to schedule numerous concurrent dashboard reports, you may need to confirm the memory configuration settings for your environment and the screenshot service pool configuration settings will meet your needs, or alter them if needed. See Configure Memory Settings and Screenshot Microservice. Log messages related to dashboard report scheduling are stored in thezoomdata.log file.
Screenshot Resolution
Self-Service Analytics’s resolution for PNGs and PDFs created as scheduled reports is 1280 x 720. If your users require a higher resolution, adjust the height and width properties inzoomdata.properties: dashboard.scheduling.screenshot.png.height and dashboard.scheduling.screenshot.png.width. Restart the screenshot microservice after making changes to zoomdata.properties.
In environments where you distribute a high number of simultaneous reports (200 users or more), a higher screen resolution such as 4k or 2160p (3840 x 2160) can have performance impacts. Balance the resolution of your scheduled dashboard reports with the frequency and recipient list size for your reports.
Containerized Environments
You can make changes to appropriate yaml files to adjust properties and feature flags. For the screenshotService, templates and yaml files you can update are located in the pathlogicomposer/charts/composer/templates logisymphony/charts/composer/templates of the untarred Helm package. These files include:
- Core configuration file: screenshot-service-deployment.yaml
- Screenshot Service properties map: screenshot-service-configmap.yaml
- Screenshot Service autoscaling options: screenshot-service-hpa.yaml
zoomdata.properties file. See Scheduled Report Properties.
Schedule a Self Service Report or Dashboard Report
Use Self-Service Analytics to send self service reports and dashboard reports to yourself, to internal users, or external users. Set up these reports for sending on a schedule when you use the Scheduled Reports feature. This topic describes how to generate these reports on a schedule. Limit each scheduled report to fewer than 10 users, and plan time gaps between consecutive runs. Generate a scheduled report- Log into as an administrator or a user with the Create Scheduled Reports privilege.
- Select the Discovery Board card on your home page or Library from the main menu, then the Reports or Dashboards tab in the library. The library displays your items in a table (list) format.
- Locate the report or dashboard you want.
-
Select the schedule icon in the associated Schedule column. The Scheduled Reports work area opens. Any defined scheduled reports are listed on the left side of the work area.
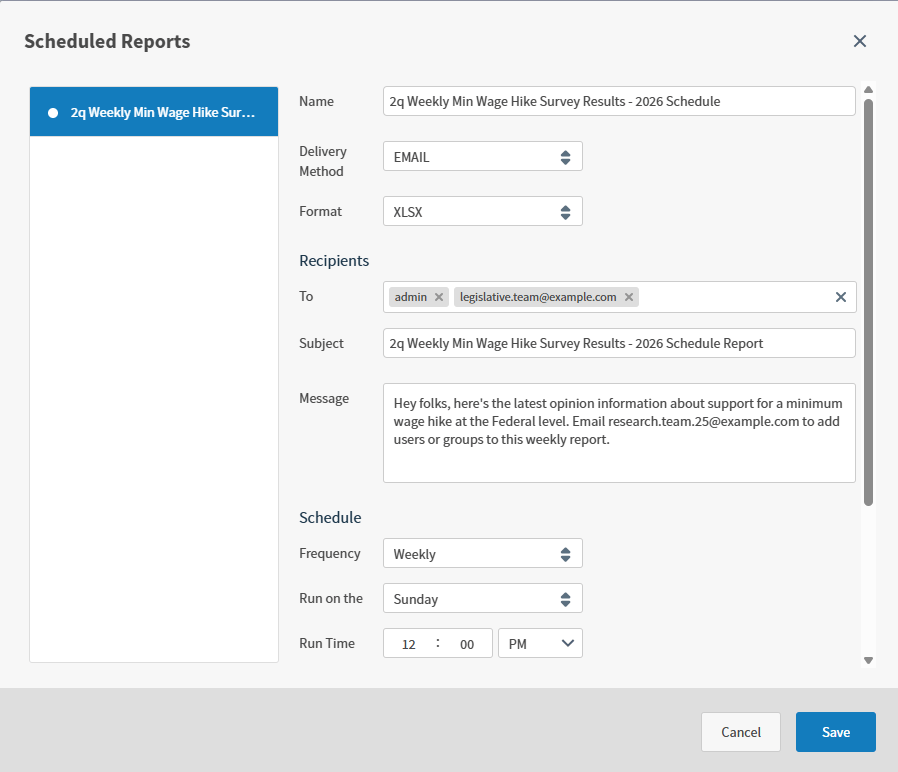
- Select Save to save the scheduled dashboard report. The name of the scheduled dashboard report appears in the list on the left of the Scheduled Reports dialog.
Update a Scheduled Report
In this release, when your admin enables the Enhanced Experience user interface, you will see changes to workflows you may have used in previous releases.
- Log in as an administrator or a user with the Create Scheduled Reports privilege.
- Select the Discovery Board card on your home page or Library from the main menu, then the Reports or Dashboards tab in the library. The library displays your items in a table (list) format.
- Locate the report or dashboard you want.
-
Select the schedule icon in the associated Schedule column. The Scheduled Reports dialog box displays.
- Select the scheduled report that you want on the left side of the Scheduled Reports dialog box. Self-Service Analytics displays the settings.
-
Update the settings for the report on the right side of the Scheduled Reports dialog.
Field Description Name Specify a name for the scheduled report definition. Delivery Method Select a format for delivery. - EMAIL (default): deliver to recipients by email.
- FILE_DROP (if enabled in your environment): deliver to recipients (users defined in your Self-Service Analytics environment only) at the defined SFTP location.
Format Select a format for the scheduled report using the arrows in the Format selector field. - For dashboard reports, select from PDF, PNG, and XLSX format.
- For self service reports, select from PDF and XLSX format. For more information on formatted PDF and XLSX options, see Export Your Self Service Report and Page Size and Orientation.
When you export raw data from your visuals to XLSX, numeric fields are exported as numbers. Dates are exported as dates in ISO 8601 format.To The To text box contains your user name. Add more recipients here by typing their name or email address (if enabled in your environment) in this field. You must have at least one name in this field. - As you type in characters, existing user accounts are searched and defined users that match are shown. See Manage Users.
- You can also set up user attributes and use the Recipient Rules API to specify who your users can see in the recipients list, and select from those users who to send the report to. See Configure Recipient Rules.
- Add users without user accounts to the recipients list: type in their full email address, then select the add icon to include them in the list. Non-Self-Service Analytics user recipients are granted the same security based on the report scheduler’s user attributes for interpolation, row and column security (if defined), and filtering.
See Scheduled Self Service Reports and Dashboard Report Prerequisites for information about Mail properties that you might need.Subject Specify a subject for the email that will be sent containing the scheduled dashboard report. By default, a subject of <dashboard-or-report-name> Schedule Report is used. Message Optionally provide a message for the email. Frequency Select a frequency for the scheduled dashboard report using the arrows in the Frequency selection box. Frequencies of Run Once, Daily, Days, Weekly, Monthly and Periodically are supported. Depending on the frequency you select, additional fields appear.
After selecting a Frequency, you can define the appropriate frequency options:- Run Once - Select a Date and Timezone to run and deliver the report once.
- Daily - Select a Run Time, Timezone, then a From and To date to define the time span to run and deliver the report daily.
- Days - Select one or more Day(s) of the week, a Run Time, Timezone, then a From and To date to define the time span to run and deliver the report on the selected day or days.
- Weekly - Select a day of the week from Run on the options, a Run Time, Timezone, then a From and To date to define the time span to run and deliver this report once weekly.
- Monthly - Select a Day of the month, a Run Time, Timezone, then a From and To date to define the time span to run and deliver this report once monthly.
- Periodically - Select one or more Month(s), a Day of the month or months, a Run Time, Timezone, then a From and To date to define the time span to run and deliver this report once a month for the selected periodic months.
Date This field only appears if you select the Run Once frequency.
Select the date for the scheduled dashboard report. Click in the box to bring up a calendar with in you can select the date.Day(s) This field only appears if the Days frequency is selected. Sunday is added by default.
Enter one or more days of the week to run this schedule, or select the x next to a day to remove.Run on the This field only appears if the Weekly frequency is selected.
Select one day of the week for Weekly to run and deliver this report on the selected day of the week.Month(s) This field only appears if the Periodically frequency is selected.
January is added by default. Enter one or more months of the year to run this schedule, or select the x next to a month to remove.Day This field only appears if the Monthly or Periodically frequency is selected.
1 is selected by default. Options range from1to31and will run on that date, if available, each month.Run Time This field appears for all frequencies except Run Once.
Specify the hour and minute of the day at which the scheduled dashboard report should be generated and sent. Type the hour of the day on the left side of the colon and the minute of the day on the right side of the colon. Use the arrows in the box to the far right to select AM or PM.Timezone Default selection is UTC; select a time zone for this schedule to run and deliver this report.
If you select a timezone other than UTC, the schedule respects the appropriate standard and seasonal time rules.From This field appears for all frequencies except Run Once.
Select the starting date for the scheduled dashboard report. Click in the box to bring up a calendar in which you can select the date.To This field appears for all frequencies except Run Once.
Select the ending date for the scheduled dashboard report. Click in the box to bring up a calendar in which you can select the date.Run Now Slide the Run Now switch on (to the right) to send the scheduled dashboard report immediately. By default, this switch is off (on the left).
You can enable Run Now simultaneously with any other Frequency selected. The report will be run and delivered immediately and at the specified Frequency. For example, if you select Run Once and switch on Run Now you will get your report two times when you Save your schedule.Field Description Name Specify a name for the scheduled report definition. Delivery Method Select a format for delivery. - EMAIL (default): deliver to recipients by email.
- FILE_DROP (if enabled in your environment): deliver to recipients (users defined in your Self-Service Analytics environment only) at the defined SFTP location.
Format Select a format for the scheduled report using the arrows in the Format selector field: PDF, PNG, and XLSX formats are supported. When you export raw data from your visuals to XLSX, numeric fields are exported as numbers. Dates are exported as dates in ISO 8601 format.To The To text box contains your user name. Add more recipients here by typing their name or email address (if enabled in your environment) in this field. You must have at least one name in this field. - As you type in characters, existing user accounts are searched and defined users that match are shown. See Manage Users.
- You can also set up user attributes and use the Recipient Rules API to specify who your users can see in the recipients list, and select from those users who to send the report to. See Configure Recipient Rules.
- Add users without user accounts to the recipients list: type in their full email address, then select the add icon to include them in the list. Non-Self-Service Analytics user recipients are granted the same security based on the report scheduler’s user attributes for interpolation, row and column security (if defined), and filtering.
See Scheduled Self Service Reports and Dashboard Report Prerequisites for information about Mail properties that you might need.Subject Specify a subject for the email that will be sent containing the scheduled dashboard report. By default, a subject of <dashboard-or-report-name> Schedule Report is used. Message Optionally provide a message for the email. Frequency Select a frequency for the scheduled dashboard report using the arrows in the Frequency selection box. Frequencies of Run Once, Days, Daily, Weekly, and Monthly are supported. Depending on the frequency you select, additional fields appear. Run on the This field only appears if the Days, Weekly, or Monthly frequencies are selected. - Select one or more available days of the week for Days.
- Select one day of the week for Weekly.
- Select a date for Monthly. Options range from
1to31and will run on that date, if available, each month.
Run Time This field only appears if the Days, Daily, Weekly, or Monthly frequencies are selected. Specify the hour and minute of the day at which the scheduled dashboard report should be generated and sent. Type the hour of the day on the left side of the colon and the minute of the day on the right side of the colon. Use the arrows in the box to the far right to select AM or PM. From This field only appears if the Days, Daily, Weekly, or Monthly frequencies are selected. Select the starting date for the scheduled dashboard report. Click in the box to bring up a calendar in which you can select the date. To This field only appears if the Days, Daily, Weekly, or Monthly frequencies are selected. Select the ending date for the scheduled dashboard report. Click in the box to bring up a calendar in which you can select the date. Date This field only appears if you select the Run Once frequency. Select the date for the scheduled dashboard report. Click in the box to bring up a calendar with in you can select the date. Run Now Slide the Run Now switch on (to the right) to send the scheduled dashboard report immediately. By default, this switch is off (on the left).
You can enable Run Now simultaneously with any other Frequency selected. The report will be delivered immediately and at the specified Frequency. For example, if you select Run Once and switch on Run Now you will get your report two times.Only the report scheduler can see the non-Self-Service Analytics users included in the recipient list. - Select Save to save the scheduled report.
Delete a Scheduled Report
In this release, when your admin enables the Enhanced Experience user interface, you will see changes to workflows you may have used in previous releases.
- Log in as an administrator or a user with the Create Scheduled Reports privilege.
- Select the Discovery Board card on your home page or Library from the main menu, then the Reports or Dashboards tab in the library. The library displays your items in a table (list) format.
- Locate the dashboard or self service report you want to remove.
-
Select the schedule icon in the associated Schedule column. Self-Service Analytics displays the Scheduled Reports dialog.
 Scheduled reports for this dashboard (or self service report) that have already been defined appear on the left side of the dialog.
- Locate and select the scheduled report that you want to remove on the left side of the Scheduled Reports dialog. Self-Service Analytics displays the settings for the report.
-
Select Delete (
 ) next to the scheduled report name on the left side of the dialog. Self-Service Analytics displays a warning.
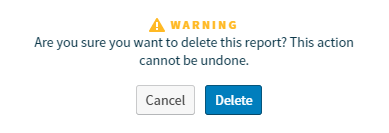
- Select Delete to delete the scheduled report. Self-Service Analytics removes the name of the scheduled report from the Scheduled Reports dialog box. Select Cancel if you do not want to delete the report.
Scheduled Reports Permissions and Behavior
Users who create scheduled dashboard reports and scheduled self service reports require specific permissions to perform these tasks. When you make changes to user accounts, these changes also affect scheduled reports in specific ways. This topic describes actions and Self-Service Analytics behaviors. To create a scheduled report, you must be an administrator or assigned to a group with the Create Scheduled Reports and Administer Scheduled Reports privilege. The following table describes the scheduled report behaviors that occur when users are removed or disabled in Self-Service Analytics or in a Self-Service Analytics tenant account.| Who | Action | From | Behavior |
|---|---|---|---|
| Report creator | Disabled | Tenant | The scheduled report remains in the system. Self-Service Analytics recipients continue to receive scheduled reports. All recipients included only by email address are removed from the report recipient list. |
| Removed | Tenant | ||
| Deleted | System | The scheduled report is removed from the system. | |
| Report recipient | Disabled | Tenant | The Self-Service Analytics recipient remains on the recipients list but the recipient no longer receives the report. A warning message is logged. |
| Removed | Tenant | ||
| Removed | System | The Self-Service Analytics recipient is removed from the recipients list. |
zoomdata.log file.
Scheduled Report Properties
Specific properties control the behavior of scheduled reports. These properties are stored inzoomdata.properties.
| Property | Required? | Description |
|---|---|---|
dashboard.scheduling.screenshot.png.height | No | Identifies the height (in pixels) of the screenshot PNG file that will be sent. The default is 720 pixels. |
dashboard.scheduling.screenshot.png.width | No | Identifies the width (in pixels) of the screenshot PNG file that will be sent. The default is 1280 pixels. |
dashboard.scheduling.screenshot.timeout | No | The time specified by this property must be less than or equal to the time set by the screenshot.service.http.client.read.timeout.milliseconds property.If you increase the value of this property, make sure that you increase the value of the screenshot.service.http.client.read.timeout.milliseconds property accordingly.Bear in mind that this property is specified in seconds, but the screenshot.service.http.client.read.timeout.milliseconds property is specified in milliseconds. |
mail.from | Yes | Specifies the email address identifying where the email comes from. “User@example.com” |
mail.login | Yes | Specifies the email login to use to access the mail server. |
mail.password | Yes | Specifies the password associated with the email login identified in the mail.login property. |
| Mail SMTP Information | Yes | Specifies the properties for SMTP port, enablement, and authentication information. mail.smtp.port: 465 mail.smtp.auth: true mail.smtp.ssl.enable: true mail.smtp.ssl.protocols: “TLSv1.2” mail.login: “ mail.login”mail.password: “ mail.password”mail.from: “ mail.from” |
screenshot.service.http.client.connect.timeout.milliseconds | No | Specifies the number of milliseconds that can elapse before Self-Service Analytics stops trying to connect to the screenshot microservice client. The default is 10000 milliseconds. |
screenshot.service.http.client.read.timeout.milliseconds | No | Specifies the number of milliseconds that can elapse before Self-Service Analytics stops trying to read from the screenshot microservice client. The default is 60000 milliseconds. If you increase the time set by the dashboard.scheduling.screenshot.timeout property, make sure that you increase the value of this property as well.The total time set by screenshot.service.http.client.read.timeout.milliseconds should always be greater than or equal to the time set by the dashboard.scheduling.screenshot.timeout property.Bear in mind that this property is specified in milliseconds, but the dashboard.scheduling.screenshot.timeout property is specified in seconds. |
screenshot.service.http.client.write.timeout.milliseconds | No | Specifies the number of milliseconds that can elapse before Self-Service Analytics stops trying to write to the screenshot microservice client. The default is 60000 milliseconds. |
sftp.host | If enabled in your environment | Specifies the properties for SFTP location, credentials, and other settings to deliver scheduled self service reports and scheduled dashboard reports to the defined SFTP location. sftp.host=localhost sftp.port=2222 sftp.user=uname sftp.password=pwd sftp.strictHostKeyChecking=no sftp.remote.directory=/tmp |
zoomdata.properties file to identify the mail server and other mail properties required to use that server to send the scheduled dashboard (for example, mail.smtp.auth, mail.smtp.host, mail.smtp.port, mail.imap.host, and mail.imap.port). Self-Service Analytics supports both IMAP and SMTP protocols. Complete descriptions of IMAP and SMTP protocol JavaMail properties can be found at these links:
- IMAP: https://javaee.github.io/javamail/docs/api/com/sun/mail/imap/package-summary.html
- SMTP: https://javaee.github.io/javamail/docs/api/com/sun/mail/smtp/package-summary.html
zoomdata.properties file, see Properties Reference.
Log messages related to dashboard report scheduling are stored in the zoomdata.log file.
Disable Sending Scheduled Reports to External Users
You can send scheduled self service reports and dashboard reports, by default, to both users with Self-Service Analytics user accounts, and email addresses outside of Self-Service Analytics. Disable the sending of scheduled reports by disabling the toggleallow-sending-reports-to-external-emails. See Server-Level Variables.
Scheduled Report Options - External Recipients Disabled
By default, you can send reports to external users by adding their email address to the Recipient field when creating a schedule for a report. When you disable sending reports to external users:- Users can no longer add external email addresses to report schedules.
- External users included in an existing schedule remain, with an added warning that the report will not be sent to external users. This does not prevent the report from being sent to Self-Service Analytics users.
- If you remove an external user from a scheduled report, they can not be re-added to the recipient list.
- Reports that include external users in the recipient list are sent to Self-Service Analytics users only, not external users.
Configure Recipient Rules
You and your users can schedule and send reports, dashboard reports, and share dashboards and self service reports with other Self-Service Analytics users as needed. If you’re running a multi tenancy environment, you can regulate your users’ data access using custom attributes and use these custom attributes to filter report recipients. This ensures your customers can only schedule reports for users that meet specific criteria, such as tenant, location, department, or other attribute you define. Use the Recipients Rules API to create filters for your customers using your custom attributes.Users you add to scheduled reports using a full email address are not affected by recipient rules. See Schedule a Self Service Report or Dashboard Report.
Recipient Rules Prerequisites
- Recipient rules can only be defined by an administrator or a user assigned to a group with the Administer Users privilege.
- Recipient rules rely on the use of custom attributes in your environment. See Specify Custom User Attributes.
users segregation section of the Swagger documentation provided by insightsoftware to create filters for your customers using your custom attributes..
API documentation is provided in your environment at this link: https://<Self-Service Analytics-URL>/composer/swagger-ui.html.
How the Recipient Rules API Uses Custom Attributes
Use the Recipient Rules API to define what list of recipients specific users can see based on a combination of their own custom attributes and the custom attributes of others. Rules can use bothAND and OR operators. Two object attributes are supported: User and OtherUser.
The examples below show possible scenarios illustrating how to filter report recipients out. Define the custom User attributes you need and pair them with an appropriate OtherUser attribute. In the examples below, we use User.tenant and OtherUser.tenant, User.region and OtherUser.region, and User.department and OtherUser.department.
Define recipient rules as broadly or narrowly as you need. Combine and filter User and OtherUser attributes with both AND and OR operators to achieve your desired result.
| Use Case | Recipient Rule Construction | Custom Attributes Example | Result |
|---|---|---|---|
| You want users in specific tenants to see and select other users in their shared tenant in the report recipient field. | (User.tenant = OtherUser.tenant) | User.tenant
| Users with attribute User.tenant WidgetCo can see and include all other WidgetCo users in a recipient list.Users with attribute User.tenant SprocketInc can see and include all other SprocketInc users in a recipient list. |
| You want users in specific tenants to see and select other users in their shared tenant and region in the report recipient field. | (User.tenant = OtherUser.tenant AND User.region = OtherUser.region) | User.tenant
User.region
| Users with attributes
can see and include all users with the same attributes in a recipient list. Users with attributes
can see and include all users with the same attributes in a recipient list. |
| You want users in specific tenants to see and select other users in their shared tenant and region, or other users of the defined type in the report recipient field. | (User.tenant = OtherUser.tenant AND User.region = OtherUser.region AND User.type = “EndUser”) OR User.type = “Admin” | User.tenant
User.region
User.type
| Users with attributes
can see and include all users with the same attributes in a recipient list. Users with attributes
can see and include all users with the same attributes in a recipient list. Users with attribute
can see and include all users in a recipient list. |
| You want users in specific tenants to see and select other users in their shared tenant, region, and department, or other users of the defined type in the report recipient field. | (User.tenant = OtherUser.tenant AND User.region = OtherUser.region AND User.department= OtherUser.department AND User.type = “EndUser”) OR User.type= “Admin” | User.tenant
User.region
User.department
User.type
| Users with attributes
can see and include all users with the same attributes in a recipient list. Users with attributes
can see and include all users with the same attributes in a recipient list. Users with attribute
can see and include all users in a recipient list. |
| You want users of a specific type to see and select all users in the account in the report recipient field. | (User.type = “user_attribute_name”) | User.type
| Users with attribute
can see and include all users from the account in a recipient list. Use this mechanism to configure visibility for users from different groups. To do this, substitute User.group for User.type.Each user must have a group custom attribute configured to use (e.g. User.group = BI Engineers). |