
- Self-Service Analytics provides basic login access to the Self-Service Analytics application. See Authorize Self-Service Analytics Access for Users in Groups.
- X.509 client certificate authentication can be used to provide single sign-on capabilities, although it does not support auto-provisioning of user accounts. See Configure Client Certificate Authentication.
- SAML (Security Assertion Markup Language) can be used to provide single sign-on capabilities. See Configure Self-Service Analytics to Support SAML.
- Kerberos can be used to provide single sign-on capabilities. See Configure Kerberos Single Sign-On (SSO) Settings.
-
Trusted Access can be used to allow for machine-to-machine authorization of Self-Service Analytics resources when embedded in your application. It allows users to log in once to the parent application and yet have their security information propagated to Self-Service Analytics, creating a seamless and secure user experience. See Trusted Access.
insightsoftware recommends using Trusted Access for all embed-related workflows.
- LDAP (Lightweight Directory Access Protocol) can be used to enable directory-based access to Self-Service Analytics. Self-Service Analytics can connect to an organization’s Active Directory (AD) and OpenLDAP directory services using configured LDAP settings. See Use Lightweight Directory Access Protocol (LDAP).
-
Log in as a system admin or a member of the Supervisors group.
The default supervisor user is no longer installed; add users to the Supervisors group instead.
- Select Tools > Security from the Administration menu. The Security page appears. It consists of several sections: Security Services, SAML Settings, LDAP Settings, and Kerberos Settings. The Security Services tab is selected. Other tabs shown are accessible only when the corresponding service is enabled on the Security Services tab.
zoomdata.properties file.
Enabling or disabling any of these security services requires a restart of the Self-Service Analytics service. Basically, any time you switch a security feature, the Self-Service Analytics service needs to be restarted before the change takes effect. The following switch status may appear for each of the authentication services: Started, Stopped, Will start or stop on next restart. See Enable or Disable a Security Service.
When working with security authentication services, bear in mind that you cannot use them all at the same time. If you switch a particular security service on, others will become disabled. If you want to use a security service that is disabled, you must switch the running services off and then start the service you want.
Security services compatibility
Use Lightweight Directory Access Protocol (LDAP)
Lightweight Directory Access Protocol (LDAP) is an application protocol used over an IP network to manage and access directory information contained in an organization’s secured network. Self-Service Analytics has been tested and can be used with Active Directory and OpenLDAP directory services. The Self-Service Analytics server can be configured to use one of these LDAP services to authenticate users. When LDAP is enabled, users can log into Self-Service Analytics using their familiar LDAP identity and credentials.LDAP configuration management tasks can be performed by a system admin or a member of the Supervisors group.
User attributes set in regular Self-Service Analytics user definitions via the UI or in LDAP user definitions are encrypted when stored in metadata. To specify the encryption mode, see Encryption.
| Screen Box | Description |
|---|---|
| URL | The LDAP connection string for connecting to the LDAP repository. Connection string is of the following format:
|
| Bind user | User name credential of the service account that (at minimum) has read access to the LDAP repository. |
| Bind password | Password credential for the Bind user (LDAP service account). |
| Search base | Identifies the Distinguished Name (DN) - the location in the LDAP directory tree where to begin queries for registered users in the LDAP directory. |
| Query | LDAP query that will resolve a specific set of users group found in the search base to be imported into Self-Service Analytics. |
| User ID attribute | Identifier attribute for users in LDAP implementation of your organization. The following user ID attributes are supported: UID, CN, sAMAccountname, and userPrincipalName. This attribute will determine how user names will be represented in Self-Service Analytics. |
In this release, when your admin enables the Enhanced Experience user interface, you will see changes to workflows you may have used in previous releases. If you are running an earlier release or your admin has not enabled the new interface, see Use Lightweight Directory Access Protocol (LDAP).
Configure LDAP
Configure LDAP- Log in as a system admin or a member of the Supervisors group.
-
Select Tools > Security from the Administration menu. The security work area opens.
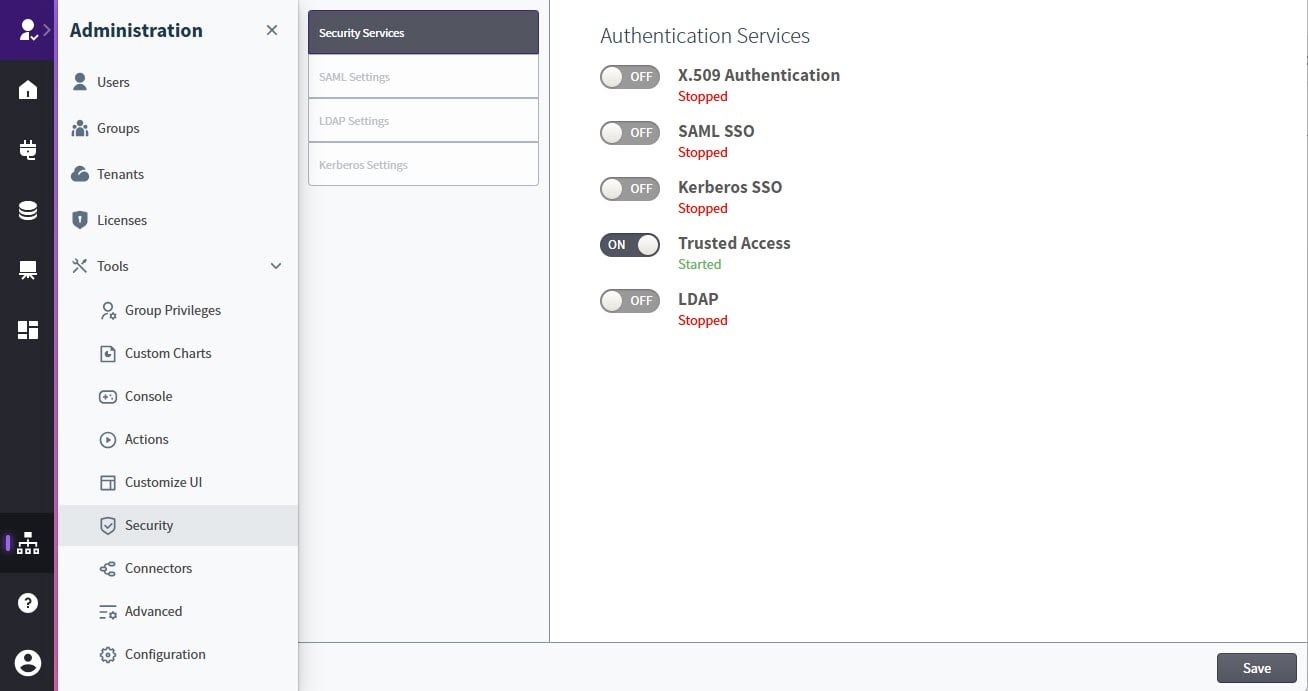
- On the Security Services tab, make sure that the LDAP security service is on. If it is not running, turn it on.
- Select the LDAP Settings tab. The LDAP Settings tab has five sections: General Settings, LDAP Server, User Provisioning, Mappings, and Mappings to Custom User Attributes.
- In the General Settings section, switch the Enable LDAP option on (slide it to the right).
- Enter the LDAP connection URL (DNS or IP address) where the LDAP directory resides.
- Enter the Bind User and Bind Password credentials. The authorized LDAP administrator needs to provide these credentials.
-
Specify the Search Base which is the DN or location in the LDAP directory tree where a search for registered users can begin. An example entry is provided in the text field:
OU=people,DC=zoomdata,DC=local, where:- OU means organizational unit
- DC means domain controller
-
Provide a query string that can run to identify user nodes under the Search Base. An example is provided in the text field:
(objectclass=person). Keep in mind that you can only import individual users into Self-Service Analytics. As a result, your query should be limited to objects that are designated as a “person” or “user.” Use a search engine to look up ‘common LDAP query strings’. - Optionally enable user provisioning, configure mappings and mappings to custom user attributes.
- Manually import users from the LDAP directory. See Manually Importing Users from the LDAP Directory.
-
To use the secure LDAP connection, import the certificate to your local
jrekey store. See Using the Secure LDAP Connection.
Enable User Provisioning
Use the User Provisioning section to enable user provisioning. User provisioning allows you to verify the identity of users that log into Self-Service Analytics against the LDAP directory and automatically create new users in Self-Service Analytics if the user’s credentials have been validated against the LDAP directory. If disabled, you must manually import the users in order to allow them to log into Self-Service Analytics. See Manually Importing Users from the LDAP Directory. When you have enabled the auto provisioning feature, you can select the default account for the provisioned users to be added. The Default Account list contains all the account names, that are available within your Self-Service Analytics instance. If you want the users to be added to one of them, select the corresponding account. Otherwise, select the User Account Mapping option to configure the mappings with LDAP attributes for your users.Configure Mappings
Use the Mappings subtab to define mappings that bind the user attributes from LDAP and Self-Service Analytics.- Select Login Name Mapping attribute from the list that will be used as a user login. There are four User ID Attributes supported: UID, CN, sAMAccountname, and userPrincipalName.
- Account Mapping - select the account to which the user should be added. Account names are case-sensitive.
- Active Account Mapping - select the account to which the user will log in for the first time
- Full Name Mapping
- Email mapping
- If you want to import users and the groups which they are assigned to, in the Group mapping attribute box, type the name of the corresponding column in LDAP.
- If you want Self-Service Analytics to automatically create groups for users if they do not exist in your environment yet, turn on Auto Create Groups (slide the switch to the right). After the credentials are verified, the user groups will be created in Self-Service Analytics and each user will be assigned to the corresponding group.
Manage Mappings to Custom User Attributes
You can associate custom user attributes with a Self-Service Analytics user on the Mappings to Custom User Attributes subtab. Custom user attributes can to store values used for credential pass through. This means that if users have access to a particular data source that has been connected to Self-Service Analytics, their credentials can be saved on this page so that their access privileges are maintained for that source within Self-Service Analytics.Manually Import Users from the LDAP Directory
Manually import users from the LDAP directory to Self-Service Analytics-
Log in as a system admin or a member of the Supervisors group.
The default supervisor user is no longer installed; add users to the Supervisors group instead.
- Navigate to the Users work area.
- Select Import Users. A list of users in the LDAP directory is displayed.
- To import specific users, select them from the list. To import all users, select Select All.
- Select Import.
When a user is imported from Active Directory or if user provisioning is enabled and a new Active Directory user is added, the corresponding Self-Service Analytics user definition is automatically added. However, when a user is removed from Active Directory, the corresponding Self-Service Analytics user definition is not automatically removed. Self-Service Analytics authentication does not occur for the removed user, but you will need to manually remove the Self-Service Analytics user definition. See Delete Users .
Use the Secure LDAP Connection
To use the secure LDAP connection, you need to import the certificate to your localjre key store.
-
Run the following command:
-
Restart Self-Service Analytics after importing the certificate:
Configure Self-Service Analytics to Support SAML
This topic walks you through the steps to configure SAML settings in Self-Service Analytics for SAML Just-in-time (JIT) provisioning. When enabled and configured, the SAML directory can be used as a source for importing and autoprovisioning users in Self-Service Analytics.- Obtain the XML metadata file from your organization’s SAML Identity Provider (IDP).
- Create a Key File using the program.
- Log in as an administrator or member of the Supervisors group and configure the SAML settings in the Security tab.
- Configure the service provider details in your IDP account that you want accessible by Self-Service Analytics.
- Upload Identity Provider Metadata and add key files to Self-Service Analytics.
- Configure the SAML mappings in Self-Service Analytics.
- Customize the Self-Service Analytics Entity ID
- Configure the Auto-Redirect to the IDP
- Use the Network Time Protocol to Synchronize Time (avoids potential failure by the identity provider to authenticate SAML users)
- Implement Single Sign-On (SSO) via SAML
Prerequisites
Obtain Identity Provider Metadata File
To enable Self-Service Analytics to support your organization’s identity provider, first obtain the metadata content from your IDP and upload into Self-Service Analytics. Your Security Administrator responsible for managing IDPs can provide this file. Save this metadata file to your local hard drive for uploading into Self-Service Analytics. Refer to the configuration instructions provided below. ACTION: Obtain the XML metadata file from your organization’s IDP.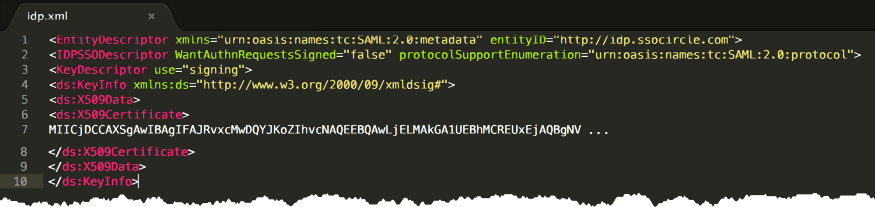
Generate a Key File and Configuring SAML with SSL
The key file helps you manage a keystore of cryptographic keys and trusted certificates. Generate the key file using the keytool program available from Oracle. After generating a key file, you are able to import your SSL certificate into the keystore. Private keys that are used to digitally sign SAML messages along with any SSL/TLS certificates need to be imported into this keystore. After installing the keytool program, take the following steps:-
Run the following command to generate your key:
- Replace
<localhost>with a unique alias (or name) for your key. This name is used (in the Key box) when you set up SAML in Self-Service Analytics. - Replace
<mykeystore>with a unique name for your keystore file. This is the file that is uploaded into Self-Service Analytics. - The validity flag sets the expiration for the certificate for this key. This value can be changed accordingly based on how long your key is valid before expiring.
- Replace
-
At the prompt, create the keystore password (
<yourKeyStorePassword>) and press Enter. -
For the next prompt, create a key password (
<yourKeyPassword)>) and press Enter. -
Enter the following command to import your SSL certificate (valid x.509) into the keystore:
- Replace
<yourAliasName>with a unique name for your certificate. - Replace
<yourcertr.cer>with the name of your SSL certificate. - Replace
<mykeystore>with the keystore filename that you created in Step 1 above.
- Replace
Step-By-Step Configuration Instructions
Access Self-Service Analytics and take the following steps to configure SAML Settings:- Log in as an administrator or a member of the Supervisors group.
- Select Tools > Security from the Administration menu. On the Security Services tab, make sure that the SAML SSO service is running. Otherwise, enable it, save your changes, and restart Self-Service Analytics for the changes to take effect. For more information, see Enable or Disable a Security Service.
- Select the SAML Settings tab.
- In the General Settings section enable SAML.
- Select Upload Identity Provider Metadata to upload the identity provider’s (IDP) metadata file into Self-Service Analytics.
-
Specify the base URL to your Self-Service Analytics Server that users will be logging into via SSO. It must be in the following format:
If the base URL is changed after saving these SAML settings, update this value and then reboot Self-Service Analytics before downloading the metadata file.
- Select Add Key File to upload the key file (that you generated from the Keytool program).
-
Enter the following information in the screen boxes:
- Key (alias): the unique alias you created for the Key (for example, we used
localhost) - Key Pass (word): your
(yourKeyPassword) - Key Store Pass (word): your
(yourKeyStorePassword)
- Key (alias): the unique alias you created for the Key (for example, we used
-
Return to your IDP account and configure the service provider information to allow Self-Service Analytics access to the following attributes:
- Required attribute: Username
- Optional Attributes: Groups, Account, Active account, Email, Full Name
- In the Default Account list, select the default account to which new users should be added if no account mapping attribute is specified.
- In the Account Mapping box, specify the SAML attribute that contains the comma separated list of Self-Service Analytics accounts associated with the user to be imported into Self-Service Analytics.
- In the Active Account Mapping box, specify the SAML attribute that contains the name of the default Self-Service Analytics account for the user.
- In the Login Name Mapping box, specify the name of the attribute that contains user logins (as established in your IDP account). This value is required so that users can be imported into and given access to Self-Service Analytics. The imported values will be used as login names for Self-Service Analytics users.
- In the Full Name Mapping box, specify the name of the SAML attribute containing users’ full names.
- In the Email Mapping box, specify the name of the SAML attribute containing users’ emails.
- In the Group Mapping box, specify the name of the SAML attribute containing the multivalue list of group names identifying user memberships.
-
If you want Self-Service Analytics to automatically create groups for users if they do not exist in your environment yet, turn the Auto Create Groups on (slide the switch to the right).
By default, groups created in Self-Service Analytics via SAML do not have any permissions or access to data sources. The Self-Service Analytics Administrator must manually assign privileges to the group.
The Group, Email, Account, Active Account, and Full Name Mapping values are optional. Use these values if you are looking to automate the setup of user and group attributes in Self-Service Analytics. For information about the mapping options, see Implement Single Sign-On (SSO) via SAML.If using ADFS, make sure to add this attribute specified in the Username Mapping box as a claim rule name in ADFS. Otherwise, this attribute is not sent by the identity provider and causes the SAML login to fail. For more information, refer to Issue #4 in our commonly reported SAML issues.
- Select Save.
- After you have set up all the necessary information on the Self-Service Analytics SAML Settings page and saved the configuration, the last step is to have Self-Service Analytics generate the metadata file that is imported into your organization’s IDP. Download the metadata file by selecting the corresponding button. The metadata file is an XML file that you upload to your IDP. Successfully enabling SSO in Self-Service Analytics results in a change to the login screen.
- If you have already configured the SAML configuration and have made changes to the keystore, restart the Self-Service Analytics server for these changes to take effect.
Mapping to Custom User Attribute
You can store additional attribute mappings that may be available in your IDP’s SAML Assertions file (for example, Address, City, State and Zip Code). To add a custom user attribute, select the corresponding button. Specify the custom user attribute and SAML attribute in the corresponding boxes.- SAML Attribute- the name of the user attribute in the SAML provider
- Custom User Attribute - the name of the attribute Self-Service Analytics displays
- Usage - how the name appears to the user
- Secure - if you want to encrypt specific custom attribute mappings, select this checkbox
Optional Configurations
See also Implement Single Sign-On (SSO) via SAML.Configure SAML Behind a Load Balancer
You need to configure the settings to work with Self-Service Analytics using SAML if there is unencrypted communication between the proxy and back-end servers and the load balancer is configured to use SSL. The default configuration parameters are as follows:https://<myserver.com>/composer, configure the settings in the zoomdata.properties file as described below:
Customize the Self-Service Analytics Entity ID
If your identity provider already contains a service provider using the entity ID ‘zoomdata’, you can create a unique entity ID for Self-Service Analytics. Also, this is applicable if you have two or more separate Self-Service Analytics instances and your IDP requires unique instance identifiers. To do this, you create an alias in thezoomdata.properties file using:
zoomdata.properties file, see Configuration Property Files.
Configure the Auto-Redirect to the IDP
SAML can be configured to automatically redirect to the identity provider without prompting you with the Self-Service Analytics login. To configure this, edit thezoomdata.properties file and add the following parameter:
<your_URL>/composer/login.
For guidance on accessing and editing the zoomdata.properties file, see Configuration Property Files.
Troubleshooting
For basic SAML troubleshooting, see Implement Single Sign-On (SSO) via SAML. If additional assistance is needed, reach out to our Technical Support team.Implement Single Sign-On (SSO) via SAML
Self-Service Analytics supports single sign-on (SSO) using the Security Assertion Markup Language (SAML), a secure, XML-based communication standard for authenticating identities between organizations. SAML eliminates the need for a user to create and maintain multiple authentication credentials (that is, passwords) for different websites. Instead, by leveraging SAML, a user authenticates one time using a secure site (known as the ‘Identity Provider’ or ‘IDP’) that then authorizes access to different applications and services that is linked to the user. Key points to implementing SAML SSO in an organization’s operating environment:- Service Providers must subscribe to an IDP service (or implement one internally) and complete a set up process. Since there are many IDPs options, service providers may subscribe to more than one service for the convenience of their users.
- Users need to complete a registration process to be added to your organization’s secured directory including the selection of authentication methods offered by your organization.
- New applications and programs (such as Self-Service Analytics) must be integrated into your organization’s existing security protocols.
- Authentication approval from the IDP is limited to a single use and there is a time limit for access.
Prepare to Integrate Self-Service Analytics into Your SAML-Enabled Network
If your organization already has SAML SSO integrated into the operating environment, Self-Service Analytics can be added to your list of secured applications and programs. This software supports the SAML 2.0 security protocol, and provides the following security functionality using SAML: (1) user authentication, (2) group mappings, and (3) account level synchronization of users and groups in Self-Service Analytics. Your organization’s Security Administrator or IT Manager responsible for network security may need to be involved if your Self-Service Analytics Administrator does not have account access to your IDP.Self-Service Analytics can only support one IDP account. If your organization uses multiple IDP accounts, select one to connect with Self-Service Analytics.
Self-Service Analytics supplies two default users you can use to log into Self-Service Analytics: admin and supervisor. You must log in as the supervisor to access the SAML configuration page. See Supplied Users and User Groups.
- IDP account should support SAML 2.0: Your organization’s IDP needs to support SAML 2.0 in order to successfully add Self-Service Analytics.
- Default Account section: users can be auto-provisioned to a specific account.
-
Importing users and groups from the IDP into Self-Service Analytics: there are two scenarios to consider for importing users and groups:
- If the user or group profile does not already exist in Self-Service Analytics, they are created the first time that a user logs into Self-Service Analytics. In this case, the profile contains no access privileges and the Self-Service Analytics Administrator needs to set up these profiles.
- If the user or group profile already exist in Self-Service Analytics, the names must be an exact match in order for the IDP profile information to populate the corresponding Self-Service Analytics accounts. For example, if the username “johndoe” is stored in the IDP, the exact same username should be in Self-Service Analytics.
Basic SAML Troubleshooting
When troubleshooting SAML configuration or login issues, be sure to enable DEBUG mode for the SAML module. DEBUG mode allows for additional logging and more detailed error messages to be captured in thezoomdata.log file (located in /opt/zoomdata/logs ) that is useful for troubleshooting purposes. To enable DEBUG mode, enter the following cURL command:
<admin> and <password> with the credentials for the Self-Service Analytics admin user. Similarly, please make sure that your URL contains the appropriate <hostname> (or IP address) and <port> of your Self-Service Analytics environment. This should be similar to the hostname (or IP address) and port specified in your browser.
Commonly Reported Issues
Issue #1: Warning Message During IDP Redirection
Summary: User sees the following warning message during redirection to the IDP (Identity Provider):Issue #2: Connection Error
Summary: User is encountering an error connecting to SAML And notices the following error message in the Self-Service Analytics log files:/etc/zoomdata directory):
Issue #3: Error Validating SAML Message on Self-Service Analytics Home Page
Summary: After following the steps to configure SAML in Self-Service Analytics and successfully connecting to the SAML IDP (e.g. ADFS) login page, the user may still encounter a “Error validating SAML message” error message on the Self-Service Analytics Home page after logging in via SAML. When looking in the zoomdata.log/zoomdata-error.log files, the user might see the following error messages:Issue #4: Error Validating SAML Message (continued)
Summary: User continues to encounter the “Error Validating SAML message” error after entering credentials through their ADFS login page. They also see the following error messages in the zoomdata.log file:- Add NameID as a “Claim rule name”.
- Choose “Active Directory” as the Attribute store.
- Choose “SAMAccount-Name” as the LDAP attribute and “Name ID” as “Outgoing claim type”.
- Finish the wizard and confirm the claim rules window.
-
Verify that the Self-Service Analytics SAML settings on the Security tab when logged in as a member of the Supervisors group, have this attribute (in this example, NameID) specified correctly under the “Username Mapping” parameter.
In ADFS 3.0, you may need to configure this attribute (e.g. “NameID”) as a “Pass Through claim.”