
- hardware or software failures due to excessive resource use or other events
- software upgrades or updates
- Load balancing: Load balancing helps you scale Self-Service Analytics for hundreds of users. You can use load balancing both on-premises and with cloud deployments. A single set of microservices communicate with each other in a monolithic flow. For more information, see Configure the Self-Service Analytics Server Behind a Load Balancer.
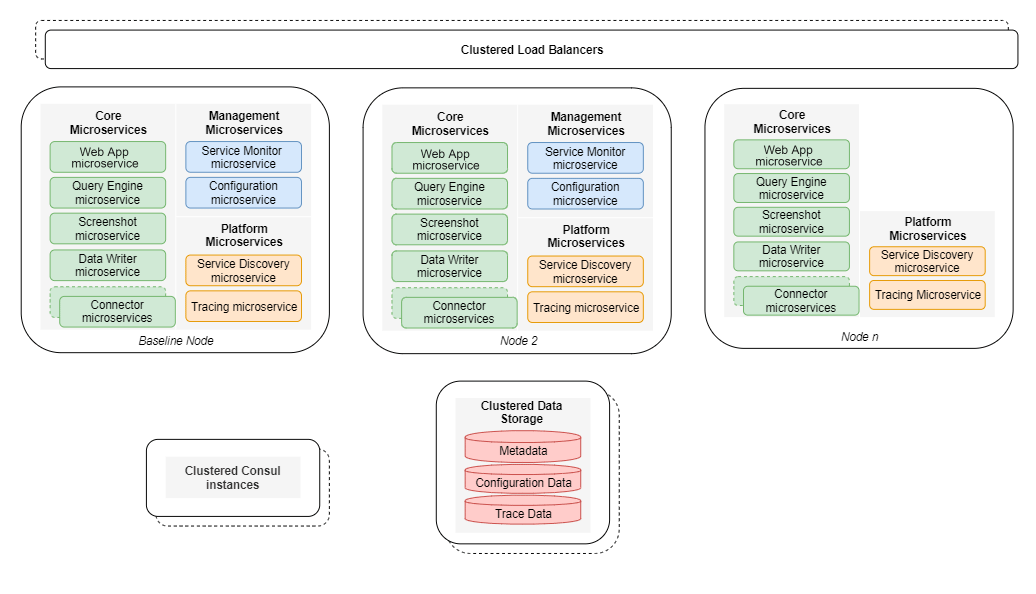
- High Availability: A high availability environment includes multiple Self-Service Analytics nodes, each with its own set of microservices. This ensures that a microservice is available at all times, somewhere in the cluster. Each microservice communicates with others using service discovery. Different numbers of different types of microservices can be defined for the Self-Service Analytics nodes, although at least two of each must be installed. A high-availability load balancer is required to distribute the network traffic across your user-facing Self-Service Analytics nodes. If only a single load balancer is deployed in a high availability environment, you will not be able to access any of the Self-Service Analytics nodes behind it if the load balancer should fail. Microservice load balancing and failover occur automatically within the Self-Service Analytics nodes themselves. For more information, see Configure a High Availability Environment.
config-server-upload.jar utility is provided that can be used to migrate the microservice properties from your standalone Self-Service Analytics servers to the Self-Service Analytics configuration data in the high availability PostgreSQL data store, where the configuration microservice can maintain them. For more information see Migrate Properties to the Configuration Server.
Configure a Distributed Self-Service Analytics Environment
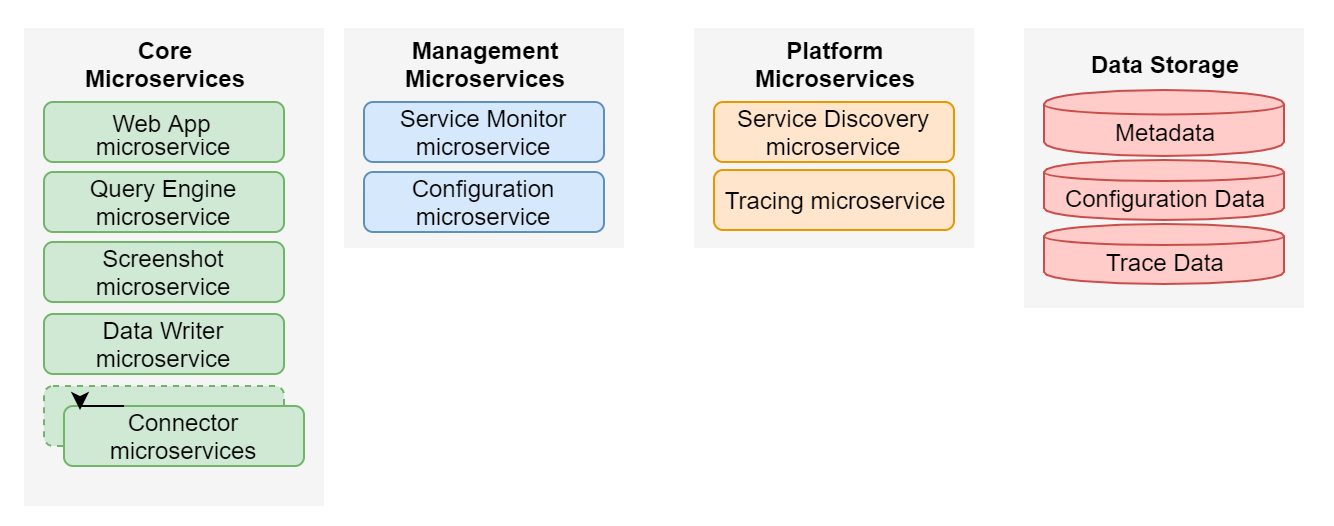
The Self-Service Analytics uses independent Java microservices so you can set up a distributed, load-balanced, or high-availability environment tailored to your needs. Here’s how they’re organized for you to plan with when considering application availability:- Core microservices - application components of Self-Service Analytics. These services provide key functionality in the application.
- Platform microservices - services that facilitate the operation and coordination between core microservices.
- Management microservices - services that provide views and controls for administration and troubleshooting of core microservices.
- Load Balancing: Load balancing helps you scale Self-Service Analytics for hundreds of users. You can use load balancing both on-premises and with cloud deployments. A single set of microservices communicate with each other in a monolithic flow. For more information, see Configure the Self-Service Analytics Server Behind a Load Balancer.
- High Availability: A high availability environment includes multiple Self-Service Analytics nodes, each with its own set of microservices. This ensures that a microservice is available at all times, somewhere in the cluster. Each microservice communicates with others using service discovery. Different numbers of different types of microservices can be defined for the Self-Service Analytics nodes, although at least two of each must be installed. A high-availability load balancer is required to distribute the network traffic across your user-facing Self-Service Analytics nodes. If only a single load balancer is deployed in a high availability environment, you will not be able to access any of the Self-Service Analytics nodes behind it if the load balancer should fail. Microservice load balancing and failover occur automatically within the Self-Service Analytics nodes themselves. For more information, see Configure a High Availability Environment.
Configure a High Availability Environment
A high availability environment includes multiple Self-Service Analytics nodes, each with its own set of microservices. This ensures that a microservice is available at all times, somewhere in the cluster. A high-availability load balancer is required to distribute the network traffic across your user-facing nodes. If only a single load balancer is deployed in a high availability environment, you will not be able to access any of the Self-Service Analytics nodes behind it if the load balancer should fail. Microservice load balancing and failover occur automatically within the nodes themselves. Different numbers of different types of microservices can be defined for the Self-Service Analytics nodes, although at least two of each must be installed. You can monitor all microservices and collect diagnostic trace information for them using the Service Monitor in conjunction with your distributed tracing services. You can maintain properties for microservices of a given type in a single location in the Service Monitor. For example, if you have two query engine microservices running in your high availability environment, you can change the properties for both microservices in a single location, ensuring that the query engine microservices operate in the same manner across the product nodes. In addition:- At least one configuration server (
config-server) must be installed and started in the high availability environment. - Only one Service Monitor (
admin-server) should be installed and started in the high availability environment. The Service Monitor is not required, but is helpful. - The Consul’s UI is available through port 8500 and is a lighter alternative to the Service Monitor. To ensure there is no single point of failure, Self-Service Analytics recommends that the Consul instance (
zoomdata-consul) and the PostgreSQL metadata repository be configured as clusters external to the Self-Service Analytics nodes. For information, see https://www.consul.io/commands/join (zoomdata-consul join <ip-address>) and https://www.postgresql.org/docs/12/high-availability.html. - Intra-service communication must be enabled by making any necessary networking (ports) and firewall changes.
Self-Service Analytics’s microservice architecture supports client-side load balancing for all microservices except Composer Web.
- If the metadata store has already been installed, identify its host name and port. Then follow the steps for upgrading a distributed environment. See Upgrade a Self-Service Analytics Distributed Environment.
-
If the metadata store has not already been installed, manually install it now. Complete the following sub-steps. Then identify its host name and port.
-
Set up the Metadata Store - Necessary for all installations.
The instructions to set up PostgreSQL as Self-Service Analytics’s metadata store differ depending on the Linux operating system used by the target server. Select a topic below:
PostgreSQL Setup for CentOS Environments
New installations of Self-Service Analytics use PostgreSQL 16. If you are upgrading your environment, you can retain your existing PostgreSQL version.-
Add the PostgreSQL Yum repository to CentOS by running this command calling the appropriate PostgreSQL version:
-
Install the PostgreSQL client and server packages by running these commands:
-
After installation, initialize the PostgreSQL database:
-
Start and enable the PostgreSQLmicroservice:
-
Confirm that the service started without errors:
If necessary, start it:
-
If you have a running firewall and remote clients should be able to connect to the PostgreSQL metadata store, modify the firewall to allow the PostgreSQL service:
- If the PostgreSQL database is operating in a cluster, repeat steps 3-6 for each instance of the database.
-
Set up the PostgreSQL Admin user and password:
PostgreSQL Setup for Ubuntu Environments
New installations of Self-Service Analytics use PostgreSQL 16. If you are upgrading your environment, you can retain your existing PostgreSQL version.-
If this is a new server instance, update your current system packages:
A reboot is necessary after an upgrade.
-
Import the GPG key and add the appropriate PostgreSQL version repository to your Ubuntu machine. Run the following commands:
The added repository contains many different packages and third-party add-ons, including:
postgresql-client,postgresql,libpq-dev,postgresql-server-dev, andpgadmin packages. -
Update the package list and install the PostgreSQL server and client packages:
The PostgreSQL microservice is started and will start with every system reboot.
-
If you have a running firewall and remote clients should be able to connect to the PostgreSQL metadata store, modify the firewall to allow the PostgreSQL service port:
-
Test the PostgreSQL connection.
-
During installation, a user named
postgresis created automatically with full superadmin access to your entire PostgreSQL instance. Before you switch to this account, your logged in system user should have sudo privileges: -
Replace the
postgrespassword with a strong password: -
Start PostgreSQL using this command.
-
Get connection details as shown below.
-
Create a test database called
mytestdbto see if everything is working.You can list the created databases by running: -
Connect to your test database.
-
During installation, a user named
-
Add the PostgreSQL Yum repository to CentOS by running this command calling the appropriate PostgreSQL version:
-
Change Metadata Store Authentication to MD5 — Not necessary when installing a high availability environment in the cloud.
If you installed Self-Service Analytics’s metadata store on a server running CentOS or RedHat, complete the configuration steps below. If the server is running Ubuntu, ignore these instructions.
Change authentication for your metadata store to MD5New installations of Self-Service Analytics use PostgreSQL 16. If you are upgrading your environment, you can retain your existing PostgreSQL version.
-
Edit the
pg_hba.conffile for the appropriate version of PosgreSQL. -
Change METHOD to MD5.
-
Restart PostgreSQL. In CentOS environments, run:
-
Edit the
-
Configure the Metadata Store for SSL - Not necessary if installing a high availability environment in the cloud.
If you have specified SSL connections for the metadata store JDBC connections in
zoomdata.propertiesfile, the root CA certificate that is used for the PostgreSQL database must be added to the/opt/zoomdata/.postgresqldirectory. This directory does not exist by default and will need to be created. Complete the following steps.-
Change to the
/opt/zoomdatadirectory as a superuser: -
Create a
.postgresqlsubdirectory. -
Copy the root CA certificate for the PostgreSQL database into the new directory:
-
Change to the
-
Configure the Metadata Store for a Distributed Environment - Not necessary if installing a high availability environment in the cloud.
The PostgreSQL data store must be configured so it is available to all Self-Service Analytics instances in a distributed environment. For more information about PostgreSQL high availability clustering, see PostgreSQL documentation on high availability environments.
Configure the PostgreSQL data store so it is available to all instancesNew installations of Self-Service Analytics use PostgreSQL 16. If you are upgrading your environment, you can retain your existing PostgreSQL version.
-
Edit the
postgresql.conffile using the appropriate version and paths: -
Set the following property in
postgresql.confand save the file. -
Edit the
pg_hba.conf file: -
Add the following to the
pg_hba.conf file: -
Save the
pg_hba.conffile. -
Restart the PostgreSQL service:
-
Edit the
-
Create user and Database - Not necessary if installing a high availability environment in the cloud.
The PostgreSQL data store must be configured so it is available to all instances in a distributed environment. For more information about PostgreSQL high availability clustering, see https://www.postgresql.org/docs/12/high-availability.html.
Create users and databases in the PostgreSQL data store so they are available to all Self-Service Analytics instances
-
Set up the Metadata Store - Necessary for all installations.
The instructions to set up PostgreSQL as Self-Service Analytics’s metadata store differ depending on the Linux operating system used by the target server. Select a topic below:
-
For each instance, run the following commands to set up the environment variables for the installation:
where:
<postgres-host>and<postgres-port>are the host name and port number of the Self-Service Analytics PostgreSQl metadata store<postgres-db-username>and<postgres-db-password>are the user name and password required to access the Self-Service Analytics PostgreSQL metadata store.
-
In high availability (HA) environments only, run the following commands for each instance to set up the environment variables for the Consul configuration:
where
<instance_ip>is the IP address of the Self-Service Analytics instance. -
In each instance, run the following command to set up the environment variables for specific enterprise data connector (EDC) packages:
where
<edc>is the name of the data connector you would like to install. You must install the PostgreSQL connector because it connects to the metadata store. Data connector names are the same as their connector microservice names without thezoomdata-edc-prefix. See Data Connector Reference. -
Run the bootstrap installation script after exporting the environment variables in the previous steps.
where
<v.r>is the Self-Service Analytics version and release. -
After the installation, ensure that the following property files are correctly set up on each node. Add or update the properties as necessary. In each, the IP address, port, user name, and password of the PostgreSQL metadata store should be specified.
In the
zoomdata.propertiesfile:In thequery-engine.propertiesfile: -
Ensure that port 8080 is open on all your back-end servers to support load balancing. If not, run the following command:
- Repeat these steps for every Self-Service Analytics instance (node) in your Self-Service Analytics cluster. For additional information on how many nodes to deploy in a high availability environment, see Determine How Many Nodes to Deploy.
-
On your machine, run the following command to install HAProxy:
-
Navigate to the HAProxy folder.
-
Create a certificate or copy an existing certificate to the
/etc/haproxyfolder. If you need to create a certificate, run the following commands: -
In the same folder, replace the contents of the
haproxy.cfgfile with the contents of the Self-Service Analytics haproxy configuration file. In the file, replace the<node1-ip>and<node2-ip>with the IP addresses of your servers. If you have more than two servers, add additional lines for each server. - Save your changes and exit the file.
-
Start the HAProxy microservice
-
Use the following command to configure the HAProxy microservice to start automatically in CentOS environments:
-
Ensure that port 443 is open on your load balancer. If not, run the following command:
- Install all the individual Consul instances on each node. This happens automatically when you use the bootstrap installation procedure.
- Make sure that a firewall is opened in your environment for ports 8500, 8300, 8301, and 8302 on all hosts that will form the Consul cluster.
-
Edit the Consul custom configuration file
consul.jsonon each node.If you did not install the Consul instances using the bootstrap installation procedure, its custom configuration file might have a different name and location. -
Configure the Consul custom configuration file for each Consul instance so it includes these lines:
The
<node-name>settings for each Consul node should be unique within the cluster. Each Consul instance in the cluster should have a different name. A bind address (bind_addr) and client address (client_addr) of0.0.0.0allow the Consul to listen over all network interfaces. Thebind_addrsetting can be limited to the host’s IP address instead. Thebootstrapsetting should be set totrueon one node in the cluster only. Set it tofalseon all other cluster nodes. For theretry_joinoption, list all the host IP addresses in the cluster. At least one must be listed. If you are using cloud-hosted instances such as AWS or GCE, theretry_joinoption can be changed to something like this (assuming each cluster node is an AWS EC2 instance and has atag_keycalledRolethat is assigned tozoomdata-cluster-node): -
Restart each Consul instance and wait for several seconds for the cluster to form. Then validate the cluster by entering the following command:
The following shows sample output from this command:
- When the Consul cluster has formed correctly, restart all the microservices for the instance. See Restart Microservices.
-
Set Up the Configuration Microservice Metadata Store or Repository
Before you can install and start Self-Service Analytics’s configuration microservice, you must set up a PostgreSQL metastore or a GitHub repository to store Self-Service Analytics property metadata. A separate PostgreSQL database or a separate GitHub repository must be configured.
PostgreSQL Database Setup Notes
If you elect to persist property metadata to a PostgreSQL metastore:-
Configure a separate database and make it accessible to the connection user account:
where
<composer-config>is the name of the PostgreSQL database and<db_username>is the connection user account name. -
Add the following properties to the Self-Service Analytics
config-server.propertiesfile, located in the/etc/zoomdatadirectory:Substitute the connection user account name and password you set up in Step 1 for<db_username>and<db_password>. Substitute the name of the PostgreSQL database for<composer-config>. - Save the properties file. You will restart the configuration microservice when you configure it. See Configure and Start the Configuration Microservice.
GitHub Repository Setup Notes
If you elect to persist property metadata to a GitHub repository:-
Add the following properties to the Self-Service Analytics
config-server.propertiesfile, located in the/etc/zoomdatadirectory:Substitute the repository user account name and password for<repo_username>and<repo_password>. Substitute the URI of the repository for<repo_uri>(for example,https://example.com/my/repo). Additional and advanced configuration information can be found in Spring.io’s documentation. - Save the properties file. You will restart the configuration microservice when you configure it. See Configure and Start the Configuration Microservice.
-
Configure a separate database and make it accessible to the connection user account:
-
Install, Configure, and Start the Configuration Microservice
Install, configure, and start the Self-Service Analytics configuration microservice
- Verify that you have set up a PostgreSQL metastore or a GitHub repository to store the property metadata. See Set Up the Configuration Microservice Metadata Store or Repository.
- Open the SSH client associated with your instance.
-
Configure all installed and enabled microservices to use the configuration microservice. Run the following script:
-
Each microservice supports two configuration properties related to the configuration microservice:
config-server.enabled: Enables or disables integration with the configuration microservice. Valid values aretrue(enable integration) andfalse(disable integration). The default istrue.config-client.retry.max-attempts: Sets the maximum number of attempts that should be made to connect to the configuration microservice. The default is 20. The Self-Service Analytics microservice will fail if the number of attempts to connect to the configuration microservice exceeds this value. This property is useful in situations where the configuration microservice starts with a delay. If your microservice fails while waiting for the configuration microservice and you want to give it more time, increase this value.
-
Install, enable and start the configuration microservice. Enter the following commands:
After starting the configuration microservice with a valid database configuration, the microservice should connect to the database and create a properties table.
-
Restart all the other microservices. Enter the following command:
See also Restart Microservices.
zoomdata-admin-server.
If you are installing Self-Service Analytics in a Windows environment, you can install the Service Monitor as part of running the initial bootstrap script. See Install Self-Service Analytics - Windows and Windows Bootstrap Reference.
- Open your SSH client.
-
Use the following command to install the Self-Service Analytics Service Monitor in a CentOS environment:
Use the following command to install the Self-Service Analytics Service Monitor in an Ubuntu environment:
-
After the Service Monitor is installed, you must specify a user name and password in its properties file. The properties file is called
admin-server.propertiesand can be found in the/etc/zoomdata/directory (Linux) or the<install-path>/conf-modify/directory (Windows). If the properties file is not there, create it. The properties that must be defined are:monitor.user.name=<username>monitor.user.password=<password>
<username>and its associated password for<password>. The user name and password can be any user name and password you want. When you have finished, save the file. -
Add the following properties to the
zoomdata.propertiesfile, located in the/etc/zoomdatadirectory (Linux) or the<install-path>/conf-modify/(Windows). These properties ensure that the Service Monitor has access to the Self-Service Analytics server actuator endpoints.actuator.user.name=<composer-admin-username>actuator.user.password=<composer-pswd>actuator.logging.external-file=<log-file-path>
<composer-admin-username>and<composer-pswd>. If the default Self-Service Analytics log file path is not used for your installation, substitute your custom log file path for<log-file-path>. The default log file path is/opt/zoomdata/logs/zoomdata.logfor Linux and<install-path>/logs/zoomdata.logfor Windows.When finished, save the file.Setting these properties exposes valid Self-Service Analytics credentials as plain text in both the properties file and as tags in the Self-Service Analytics Consul. Anyone in your network with the ability to communicate directly with the Consul API or view the Consul UI will be able to see these values. -
Start the microservice. For example, use the following command to start the Self-Service Analytics Service Monitor using
systemdin a CentOS or Ubuntu environment:See also Start Microservices.
- Determine How Many Nodes to Deploy
- Add Nodes to an Existing High Availability Installation
- Remove Nodes from a High Availability Environment
- Migrate Properties to the Configuration Server
Configure Load Balancing in a High Availability Environment
A high availability environment is designed to ensure concurrent users having access to the same microservices at the same time, including the COMPOSER-WEB service. To have a high availability environment, you need to Configure a High Load Environment along with setting up at least two instances of each microservice, including COMPOSER-WEB. These services must be accessible through a Load Balancer.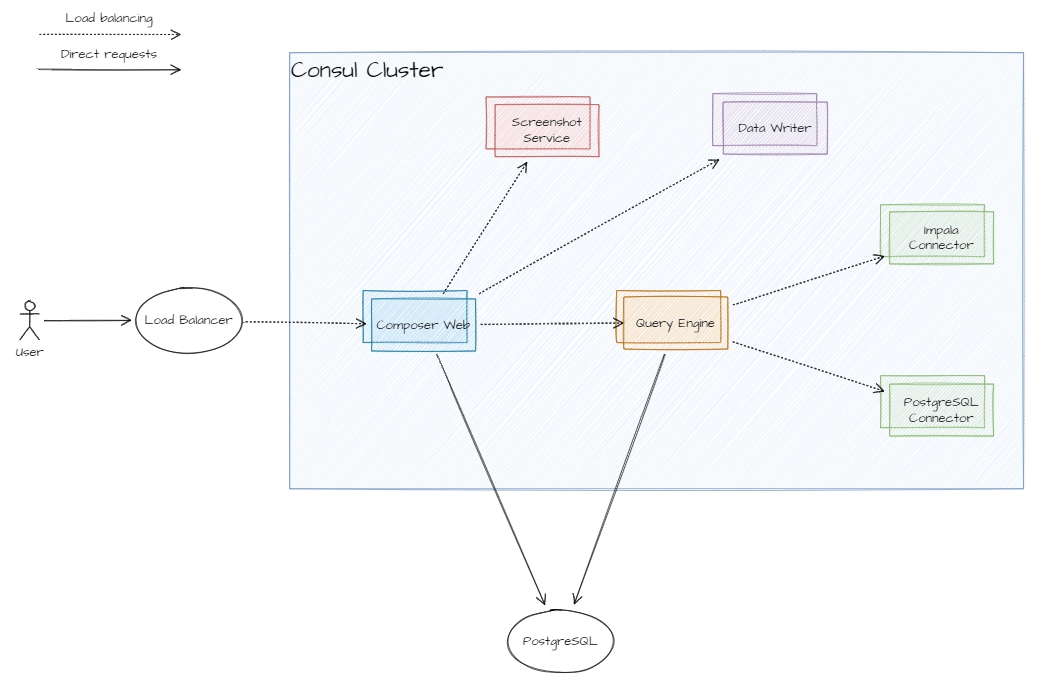
Setting Up Your Load Balancer
The following steps provide an example of setting up HAProxy as a load balancer. Regardless of what kind of load balancer you use, ensure that its port 443 is open. Set up an HAProxy load balancer-
On your machine, run the following command to install HAProxy:
-
Navigate to the HAProxy folder.
-
Create a certificate or copy an existing certificate to the
/etc/haproxyfolder. If you need to create a certificate, run the following commands: -
In the same folder, replace the contents of the
haproxy.cfgfile with the contents of the Self-Service Analytics haproxy configuration file. In the file, replace the<node1-ip>and<node2-ip>with the IP addresses of your servers. If you have more than two servers, add additional lines for each server. - Save your changes and exit the file.
-
Start the HAProxy microservice.
-
Use the following command to configure the HAProxy microservice to start automatically in CentOS environments:
-
Ensure that port 443 is open on your load balancer. If not, run the following command:
Determine How Many Nodes to Deploy
To effectively implement high availability in your Self-Service Analytics environment, at least two nodes, each containing the following microservices, are required.- Web App microservice
- Query Engine microservice
- Data Writer microservice
- Appropriate connector microservices for your installation
- Configuration microservice
Add Nodes to an Existing High Availability Installation
Add Self-Service Analytics nodes (or instances) to an existing high availability environment- If not already installed, install the Self-Service Analytics instance as though it were a single instance (and not running in a high availability environment). See Install Self-Service Analytics - Linux.
-
Edit the
zoomdata.propertiesandquery-engine.propertiesfiles and ensure that the JDBC settings point to the PostgreSQL data store shared by the entire Self-Service Analytics cluster. Also ensure that the user name and password used to access the PostgreSQL data store are correct in these files. For information about the shared PostgreSQL data store, see Configure a High Availability Environment. -
Edit the
consul.jsonfile on the instance you are adding. -
Verify the
consul.jsonfile looks like this:A bind address (bind_addr) and client address (client_addr) of0.0.0.0allow the Consul to listen over all network interfaces. Depending on your network setup, you may want to explicitly specify an IP address for this. Thebootstrap_expectvalue is the total number of Self-Service Analytics nodes (instances) in your Self-Service Analytics cluster and must be the same value on every instance in the cluster. - Restart all the Self-Service Analytics microservices for the instance. See Restart Microservices.
-
Join each instance to the Consul cluster by running this command:
You can verify that the node has joined the Consul cluster by running this command:
Remove Nodes from a High Availability Environment
Remove Self-Service Analytics nodes (or instances) from a high availability environment-
Run the following command on the instance:
where
<external-Consul-node-IP>is the IP address of the Consul used by the high availability environment. -
If the instance you are removing will be run standalone, edit the
zoomdata.properties``and query-engine.propertiesfiles to point at a local PostgreSQL data store for that instance. Ensure that the JDBC settings point to the local PostgreSQL and that the user name and password used to access the local PostgreSQL data store are correct in these files. After changing the settings, restart all the Self-Service Analytics microservices for the instance. See Restart Microservices. If the instance you are removing will not be used at all, you can skip this step. -
Edit the
consul.jsonfile on all the remaining Self-Service Analytics instances in your high availability environment. -
Reduce the value specified for the
bootstrap_expectsetting by one. This value is the total number of Self-Service Analytics nodes (instances) in your Self-Service Analytics cluster and must be the same value on every instance in the cluster. -
Restart the
zoomdata-consulmicroservice on every Self-Service Analytics instance in the cluster to ensure they all pic up the node count change.
Add a New Node to Existing Self-Service Analytics Multi-Node Deployments
Environment Prerequisites
-
You must have previously configured your Self-Service Analytics multi-node deployment.
zoomdata-consulandpostgresql, configured as clusters external to the nodes, must be configured to accept incoming connections.- See https://www.consul.io/commands/join (
zoomdata-consul join <ip-address>). - See https://www.postgresql.org/docs/12/high-availability.html.
- See https://www.consul.io/commands/join (
- You must have Linux machines where additional Self-Service Analytics components will be installed.
Node Installation and Configuration
Each process described here must be performed on each additional node of your Self-Service Analytics multi-node deployment.Install A Java 21 Distribution (26.3 and later)
Supported options include:- Oracle: download here (https://www.oracle.com/java/technologies/downloads/#java21)
- OpenJDK: download here (https://openjdk.org/projects/jdk/21/)
- AWS Corretto: download here (https://docs.aws.amazon.com/corretto/latest/corretto-21-ug/downloads-list.html)
Add an OS Package Repository
you will need to include an OS package repository of your version of Self-Service Analytics. CentOS/RHEL/etc/yum.repos.d/zoomdata.repo
<COMPOSER-VERSION must be replaced by the same trunk version (such as 25.4 or 26.3) as your other Self-Service Analytics cluster nodes are equipped with. RHEL-RELEASE must be replaced by the supported version of CentOS/RHEL./etc/apt/sources.list.d/zoomdata.list
<COMPOSER-VERSION must be replaced by the same trunk version (such as 26.3) as your other Self-Service Analytics cluster nodes are equipped with. UBUNTU-CODENAME must be replaced by one of the supported versions of Ubuntu.Install the zoomdata-consul Package
This allows the cluster node to communicate in Service Discovery with other cluster nodes.
CentOS/RHEL
Configure the Zoomdata Consul Package
Configure the Zoomdata Consul package to be a part of the existing cluster.- Stop the
zoomdata-consulservice if it is running. - Edit the
/etc/zoomdata/consul.jsonfile and add: - Start the
zoomdata-consulservice. Check if it joined the cluster:/opt/zoomdata/bin/zoomdata-consul members
Install Self-Service Analytics Components
Install the subset of Self-Service Analytics components required by the role of each node you’re adding.COMPOSER-WEB (
zoomdata) and Self-Service Analytics Query Engine (zoomdata-query-engine) require extra configuration to use the shared metadata storage you configured.- RHEL/CentOS
- Ubuntu
Validation
-
Ensure
zoomdata-consulservice, and other zoomdata services are running and not in a failed state. -
Check that the Consul cluster formed successfully. It should show all nodes, including the node or nodes you just added.
-
Check the logs to troubleshoot any issues you may have.
Migrate Properties to the Configuration Server
If you have the configuration microservice configured and running in a high availability environment, you can maintain properties for microservices of a given type in a single location in the Service Monitor. For example, if you have two query engine microservices running in your high availability environment, you can change the properties for both microservices in a single location, ensuring that the query engine microservices operate in the same manner across the product nodes. See Maintain Application Properties and Configure and Start the Configuration Microservice for information about the configuration microservice. A utility is provided that can be used to migrate the microservice properties from your standalone Self-Service Analytics server to the Self-Service Analytics configuration data in the high availability PostgreSQL data store, where the configuration microservice can maintain them. The utility is located in the zoomdata tarball at…/scripts/zoomdata/config-server-upload.jar.
Run this utility using the following syntax:
<service> is the microservice name, <properties-file> is the fully qualified file name of the properties file you want to migrate, and <config-service-url> is the URL of the configuration microservice (usually http://localhost:8888/api/environment).
The following example migrates the properties from /etc/zoomdata/zoomdata.properties for the Self-Service Analytics microservice to the configuration data in the high availability PostgreSQL data store at the URL http://localhost:8888/api/environment:
In high availability environments, you will need to run this utility for every type of microservice in the environment to ensure that you can maintain the properties for all microservices in the Service Monitor.
Configure a High Load Environment
A high load environment should be able to handle hundreds of concurrent users. One of the simplest solutions is to dedicate powerful machines to our microservices, but it’s cost-inefficient and hardly scalable. Self-Service Analytics has a microservice architecture and supports client-side load balancing for all microservices except COMPOSER-WEB. It enables you to deploy several instances of the same microservice on smaller machines and get a performance gain. You are also able to scale each microservice independently according to the type of load your system receives.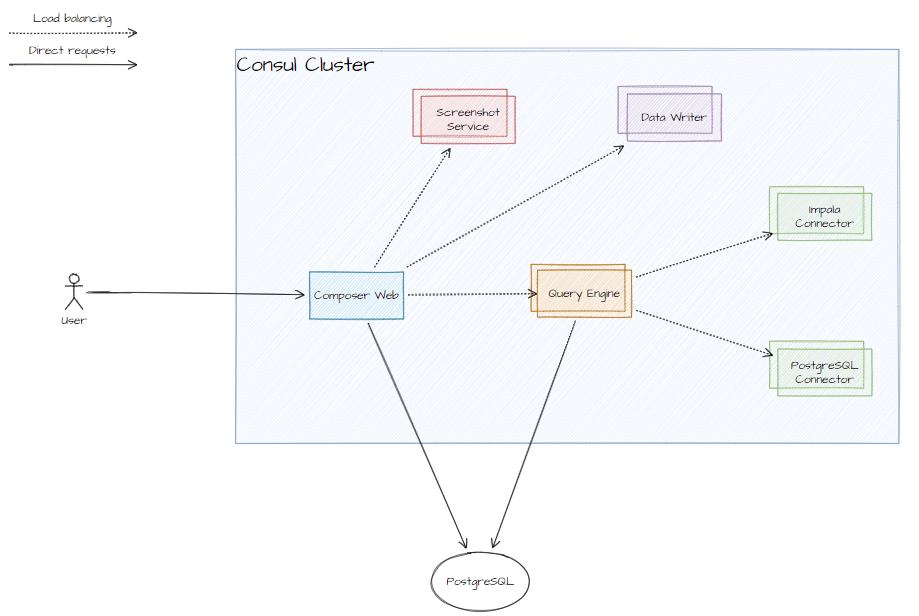
Install PostgreSQL
When setting up your distributed environment, you need to determine if a metadata store is already installed in your environment. If you have already installed Self-Service Analytics and are now setting up a distributed environment, your metadata store may be installed with your existing Self-Service Analytics instance or instances. If this is the first time you’re installing Self-Service Analytics, and you want to set up a distributed environment, you must set up a new metadata store.- Set Up the PostgreSQL Metadata Store
- Change Metadata Store Authentication to MD5
- Create the Metadata Store User & Stores
- Configure the Metadata Store for SSL
- Configure the Metadata Store for a Distributed Environment
Configure the Metadata Store for a Distributed Environment
Configure the Metadata Store for a Distributed Environment All Self-Service Analytics installations require a Postgres metadata store. If you install Self-Service Analytics on a single server using the supplied bootstrap installation script, this metadata store is installed for you. If you install Self-Service Analytics manually, you must also manually set up the metadata store. The metadata store should be centrally installed, accessible by all Self-Service Analytics nodes. In a high availability environment, it can be clustered. When setting up a distributed environment, you need to determine whether the metadata store is installed. If you have already installed Self-Service Analytics and are now trying to set up a distributed environment, there is a good chance that the metadata store was installed with your existing Self-Service Analytics instance or instances. If this is the first time you have installed Self-Service Analytics, and you want to set up a distributed environment, a new metadata store is required.- If the metadata store has already been installed, identify its host name and port. Then follow the steps for upgrading a distributed environment. See Upgrade a Self-Service Analytics Distributed Environment.
-
If the metadata store has not already been installed, manually install it now. Complete the following sub-steps. Then identify its host name and port.
-
Set up the Metadata Store - Necessary for all installations.
The instructions to set up PostgreSQL as Self-Service Analytics’s metadata store differ depending on the Linux operating system used by the target server. Select a topic below:
PostgreSQL Setup for CentOS Environments
New installations of Self-Service Analytics use PostgreSQL 16. If you are upgrading your environment, you can retain your existing PostgreSQL version.-
Add the PostgreSQL Yum repository to CentOS by running this command calling the appropriate PostgreSQL version:
-
Install the PostgreSQL client and server packages by running these commands:
-
After installation, initialize the PostgreSQL database:
-
Start and enable the PostgreSQLmicroservice:
-
Confirm that the service started without errors:
If necessary, start it:
-
If you have a running firewall and remote clients should be able to connect to the PostgreSQL metadata store, modify the firewall to allow the PostgreSQL service:
- If the PostgreSQL database is operating in a cluster, repeat steps 3-6 for each instance of the database.
-
Set up the PostgreSQL Admin user and password:
PostgreSQL Setup for Ubuntu Environments
New installations of Self-Service Analytics use PostgreSQL 16. If you are upgrading your environment, you can retain your existing PostgreSQL version.-
If this is a new server instance, update your current system packages:
A reboot is necessary after an upgrade.
-
Import the GPG key and add the appropriate PostgreSQL version repository to your Ubuntu machine. Run the following commands:
The added repository contains many different packages and third-party add-ons, including:
postgresql-client,postgresql,libpq-dev,postgresql-server-dev, andpgadmin packages. -
Update the package list and install the PostgreSQL server and client packages:
The PostgreSQL microservice is started and will start with every system reboot.
-
If you have a running firewall and remote clients should be able to connect to the PostgreSQL metadata store, modify the firewall to allow the PostgreSQL service port:
-
Test the PostgreSQL connection.
-
During installation, a user named
postgresis created automatically with full superadmin access to your entire PostgreSQL instance. Before you switch to this account, your logged in system user should have sudo privileges: -
Replace the
postgrespassword with a strong password: -
Start PostgreSQL using this command.
-
Get connection details as shown below.
-
Create a test database called
mytestdbto see if everything is working.You can list the created databases by running: -
Connect to your test database.
-
During installation, a user named
-
Add the PostgreSQL Yum repository to CentOS by running this command calling the appropriate PostgreSQL version:
-
Change Metadata Store Authentication to MD5 — Not necessary when installing a high availability environment in the cloud.
If you installed Self-Service Analytics’s metadata store on a server running CentOS or RedHat, complete the configuration steps below. If the server is running Ubuntu, ignore these instructions.
Change authentication for your metadata store to MD5New installations of Self-Service Analytics use PostgreSQL 16. If you are upgrading your environment, you can retain your existing PostgreSQL version.
-
Edit the
pg_hba.conffile for the appropriate version of PosgreSQL. -
Change METHOD to MD5.
-
Restart PostgreSQL. In CentOS environments, run:
-
Edit the
-
Configure the Metadata Store for SSL - Not necessary if installing a high availability environment in the cloud.
If you have specified SSL connections for the metadata store JDBC connections in
zoomdata.propertiesfile, the root CA certificate that is used for the PostgreSQL database must be added to the/opt/zoomdata/.postgresqldirectory. This directory does not exist by default and will need to be created. Complete the following steps.-
Change to the
/opt/zoomdatadirectory as a superuser: -
Create a
.postgresqlsubdirectory. -
Copy the root CA certificate for the PostgreSQL database into the new directory:
-
Change to the
-
Configure the Metadata Store for a Distributed Environment - Not necessary if installing a high availability environment in the cloud.
The PostgreSQL data store must be configured so it is available to all Self-Service Analytics instances in a distributed environment. For more information about PostgreSQL high availability clustering, see PostgreSQL documentation on high availability environments.
Configure the PostgreSQL data store so it is available to all instancesNew installations of Self-Service Analytics use PostgreSQL 16. If you are upgrading your environment, you can retain your existing PostgreSQL version.
-
Edit the
postgresql.conffile using the appropriate version and paths: -
Set the following property in
postgresql.confand save the file. -
Edit the
pg_hba.conf file: -
Add the following to the
pg_hba.conf file: -
Save the
pg_hba.conffile. -
Restart the PostgreSQL service:
-
Edit the
-
Create user and Database - Not necessary if installing a high availability environment in the cloud.
The PostgreSQL data store must be configured so it is available to all instances in a distributed environment. For more information about PostgreSQL high availability clustering, see https://www.postgresql.org/docs/12/high-availability.html.
Create users and databases in the PostgreSQL data store so they are available to all Self-Service Analytics instances
-
Set up the Metadata Store - Necessary for all installations.
The instructions to set up PostgreSQL as Self-Service Analytics’s metadata store differ depending on the Linux operating system used by the target server. Select a topic below:
Install Consul Cluster
Self-Service Analytics requires consul 1.2.2 to discover microservices. We recommend using consul reference deployment with 3 dedicated consul servers, and consul agents on each node that contains a Self-Service Analytics microservice. See the deployment guidelines for more information on installing consul server nodes.Install Microservices
Self-Service Analytics consists of several microservices. In a distributed environment, we recommend installing each microservice on a separate machine with a consul agent. The consul agent should be connected to the consul cluster you installed in a previous step. See the deployment guidelines for more information on installing consul server nodes. We recommend including at least two instances of each microservice except COMPOSER-WEB. Enable intra-service communication by making any necessary networking (ports) and firewall changes. To install a microservice on a machine, see Add a New Node to Existing Self-Service Analytics Multi-Node Deployments.Next Steps
- Scaling Self-Service Analytics Microservices
- Install and Configure the Configuration Microservice on Each Node
- Install and Configure the Service Monitor (Optional)
Install and Configure the Configuration Microservice on Each Node
Install and Configure the Configuration Microservice On Each Node Complete the following steps.-
Set Up the Configuration Microservice Metadata Store or Repository
Before you can install and start Self-Service Analytics’s configuration microservice, you must set up a PostgreSQL metastore or a GitHub repository to store Self-Service Analytics property metadata. A separate PostgreSQL database or a separate GitHub repository must be configured.
PostgreSQL Database Setup Notes
If you elect to persist property metadata to a PostgreSQL metastore:-
Configure a separate database and make it accessible to the connection user account:
where
<composer-config>is the name of the PostgreSQL database and<db_username>is the connection user account name. -
Add the following properties to the Self-Service Analytics
config-server.propertiesfile, located in the/etc/zoomdatadirectory:Substitute the connection user account name and password you set up in Step 1 for<db_username>and<db_password>. Substitute the name of the PostgreSQL database for<composer-config>. - Save the properties file. You will restart the configuration microservice when you configure it. See Configure and Start the Configuration Microservice.
GitHub Repository Setup Notes
If you elect to persist property metadata to a GitHub repository:-
Add the following properties to the Self-Service Analytics
config-server.propertiesfile, located in the/etc/zoomdatadirectory:Substitute the repository user account name and password for<repo_username>and<repo_password>. Substitute the URI of the repository for<repo_uri>(for example,https://example.com/my/repo). Additional and advanced configuration information can be found in Spring.io’s documentation. - Save the properties file. You will restart the configuration microservice when you configure it. See Configure and Start the Configuration Microservice.
-
Configure a separate database and make it accessible to the connection user account:
-
Install, Configure, and Start the Configuration Microservice
Install, configure, and start the Self-Service Analytics configuration microservice
- Verify that you have set up a PostgreSQL metastore or a GitHub repository to store the property metadata. See Set Up the Configuration Microservice Metadata Store or Repository.
- Open the SSH client associated with your instance.
-
Configure all installed and enabled microservices to use the configuration microservice. Run the following script:
-
Each microservice supports two configuration properties related to the configuration microservice:
config-server.enabled: Enables or disables integration with the configuration microservice. Valid values aretrue(enable integration) andfalse(disable integration). The default istrue.config-client.retry.max-attempts: Sets the maximum number of attempts that should be made to connect to the configuration microservice. The default is 20. The Self-Service Analytics microservice will fail if the number of attempts to connect to the configuration microservice exceeds this value. This property is useful in situations where the configuration microservice starts with a delay. If your microservice fails while waiting for the configuration microservice and you want to give it more time, increase this value.
-
Install, enable and start the configuration microservice. Enter the following commands:
After starting the configuration microservice with a valid database configuration, the microservice should connect to the database and create a properties table.
-
Restart all the other microservices. Enter the following command:
See also Restart Microservices.
Install and Configure the Service Monitor (Optional)
Install and Configure the Service Monitor (Optional) The Self-Service Analytics Service Monitor microservice is not installed as part of a default Self-Service Analytics installation. The microservice name iszoomdata-admin-server.
If you are installing Self-Service Analytics in a Windows environment, you can install the Service Monitor as part of running the initial bootstrap script. See Install Self-Service Analytics - Windows and Windows Bootstrap Reference.
- Open your SSH client.
-
Use the following command to install the Self-Service Analytics Service Monitor in a CentOS environment:
Use the following command to install the Self-Service Analytics Service Monitor in an Ubuntu environment:
-
After the Service Monitor is installed, you must specify a user name and password in its properties file. The properties file is called
admin-server.propertiesand can be found in the/etc/zoomdata/directory (Linux) or the<install-path>/conf-modify/directory (Windows). If the properties file is not there, create it. The properties that must be defined are:monitor.user.name=<username>monitor.user.password=<password>
<username>and its associated password for<password>. The user name and password can be any user name and password you want. When you have finished, save the file. -
Add the following properties to the
zoomdata.propertiesfile, located in the/etc/zoomdatadirectory (Linux) or the<install-path>/conf-modify/(Windows). These properties ensure that the Service Monitor has access to the Self-Service Analytics server actuator endpoints.actuator.user.name=<composer-admin-username>actuator.user.password=<composer-pswd>actuator.logging.external-file=<log-file-path>
<composer-admin-username>and<composer-pswd>. If the default Self-Service Analytics log file path is not used for your installation, substitute your custom log file path for<log-file-path>. The default log file path is/opt/zoomdata/logs/zoomdata.logfor Linux and<install-path>/logs/zoomdata.logfor Windows.When finished, save the file.Setting these properties exposes valid Self-Service Analytics credentials as plain text in both the properties file and as tags in the Self-Service Analytics Consul. Anyone in your network with the ability to communicate directly with the Consul API or view the Consul UI will be able to see these values. -
Start the microservice. For example, use the following command to start the Self-Service Analytics Service Monitor using
systemdin a CentOS or Ubuntu environment:See also Start Microservices.
Configure the Self-Service Analytics Server Behind a Load Balancer
Load balancing helps you to scale Self-Service Analytics to hundreds of users. You can use load balancing both on-premises and with cloud deployments, meaning you can use load balancing for various environments. When the server is load balanced within your network environment, it includes native SSL support and can proxy WebSocket traffic. The following diagram depicts a classic load balancing setup.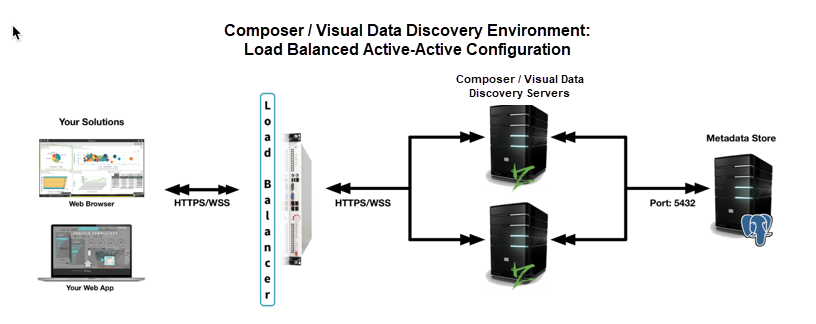
Step 1: Identify or Install the Postgres Metadata Store
Step 1: Identify or Install the Postgres Metadata Store
All Self-Service Analytics installations require a Postgres metadata store. If you install Self-Service Analytics on a single server using the supplied bootstrap installation script, this metadata store is installed for you. If you install Self-Service Analytics manually, you must also manually set up the metadata store.The metadata store should be centrally installed, accessible by all Self-Service Analytics nodes. In a high availability environment, it can be clustered.When setting up a distributed environment, you need to determine whether the metadata store is installed. If you have already installed Self-Service Analytics and are now trying to set up a distributed environment, there is a good chance that the metadata store was installed with your existing Self-Service Analytics instance or instances.If this is the first time you have installed Self-Service Analytics, and you want to set up a distributed environment, a new metadata store is required.
- If the metadata store has already been installed, identify its host name and port. Then follow the steps for upgrading a distributed environment. See Upgrade a Self-Service Analytics Distributed Environment.
-
If the metadata store has not already been installed, manually install it now. Complete the following sub-steps. Then identify its host name and port.
-
Create the Metadata Store User & Stores - Necessary for all installations.
The instructions to set up PostgreSQL as Self-Service Analytics’s metadata store differ depending on the Linux operating system used by the target server. Select a topic below:PostgreSQL Setup for CentOS Environments
New installations of Self-Service Analytics use PostgreSQL 16. If you are upgrading your environment from an earlier version of Composer, you can retain your existing PostgreSQL version.-
Add the PostgreSQL Yum repository to CentOS by running this command calling the appropriate PostgreSQL version:
-
Install the PostgreSQL client and server packages by running these commands:
-
After installation, initialize the PostgreSQL database:
-
Start and enable the PostgreSQLmicroservice:
-
Confirm that the service started without errors:
If necessary, start it:
-
If you have a running firewall and remote clients should be able to connect to the PostgreSQL metadata store, modify the firewall to allow the PostgreSQL service:
- If the PostgreSQL database is operating in a cluster, repeat steps 3-6 for each instance of the database.
-
Set up the PostgreSQL Admin user and password:
PostgreSQL Setup for Ubuntu Environments
New installations of Self-Service Analytics use PostgreSQL 16. If you are upgrading your environment from an earlier version of Composer, you can retain your existing PostgreSQL version.-
If this is a new server instance, update your current system packages:
A reboot is necessary after an upgrade.
-
Import the GPG key and add the appropriate PostgreSQL version repository to your Ubuntu machine. Run the following commands:
The added repository contains many different packages and third-party add-ons, including:
postgresql-client,postgresql,libpq-dev,postgresql-server-dev, andpgadmin packages. -
Update the package list and install the PostgreSQL server and client packages:
The PostgreSQL microservice is started and will start with every system reboot.
-
If you have a running firewall and remote clients should be able to connect to the PostgreSQL metadata store, modify the firewall to allow the PostgreSQL service port:
-
Test the PostgreSQL connection.
-
During installation, a user named
postgresis created automatically with full superadmin access to your entire PostgreSQL instance. Before you switch to this account, your logged in system user should have sudo privileges: -
Replace the
postgrespassword with a strong password: -
Start PostgreSQL using this command.
-
Get connection details as shown below.
-
Create a test database called
mytestdbto see if everything is working.You can list the created databases by running: -
Connect to your test database.
-
During installation, a user named
-
Add the PostgreSQL Yum repository to CentOS by running this command calling the appropriate PostgreSQL version:
-
Change Metadata Store Authentication to MD5 -- Not necessary when installing a high availability environment in the cloud.
If you installed Self-Service Analytics’s metadata store on a server running CentOS or RedHat, complete the configuration steps below. If the server is running Ubuntu, ignore these instructions.Change authentication for your metadata store to MD5New installations of Self-Service Analytics use PostgreSQL 16. If you are upgrading your environment from an earlier version of Composer, you can retain your existing PostgreSQL version.-
Edit the
pg_hba.conffile for the appropriate version of PosgreSQL. -
Change METHOD to MD5.
-
Restart PostgreSQL. In CentOS environments, run:
-
Edit the
-
Configure the Metadata Store for SSL - Not necessary if installing a high availability environment in the cloud.
If you have specified SSL connections for the metadata store JDBC connections inzoomdata.propertiesfile, the root CA certificate that is used for the PostgreSQL database must be added to the/opt/zoomdata/.postgresqldirectory. This directory does not exist by default and will need to be created. Complete the following steps.-
Change to the
/opt/zoomdatadirectory as a superuser: -
Create a
.postgresqlsubdirectory. -
Copy the root CA certificate for the PostgreSQL database into the new directory:
-
Change to the
-
Configure the Metadata Store for a Distributed Environment
The PostgreSQL data store must be configured so it is available to all Self-Service Analytics instances in a distributed environment. For more information about PostgreSQL high availability clustering, see PostgreSQL documentation on high availability environments.Configure the PostgreSQL data store so it is available to all instancesNew installations of Self-Service Analytics use PostgreSQL 16. If you are upgrading your environment from an earlier version of Composer, you can retain your existing PostgreSQL version.-
Edit the
postgresql.conffile using the appropriate version and paths: -
Set the following property in
postgresql.confand save the file. -
Edit the
pg_hba.conf file: -
Add the following to the
pg_hba.conf file: -
Save the
pg_hba.conffile. -
Restart the PostgreSQL service:
-
Edit the
-
Step 2. Install Self-Service Analytics On Your Distributed Servers
Step 2. Install Self-Service Analytics On Your Distributed Servers
Intra-service communication must be enabled by making any necessary networking (ports) and firewall changes.To deploy multiple nodes (or instances) in a distributed environment, complete the following steps for each instance
-
For each instance, run the following commands to set up the environment variables for the installation:
where:
<postgres-host>and<postgres-port>are the host name and port number of the Self-Service Analytics PostgreSQL metadata store<postgres-db-username>and<postgres-db-password>are the user name and password required to access the Self-Service Analytics PostgreSQL metadata store.
-
In each instance, run the following command to set up the environment variables for specific enterprise data connector (EDC) packages:
where
<edc>is the name of the data connector you would like to install. You must install the PostgreSQL connector because it connects to the metadata store. Data connector names are the same as their connector microservice names without thezoomdata-edc-prefix. See Data Connector Reference. -
Run the bootstrap installation script after exporting the environment variables in the previous steps.
where
<v.r>is the Self-Service Analytics version and release. -
After the installation, ensure that the following property files are correctly set up on each node. Add or update the properties as necessary. In each, the IP address, port, user name, and password of the PostgreSQL metadata store should be specified.
In the
zoomdata.propertiesfile:In thequery-engine.propertiesfile: -
Ensure that port 8080 is open on all your back-end servers to support load balancing. If not, run the following command:
- Repeat these steps for every Self-Service Analytics instance (node) in your Self-Service Analytics cluster.
Step 3. Set Up a Load Balancer
Step 3. Set Up a Load Balancer
Set up one or more load balancers in your environment. For a simple load balanced configuration, only one is needed. In a high availability configuration, however, more than one load balancer is recommended; if only a single load balancer is deployed in a high availability environment, you will not be able to access any of the Self-Service Analytics nodes behind it if the load balancer should fail.The following steps provide an example of setting up HAProxy as a load balancer. Regardless of what kind of load balancer you use, ensure that port 443 is open on it.Set up an HAProxy load balancer
-
On your machine, run the following command to install HAProxy:
-
Navigate to the HAProxy folder.
-
Create a certificate or copy an existing certificate to the
/etc/haproxyfolder. If you need to create a certificate, run the following commands: -
In the same folder, replace the contents of the
haproxy.cfgfile with the contents of the Self-Service Analytics haproxy configuration file. In the file, replace the<node1-ip>and<node2-ip>with the IP addresses of your servers. If you have more than two servers, add additional lines for each server. - Save your changes and exit the file.
-
Start the HAProxy microservice
-
Use the following command to configure the HAProxy microservice to start automatically in CentOS environments:
-
Ensure that port 443 is open on your load balancer. If not, run the following command:
Step 4. Copy Specialized Files
Step 4. Copy Specialized Files
If you have any specialized files for Self-Service Analytics, such as vocabulary files, manually copy them to each instance of Self-Service Analytics in your distributed environment.