> ## Documentation Index
> Fetch the complete documentation index at: https://insightsoftware.mintlify.site/llms.txt
> Use this file to discover all available pages before exploring further.

# Manage Impala Cloudera Connectors

> Provides an overview of Cloudera connector management options.

Self-Service Analytics provides connectors to the following Cloudera data stores:

* Cloudera Impala is a query engine that accesses data stored in clusters running Apache Hadoop.
* Cloudera Search enables searches of data stored in Hadoop and provides a simple full-text interface to conduct those searches. Cloudera Search supports Cloudera's open source Hadoop platform - Cloudera Distributed Hadoop (CDH). Self-Service Analytics also connects to CDH via the [HDFS connector](/simba-embedded-analytics/docs/self-service-analytics/26.3/connect-to-data/connectors/hdfs) .

Cloudera also supports a secure CDH cluster using Kerberos authentication so that access requests can be validated and confirmed. Self-Service Analytics can connect [Connect to a Kerberized CDH Cluster](#connect-to-a-kerberized-cdh-cluster).

* [Manage the Impala Connector](#manage-the-impala-connector)
* [Connect to Impala with TLS (SSL) Enabled](#connect-to-impala-with-tls-ssl-enabled)
* [Connect to a Kerberized CDH Cluster](#connect-to-a-kerberized-cdh-cluster)
* [Work With Distinct Counts on Cloudera Impala](#work-with-distinct-counts-on-cloudera-impala)
* [Enable User Delegation](/simba-embedded-analytics/docs/self-service-analytics/26.3/connect-to-data/connectors/connectors-ov#enable-user-delegation)
* [Apply User Delegation to a Connection](/simba-embedded-analytics/docs/self-service-analytics/26.3/connect-to-data/connectors/connectors-ov#apply-user-delegation-to-a-connection)
* [Manage the Cloudera Search Connector](/simba-embedded-analytics/docs/self-service-analytics/26.3/connect-to-data/connectors/cloudera-search)

<h2 id="manage-the-impala-connector">
  Manage the Impala Connector
</h2>

The Self-Service Analytics Cloudera Impala™ connector allows you to visualize huge volumes of data stored in their Hadoop cluster in real time and with no ETL. Self-Service Analytics supports Impala versions 3.2 - 3.4.

Before you can establish a connection from Self-Service Analytics to Cloudera Impala storage, a connector server needs to be installed and configured. See [Manage Connectors and Connector Servers](/simba-embedded-analytics/docs/self-service-analytics/26.3/connect-to-data/connectors/connectors-ov#manage-connectors-and-connector-servers) for general instructions and [Connect to Impala](#connect-to-impala) for details specific to the Cloudera Impala connector.

After setting up the connector, create data sources that specify the necessary connection information and identify the data you want to use. See [Create and Manage Data Sources](/simba-embedded-analytics/docs/self-service-analytics/26.3/connect-to-data/sources/data-source-config-overview) for more information. After you set up your data sources, create [dashboards](/simba-embedded-analytics/docs/self-service-analytics/26.3/analyze-data/dashboards/dash-manage#create-dashboards), self service reports, and [visuals](/simba-embedded-analytics/docs/self-service-analytics/26.3/analyze-data/visuals/visual-add-dash#create-and-add-visuals-to-the-visual-gallery) from the data in these data sources. See [Create Dashboards](/simba-embedded-analytics/docs/self-service-analytics/26.3/analyze-data/dashboards/dash-manage#create-dashboards).

This topic describes:

* [Feature Support](#feature-support)
* [Impala Authentication](#impala-authentication)
* [Connect to Impala](#connect-to-impala)
* [Impala Table Settings](#impala-table-settings)

See also:

* [Work With Distinct Counts on Cloudera Impala](#work-with-distinct-counts-on-cloudera-impala)
* [Enable Data Sharpening for Cloudera Impala Data Sources](#enable-data-sharpening-for-cloudera-impala-data-sources)

<h3 id="feature-support">
  Feature Support
</h3>

Connector support for specific [features](/simba-embedded-analytics/docs/self-service-analytics/26.3/connect-to-data/connectors/connector-feature-support) is shown in the following table.

**Key:** **Y** - Supported; **N** - Not Supported; N/A - not applicable

<table>
  <thead>
    <tr>
      <th>Feature</th>
      <th colSpan={3}>Supported?</th>
      <th>Notes</th>
    </tr>
  </thead>

  <tbody>
    <tr>
      <td>[Admin-Defined Functions](/simba-embedded-analytics/docs/self-service-analytics/26.3/connect-to-data/data/admin-fx-ov)</td>
      <td colSpan={3}>**Y**</td>

      <td />
    </tr>

    <tr>
      <td>[Box Plots](/simba-embedded-analytics/docs/self-service-analytics/26.3/analyze-data/visuals/scatter-plot#box-plots)</td>
      <td colSpan={3}>**Y**</td>

      <td />
    </tr>

    <tr>
      <td>[Custom SQL Queries](/simba-embedded-analytics/docs/self-service-analytics/26.3/connect-to-data/connectors/connector-feature-support#custom-sql-queries-2)</td>
      <td colSpan={3}>**Y**</td>
      <td>If you need to access a BigQuery partition, explicitly include an alias for the built in partition column in your select clause, such as `select *, _PARTITIONTIME as pt from projectId.datasetId.tableId`.</td>
    </tr>

    <tr>
      <td>[Derived Fields (Row-Level Expressions)](/simba-embedded-analytics/docs/self-service-analytics/26.3/connect-to-data/data/derived-fields)</td>
      <td colSpan={3}>**Y**</td>

      <td />
    </tr>

    <tr>
      <td>[Distinct Counts](/simba-embedded-analytics/docs/self-service-analytics/26.3/connect-to-data/data/fx-aggregate#distinct-counts)</td>
      <td colSpan={3}>**Y**</td>
      <td>Cloudera Impala connectors can receive only a single distinct count field in a query.</td>
    </tr>

    <tr>
      <td>[Fast Distinct Values](/simba-embedded-analytics/docs/self-service-analytics/26.3/connect-to-data/connectors/connector-feature-support#fast-distinct-values)</td>
      <td colSpan={3}>N/A</td>

      <td />
    </tr>

    <tr>
      <td>[Group By Multiple Fields](/simba-embedded-analytics/docs/self-service-analytics/26.3/connect-to-data/connectors/connector-feature-support#group-by-multiple-fields)</td>
      <td colSpan={3}>**Y**</td>

      <td />
    </tr>

    <tr>
      <td>[Group By Time](/simba-embedded-analytics/docs/self-service-analytics/26.3/connect-to-data/connectors/connector-feature-support#group-by-time)</td>
      <td colSpan={3}>**Y**</td>

      <td />
    </tr>

    <tr>
      <td>[Group By UNIX Time](/simba-embedded-analytics/docs/self-service-analytics/26.3/connect-to-data/connectors/connector-feature-support#group-by-unix-time)</td>
      <td colSpan={3}>**Y**</td>

      <td />
    </tr>

    <tr>
      <td>[Histogram Floating Point Values](/simba-embedded-analytics/docs/self-service-analytics/26.3/connect-to-data/connectors/connector-feature-support#histogram-floating-point-values)</td>
      <td colSpan={3}>**Y**</td>

      <td />
    </tr>

    <tr>
      <td>[Histograms](/simba-embedded-analytics/docs/self-service-analytics/26.3/analyze-data/visuals/bar-standard#bars-histograms)</td>
      <td colSpan={3}>**Y**</td>

      <td />
    </tr>

    <tr>
      <td>[Kerberos Authentication](/simba-embedded-analytics/docs/self-service-analytics/26.3/administer/security/kerberos-sso)</td>
      <td colSpan={3}>**Y**</td>

      <td />
    </tr>

    <tr>
      <td>[Last Value](/simba-embedded-analytics/docs/self-service-analytics/26.3/connect-to-data/connectors/connector-feature-support#last-value)</td>
      <td colSpan={3}>**Y**</td>

      <td />
    </tr>

    <tr>
      <td>[Live Mode and Playback](/simba-embedded-analytics/docs/self-service-analytics/26.3/analyze-data/time-bar#live-mode-and-historical-playback)</td>
      <td colSpan={3}>**Y**</td>

      <td />
    </tr>

    <tr>
      <td>[Multivalued Fields](/simba-embedded-analytics/docs/self-service-analytics/26.3/connect-to-data/connectors/connector-feature-support#multivalued-fields-2)</td>
      <td colSpan={3}>N/A</td>

      <td />
    </tr>

    <tr>
      <td>[Nested Fields](/simba-embedded-analytics/docs/self-service-analytics/26.3/connect-to-data/data/nested-data-structures)</td>
      <td colSpan={3}>N/A</td>

      <td />
    </tr>

    <tr>
      <td>[Partitions](/simba-embedded-analytics/docs/self-service-analytics/26.3/connect-to-data/connectors/connector-feature-support#partitions)</td>
      <td colSpan={3}>**Y**</td>

      <td />
    </tr>

    <tr>
      <td>[Pushdown Joins for Fusion Data Sources](/simba-embedded-analytics/docs/self-service-analytics/26.3/connect-to-data/sources/data-fusion-overview#optimize-joins)</td>
      <td colSpan={3}>**Y**</td>

      <td />
    </tr>

    <tr>
      <td>[Schemas](/simba-embedded-analytics/docs/self-service-analytics/26.3/connect-to-data/connectors/connector-feature-support#schemas-2)</td>
      <td colSpan={3}>**Y**</td>

      <td />
    </tr>

    <tr>
      <td>[Text Search](/simba-embedded-analytics/docs/self-service-analytics/26.3/connect-to-data/connectors/connector-feature-support#text-search)</td>
      <td colSpan={3}>N/A</td>

      <td />
    </tr>

    <tr>
      <td>[TLS](/simba-embedded-analytics/docs/self-service-analytics/26.3/connect-to-data/connectors/connector-feature-support#tls)</td>
      <td colSpan={3}>**Y**</td>

      <td />
    </tr>

    <tr>
      <td>[User Delegation](/simba-embedded-analytics/docs/self-service-analytics/26.3/connect-to-data/connectors/connectors-ov#enable-user-delegation)</td>
      <td colSpan={3}>**Y**</td>

      <td />
    </tr>

    <tr>
      <td>[Wildcard Filters](/simba-embedded-analytics/docs/self-service-analytics/26.3/analyze-data/filters/filters-attr#apply-wildcard-filters-to-a-visual-filter-snippet-or-dashboard)</td>
      <td colSpan={3}>**Y**</td>

      <td />
    </tr>

    <tr>
      <td>[Wildcard Filters, Case-Insensitive Mode](/simba-embedded-analytics/docs/self-service-analytics/26.3/connect-to-data/connectors/connector-feature-support#wildcard-case-insensitive-filters)</td>
      <td colSpan={3}>**Y**</td>

      <td />
    </tr>

    <tr>
      <td>[Wildcard Filters, Case-Sensitive Mode](/simba-embedded-analytics/docs/self-service-analytics/26.3/connect-to-data/connectors/connector-feature-support#wildcard-case-sensitive-filters)</td>
      <td colSpan={3}>**Y**</td>

      <td />
    </tr>
  </tbody>
</table>

The Cloudera Impala connector also supports Progress reporting. Progress reporting support allows the connector to report the progress of a running query. On the UI, this shows as **Reading *nn*%** in the upper left corner of a visual.

<h3 id="impala-authentication">
  Impala Authentication
</h3>

Support is provided for passing along credentials for users with access privileges to Impala source. Delegation allows for Impala queries to be issued with the privileges from a specified user. This is available in the Connection page and is set as the **Do As User** list. See [Enable User Delegation](/simba-embedded-analytics/docs/self-service-analytics/26.3/connect-to-data/connectors/connectors-ov#enable-user-delegation) and [Apply User Delegation to a Connection](/simba-embedded-analytics/docs/self-service-analytics/26.3/connect-to-data/connectors/connectors-ov#apply-user-delegation-to-a-connection).

<h3 id="connect-to-impala">
  Connect to Impala
</h3>

When setting up an Impala connection, you need to provide the following.

1. Specify the JDBC URL. You can connect to your Impala data source using either simple user credentials authentication or Kerberos authentication with optional SSL encryption. Refer to [Connecting to Impala on Kerberized CDH](#connect-to-a-kerberized-cdh-cluster) or [Connecting to Impala with TLS (SSL)](#connect-to-impala-with-tls-ssl-enabled) for more details on the configuration.

   Self-Service Analytics enables you to connect either to a single Impala node or to multiple nodes within a cluster. To connect to a single Impala node, specify a JDBC URL in the following format:

   ```
   jdbc:hive2://<impala_host>:<port>/;auth=noSasl
   ```

   To connect to multiple Impala nodes, specify the required JDBC URLs separated by commas. The URLs will be used in a round-robin fashion. Keep in mind that such a connection will be valid as long as there is at least one available node. If all the nodes can not be reached, then the connection will not be validated.

2. If Impala authentication has been set up, provide a user name and password.

3. To allow for Impala user delegation, select the appropriate custom user attribute from the **Do As User** drop-down list (set up by the Self-Service Analytics supervisor or administrator). This basically allows Self-Service Analytics to pass along credentials for the specified user with access rights to Impala. See [Enable User Delegation](/simba-embedded-analytics/docs/self-service-analytics/26.3/connect-to-data/connectors/connectors-ov#enable-user-delegation) and [Apply User Delegation to a Connection](/simba-embedded-analytics/docs/self-service-analytics/26.3/connect-to-data/connectors/connectors-ov#apply-user-delegation-to-a-connection).

4. Select **Validate**. If successfully validated, the connection is saved.

<h3 id="impala-table-settings">
  Impala Table Settings
</h3>

Time-based fields can be configured for partitioning in an Impala [data source configuration](/simba-embedded-analytics/docs/self-service-analytics/26.3/connect-to-data/sources/data-source-config-overview) using the **Partition** column on the Fields tab of the data source. The following options are available:

* No (partitioning to be done)

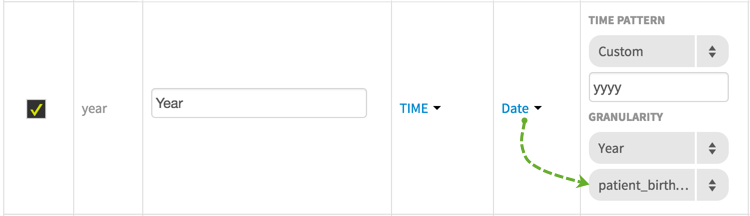
* Date - this option is available for the Time field type. If you select this option, the list of the partitioned columns will be displayed in the Configure column.

  <img src="https://mintcdn.com/insightsoftware/2cXq_sDOxrDVXUcv/simba-embedded-analytics/docs/self-service-analytics/26.3/images/connectors/impala-partitioned-date.png?fit=max&auto=format&n=2cXq_sDOxrDVXUcv&q=85&s=771f4766b0d7fd4d456818e4fdada24a" alt="" width="288" height="83" data-path="simba-embedded-analytics/docs/self-service-analytics/26.3/images/connectors/impala-partitioned-date.png" />

* Function - If you select this option, the list of the partitioned columns and supported MURMUR3\_HASH function will be displayed in the Configure column.
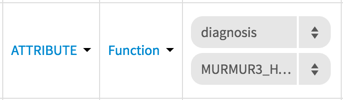
  <img src="https://mintcdn.com/insightsoftware/2cXq_sDOxrDVXUcv/simba-embedded-analytics/docs/self-service-analytics/26.3/images/connectors/impala-partitioned-function.png?fit=max&auto=format&n=2cXq_sDOxrDVXUcv&q=85&s=5e68b6d97d1bbf035b66453a53853889" alt="" width="192" height="56" data-path="simba-embedded-analytics/docs/self-service-analytics/26.3/images/connectors/impala-partitioned-function.png" />

Numeric and time-based fields can be edited using the Fields tab:

* Numeric type Number - ability to select a default aggregation function
* Time fields - ability to define the default time pattern and granularity; if the time field provides granularities of hour, minute and second, then a time zone label may be applied.

Select the checkbox in the **Distinct Count** column for any fields if a distinct count is needed. For more information, see [Work With Distinct Counts on Cloudera Impala](#work-with-distinct-counts-on-cloudera-impala).
<h2 id="work-with-distinct-counts-on-cloudera-impala">
  Work With Distinct Counts on Cloudera Impala
</h2>

Due to the structure of Cloudera Impala, you cannot build a visual using two or more metrics for which the Distinct Count option has been enabled. You can enable or disable the distinct counts for the specific fields in a data source on the [Manage the Fields Work Areas](/simba-embedded-analytics/docs/self-service-analytics/26.3/connect-to-data/sources/data-source-config-fields-tab) of a [data source](/simba-embedded-analytics/docs/self-service-analytics/26.3/connect-to-data/sources/data-source-config-overview).

<h2 id="connect-to-a-kerberized-cdh-cluster">
  Connect to a Kerberized CDH Cluster
</h2>

A secure CDH Cluster uses Kerberos authentication to validate and confirm access requests. You can set up Self-Service Analytics to connect to the secure CDH Cluster using the instructions provided below. Before establishing a connection to either type of cluster, review the prerequisites and be sure to obtain your Kerberos credentials.

* [Obtain Kerberos Credentials](#obtain-kerberos-credentials)
* [Configure an Impala Connector](#configure-an-impala-connector)
* [Configure a Cloudera Search Connector](#configure-a-cloudera-search-connector)
* [Connect to a Kerberized Data Source](#connect-to-a-kerberized-data-source)
* [Use TLS Encryption with Kerberos Authentication](#connect-to-a-kerberized-cdh-cluster-use-tls-encryption-with)

<h4 id="connect-to-a-kerberized-cdh-cluster-prerequisites">
  Prerequisites
</h4>

* To enable Kerberos for CDH distribution using Cloudera manager, see Cloudera's documentation [Configuring Authentication in Cloudera Manager](https://docs.cloudera.com/documentation/manager/5-1-x/Configuring-Hadoop-Security-with-Cloudera-Manager/cm5chs_authentication_cm.html).
* Kerberos authentication requires precise time correspondence on all instances to work properly. You need to enable the Network Time Protocol service in your network. See [Use the Network Time Protocol to Synchronize Time](/simba-embedded-analytics/docs/self-service-analytics/26.3/administer/install/install-ov#use-the-network-time-protocol-to-synchronize-time).

<h3 id="obtain-kerberos-credentials">
  Obtain Kerberos Credentials
</h3>

Each microservice must have its own unique identifier called a [principal](http://web.mit.edu/kerberos/krb5-1.5/krb5-1.5.4/doc/krb5-user/What-is-a-Kerberos-Principal_003f.html). Perform the following steps:

1. Install the Kerberos client on the machine where the Self-Service Analytics Impala connector is installed.

2. Generate the Kerberos principal and corresponding keytab for the Self-Service Analytics microservice. Before you proceed, make sure that:

   * Self-Service Analytics or a connector is running on a node with proper Kerberos configuration: `/etc/krb5.conf` or similar location for your Linux distribution.
   * The Kerberos realm on your environment is the same as the realm specified in the `kdc.conf` file from Impala server.

3. Check the Kerberos configuration (that is, `krb5.conf`) and validity of the principal and keytab pair using MIT Kerberos client:

   ```
   kinit -V -k -t zoomdata_principal .keytab zoomdata_principal@KERBEROS.REALM
   ```

4. Make the keytab accessible for the Self-Service Analytics server or a connector:

   ```bash theme={null}
   sudo mkdir /etc/zoomdata sudo mv zoomdata_principal.keytab /etc/zoomdata sudo chown zoomdata:zoomdata /etc/zoomdata/zoomdata_principal.keytab sudo chmod 600 /etc/zoomdata/zoomdata_principal.keytab
   ```

<h3 id="configure-an-impala-connector">
  Configure an Impala Connector
</h3>

1. Create or update the file named `/etc/zoomdata/edc-impala.properties`. If this file already exists, verify that the information below exists in the file:

   ```properties theme={null}
   kerberos.krb5.conf.location=/etc/krb5.conf kerberos.service.account.authentication=true kerberos.service.account.principal=zoomdata_principal@KERBEROS.REALM kerberos.service.account.keytab.location=/etc/zoomdata/zoomdata_principal.keytab
   ```

2. Restart the Impala connector:

   ```bash theme={null}
   sudo systemctl restart zoomdata-edc-impala
   ```

<h3 id="configure-a-cloudera-search-connector">
  Configure a Cloudera Search Connector
</h3>

1. Create or update the file named `/etc/zoomdata/edc-cloudera-search.properties`. If this file already exists, verify that the information below exists in the file:

   ```properties theme={null}
   kerberos.krb5.conf.location=/etc/krb5.conf kerberos.service.account.authentication=true kerberos.service.account.principal=zoomdata_principal@KERBEROS.REALM kerberos.service.account.keytab.location=/etc/zoomdata/zoomdata_principal.keytab
   ```

2. Restart the Cloudera Search microservice:

   ```bash theme={null}
   sudo systemctl restart zoomdata-edc-cloudera-search
   ```

<h3 id="connect-to-a-kerberized-data-source">
  Connect to a Kerberized Data Source
</h3>

You are now ready to create the Cloudera Search or Impala source:

1. Open a new browser window and log into Self-Service Analytics.

2. Select **Sources**.

3. Select **Cloudera** **Search or** **Impala**.

4. Specify the name of your source and add a description (if desired). Select **Next**.

5. On the Connection tab, define the connection source. You can use an existing connection, if available, or create a new one. To create a new connection, select the **Input New Credentials** option button and specify the connection name and JDBC URL. Make sure that you enter the JDBC URL in the correct format.

   For Impala, specify:

   ```
   jdbc:hive2://<impala_host>:21050/;principal=<impala_principal@KERBEROS.REALM>
   ```

   For Cloudera Search, specify:

   ```
   cloudera.domain:2181/solr
   ```

   The JDBC URL for Cloudera Search needs to be the zookeeper URL of the Kerberized cluster.

   Replace the placeholders as follows:

   * For \<impala\_host>, enter the IP address/host name of the Impala node you are connecting to.
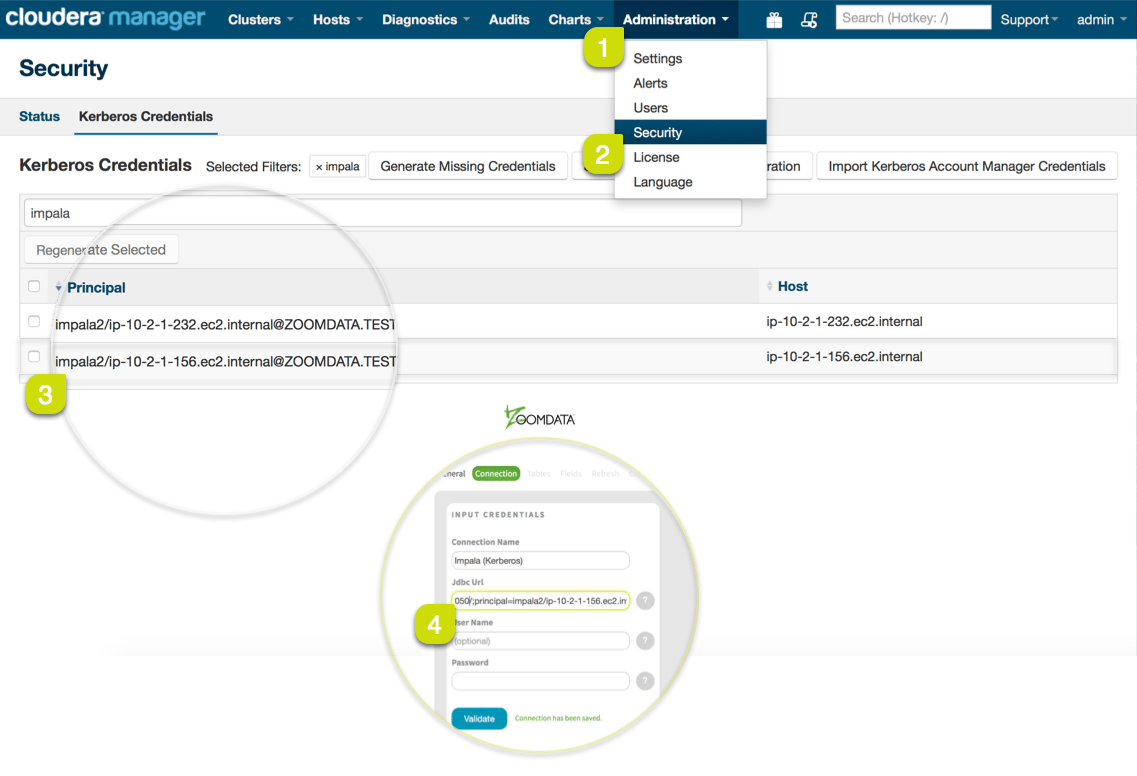
   * For \<[impala\_principal@KERBEROS.REALM](mailto:impala_principal@KERBEROS.REALM)>, enter the principal of the node you are connecting to. To get the list of all Impala principals, navigate to Cloudera Manager > Administration > Security > Kerberos Credentials.

   <img src="https://mintcdn.com/insightsoftware/2cXq_sDOxrDVXUcv/simba-embedded-analytics/docs/self-service-analytics/26.3/images/connectors/cloudera-kerberos-cdh.png?fit=max&auto=format&n=2cXq_sDOxrDVXUcv&q=85&s=7884f356fc95db9b4e0a2163ee51dbcc" alt="" width="480" height="328" data-path="simba-embedded-analytics/docs/self-service-analytics/26.3/images/connectors/cloudera-kerberos-cdh.png" />

6. Select **Validate**. After successful validation, the values are saved. Select **Next**.

   <Note>
     If you run into connection issues, verify that the Self-Service Analytics Server was restarted successfully. Access the troubleshooting topic [Verify the Self-Service Analytics Server Restart](/simba-embedded-analytics/docs/self-service-analytics/26.3/administer/common-issues#verify-the-self-service-analytics-server-restart) for assistance.
   </Note>

You can continue configuring the data source as needed.

After you have completed the configuration, Self-Service Analytics begins accessing the data source using `zoomdata_principal@KERBEROS.REALM` authenticated by its keytab in `/etc/zoomdata/zoomdata_principal.keytab`.

<h3 id="connect-to-a-kerberized-cdh-cluster-use-tls-encryption-with">
  Use TLS Encryption with Kerberos Authentication
</h3>

See [Connect to Impala with TLS (SSL) Enabled](#connect-to-impala-with-tls-ssl-enabled) for more details.

<h2 id="enable-data-sharpening-for-cloudera-impala-data-sources">
  Enable Data Sharpening for Cloudera Impala Data Sources
</h2>

Data Sharpening works with certain partitioned Impala data sources. The partitioned field should be a time-based attribute and in a supported time format (for example, yyyy-MM-dd). Follow the steps below to set up Data Sharpening for an Impala data source.

<Note>
  In this release, when your admin enables the Enhanced Experience user interface, you will see changes to workflows you may have used in previous releases.
</Note>

**Configure Data Sharpening for a Cloudera Impala data source configuration:**

1. Log in (either as an administrator or as a user who has been assigned to a group with [data source management privileges](/simba-embedded-analytics/docs/self-service-analytics/26.3/administer/users/aaa-ov#group-privilege-reference)).
2. Select the **Sources** card on your [home page](/simba-embedded-analytics/docs/self-service-analytics/26.3/get-started/welcome#home-page) or **Data Sources** from the [main menu](/simba-embedded-analytics/docs/self-service-analytics/26.3/get-started/welcome#the-main-menu). The [Sources](/simba-embedded-analytics/docs/self-service-analytics/26.3/connect-to-data/sources/data-source-config-overview#data-sources-page) page appears.
3. Select the appropriate data source configuration to edit it, then access the [Fields tab](/simba-embedded-analytics/docs/self-service-analytics/26.3/connect-to-data/sources/data-source-config-fields-tab) of the data source.
4. Locate and select the time field you want to use as the driving time field. Select an appropriate time granularity in the **Data Details** section of the **Settings** side bar menu, then **Save** your changes. Consider the 10% rule to ensure Data Sharpening runs when you want it to. See [When Data Sharpening Occurs](/simba-embedded-analytics/docs/self-service-analytics/26.3/connect-to-data/sources/data-sharpening-ov#when-data-sharpening-occurs) for more information.
5. Select the **Global Settings** tab, and enable **Time Bar** if not enabled to access the data sharpening settings. See [Configure Time Bar Defaults](/simba-embedded-analytics/docs/self-service-analytics/26.3/connect-to-data/sources/data-source-config-global-settings-tab#configure-time-bar-defaults).
6. Select the time field you want to use as the driving time field in the drop-down for **Default Time Attribute**.
7. Enable the **Prefer Sharpening** toggle to enable sharpening and sharpening settings.
8. Optionally, use the **Max Queries** slider to specify the maximum number of queries used for Data Sharpening. The default maximum is 10 queries.
9. When your changes are complete, select **Save Settings** to save your changes.

<h2 id="connect-to-impala-with-tls-ssl-enabled">
  Connect to Impala with TLS (SSL) Enabled
</h2>

You can connect to the Impala data source with TLS/SSL network-level encryption to secure your data while working with your data source.

<h4 id="connect-to-impala-with-tls-ssl-enabled-prerequisites">
  Prerequisites
</h4>

**For Impala:**

* Before you proceed, make sure that TLS is configured for Impala using either [Cloudera Manager](https://docs.cloudera.com/documentation/enterprise/5-4-x/topics/impala_ssl.html#concept_gnk_2tt_qp) or the [Command Line interface](https://docs.cloudera.com/documentation/enterprise/5-4-x/topics/impala_ssl.html#concept_q1p_j2d_rp).

* Impala's TLS configuration requires an x509 certificate that will identify the Impala daemon to clients during TLS connections. Production usage of TLS usually implies purchasing the necessary certificates from a commercial Certificate Authority (CA), while development environments can use self-signed certificates. If you have either a **rootCA** from the trusted CA or a **self-signed certificate** in PEM format you can verify your Impala TLS configuration using the `openssl` utility:

  ```bash theme={null}
  openssl s_client -connect <impala_host>:port -CAfile <certificate.pem>
  ```

**For the Self-Service Analytics Server/Impala Connector:**

* There is no particular configuration related to TLS from the point of view of Self-Service Analytics components. However, the client must have a [Java **truststore**](https://docs.oracle.com/cd/E19509-01/820-3503/ggffo/index.html) with a correct certificate (for example, a root certificate provided by some CA) installed. This means that the **truststore** must be accessible to the Self-Service Analytics Server/Impala connector.

* To list all the certificates installed in the Java truststore, use the `keytool` utility:

  ```bash theme={null}
  keytool -v -list -keystore <path_to_truststore> -storetype jks -storepass <truststore_password>
  ```

After you have the Java truststore configured, enabling SSL from Self-Service Analytics’s perspective is a matter of composing the correct JDBC URL.

#### Creating a JDBC URL with the TLS Parameters

To specify the TLS-related parameters, use the following template for a JDBC URL:

```
jdbc:hive2://<impala_host>:<port>/;ssl=true;sslTrustStore=<path_to_truststore>;
trustStorePassword=<truststore_password>;auth=noSasl
```

where:

* `ssl=true` is a required parameter for enabling TLS encryption.

* `path_to_truststore` is the path to a Java **truststore** which contains either a certificate issued by a trusted CA or a self-signed certificate (not recommended and shouldn’t be used in a production environment).

  <Note>
    Make sure that the Self-Service Analytics server/connector process has read access privileges to the **truststore** file.
  </Note>

* `truststore_password` is the password to access the **truststore**.

* `auth=noSasl` is a required parameter when no authentication or simple user/password authentication is used.

<h3 id="connect-to-impala-with-tls-ssl-enabled-use-tls-encryption-with">
  Use TLS Encryption with Kerberos Authentication
</h3>

See [Connect to a Kerberized CDH Cluster](#connect-to-a-kerberized-cdh-cluster) for more details on enabling Kerberos authentication. The template for a JDBC URL containing both TLS and Kerberos parameters is as follows:

```
jdbc:hive2://<impala_host>:<port>/;principal=<impala_principal>;ssl=true;
sslTrustStore=<path_to_truststore>;trustStorePassword=<truststore_password>
```

You do not need to specify the `auth=noSasl` parameter when using Kerberos authentication.

## Initial Kerberized Impala Troubleshooting Steps

After configuring Self-Service Analytics to connect to a kerberized Impala data source per [Connect to a Kerberized CDH Cluster](#connect-to-a-kerberized-cdh-cluster), Self-Service Analytics may still fail to connect when the user attempts to create a new Impala data source to this kerberized CDH cluster. In these situations, we recommend you to check the following first before opening a support ticket for further assistance:

* Verify that the time is synchronized between the Kerberos and Self-Service Analytics servers. Kerberos is very sensitive to time differences that exist. If possible, consider configuring a Network Time Protocol (e.g. ntpd) to synchronize the time on your servers.

* Double-check the configuration parameters, JDBC URL, and that the correct user is specified in the `zoomdata.jvm` file for Kerberos. For example, an unintended space when copying parameters can cause the connection to fail.

* Check if you are using AES-256 encryption level in your Active Directory. By default, Java *does not* support AES-256 encryption. In case your environment is using AES-256 encryption, make sure to do the following <u>whenever you install Self-Service Analytics on a new server or you are upgrading Self-Service Analytics to a new major version</u>:

  1. Navigate to the [Java Cryptography Extension (JCE) Unlimited Strength Jurisdiction Policy Files 8 download page](https://www.oracle.com/java/technologies/javase-jce8-downloads.html).

  2. Download the archive `jce_policy-8.zip`.

  3. Extract the `jce/local_policy.jar` and `jce/US_export_policy.jar` files from the archive to the appropriate directory. Overwrite the files already present in the directory.

     * Linux: `/opt/zoomdata/jre/lib/security/`
     * Windows: `<install-path>/jre/lib/security/`

  4. Restart Self-Service Analytics.