> ## Documentation Index
> Fetch the complete documentation index at: https://insightsoftware.mintlify.site/llms.txt
> Use this file to discover all available pages before exploring further.
# Create and Manage Data Store Connections
> Describes how to manage data store connection definitions.
Data store connections define the connection strings and options necessary to connect to a data store. You can manually add and maintain them. Saved and validated data store connections can be used in [sources](/simba-embedded-analytics/docs/self-service-analytics/26.3/connect-to-data/sources/data-source-config-overview). Data store connections must be validated when they are defined. If they are not validated, they cannot be saved.
You must be logged in as an administrator or as a user with the [group privilege](/simba-embedded-analytics/docs/self-service-analytics/26.3/administer/users/aaa-ov#group-privilege-reference) **Manage Connections** to manage data store connection definitions.
In this release, when your admin enables the Enhanced Experience user interface, you will see changes to workflows you may have used in previous releases.
To manage existing data store connections or add new ones, select the **Connection** card on your home page or **Connections** from the main menu. The [Connections page](#connections-page) appears.
You can use a Dundas BI connection as a data source or in a fusion data source. See [Add Data Store Connections](#add-data-store-connections).
Review the following links for information on managing your data store connection definitions.
* [Connections Page](#connections-page)
* [List Data Store Connections](#list-data-store-connections)
* [Search and Filter Lists](/simba-embedded-analytics/docs/self-service-analytics/26.3/get-started/welcome#search-and-filter-lists)
* [Add Data Store Connections](#add-data-store-connections)
* [Modify Data Store Connections](#modify-data-store-connections)
* [Delete Data Store Connections](#delete-data-store-connections)
* [Select a Connection for a Source](/simba-embedded-analytics/docs/self-service-analytics/26.3/connect-to-data/sources/data-source-config-overview#select-a-connection-for-a-source)
* [Use User Attributes for Connection Parameters](#use-user-attributes-for-connection-parameters)
* [Insert Variables for Connection Parameters](#insert-variables-for-connection-parameters)
Add Data Store Connections
You can add and validate data store connections on the [Connections page](#connections-page) in the UI for connector servers that [are registered](/simba-embedded-analytics/docs/self-service-analytics/26.3/connect-to-data/connectors/connectors-ov#register-a-new-connector-server) in your environment.
You must be logged in as a user with the [group privilege](/simba-embedded-analytics/docs/self-service-analytics/26.3/administer/users/aaa-ov#group-privilege-reference) **Manage Connections** to maintain data store connection definitions.
### Add and Validate a Connection
1. Log in as a user with the [group privilege](/simba-embedded-analytics/docs/self-service-analytics/26.3/administer/users/aaa-ov#group-privilege-reference) **Manage Connections**.
2. Select the **Connection** card on your home page or **Connections** from the main menu. The [Connections work area](#connections-page) appears.
The Connections page lists the data store connections you have defined, identifies the number of associated data sources, and other overview information about your existing connections.
3. Select **Create Connection** in the upper right corner of the connection list. The Select a Connection Type dialog appears.
4. Select the connection type you want to use for the connection definition. The Add \ Connection page appears.
5. Optionally, change the default name for the connection in the **Connection Name** field.
6. The connection details required to connect to a data store vary by data store. Use the fields in Connection Details to specify the URL and other connection details and, if applicable, authentication credentials (**User Name** and **Password** fields) required to connect to the data store. Fields highlighted in red are required. Any connection requirements for a specific data store are described in the connector documentation for that data store. See the [Data Connector Reference](/simba-embedded-analytics/docs/self-service-analytics/26.3/reference/data-connector-reference).
You can insert variables for connection parameters, if you have defined any custom attributes in your environment. See [Insert Variables for Connection Parameters](#insert-variables-for-connection-parameters). Additionally, you can select any user attributes you have defined for connection parameters using the up and down arrows in the connection parameter section. See [Use User Attributes for Connection Parameters](#use-user-attributes-for-connection-parameters).
7. If the **Do As User** option is available, optionally specify the custom user attributes you set up to enable user delegation. See [Apply User Delegation to a Connection](/simba-embedded-analytics/docs/self-service-analytics/26.3/connect-to-data/connectors/connectors-ov#apply-user-delegation-to-a-connection).
8. This is an optional step.
Each data source configuration specifies refresh settings for the data from the data store. If a data store connection requires special credentials to refresh the data source data, select the **Add an Override** button under **Scheduler Overrides** and select an override setting to use. The override settings you can specify mirror the regular data store connection settings (except for the connection definition name) and vary based on the type of data store connector used for the connection. See [Data Connector Reference](/simba-embedded-analytics/docs/self-service-analytics/26.3/reference/data-connector-reference).
More than one override setting can be specified. Simply select the **Add an Override** button again and select a different setting and provide its input value. Repeat this process until all override settings required by the data store have been specified.
9. Select **Validate** to validate the connection. If the connection is valid, you can save the connection. If invalid, make changes, then select **Validate** again.
10. Select **Save** to save the connection.
After you create a connection, you can update the Connection Details or view Data Sources associated with this connection at any time. See [Modify Data Store Connections](#modify-data-store-connections).
**Add and Validate a Connection to a Dundas BI Data Source or Data Cube**
You can use the Dundas BI Connector to [connect to any data source used in that environment](#connect-to-a-dundas-bi-data-store), or to connect to a data cube or other warehoused data in that environment. This feature also allows you to leverage data organized in a data cube for integration into your analytics environment.
1. Log in as a user with the [group privilege](/simba-embedded-analytics/docs/self-service-analytics/26.3/administer/users/aaa-ov#group-privilege-reference) **Manage Connections**.
2. Select **Connections** from the main menu. The Connections work area opens.
The Connections page lists the data store connections you have defined, identifies the number of associated data sources, and other overview information about your existing connections.
3. Select **Create Connection** in the upper right corner of the connection list. The **Select a Connection Type** dialog appears.
4. Select **Managed** from the available connection types. An **Add Managed Connection** work area opens.
5. Enter a **Connection Name**, and the name of the **Project** to which the data source or data cube you want to use belongs.
6. Select a **Credentials** option from the drop-down list, usually `User.credentials`, unless otherwise specified by your system administrator or tenant administrator. Make the `IMPERSONATE_ACCOUNT` field visible.
7. Select **Validate** to validate the connection. If the connection is valid, you can save the connection. If invalid, make changes, then select **Validate** again.
8. Select **Save** to save the validated connection.
After you create a connection, you can update the Connection Details or view Data Sources associated with this connection at any time. See [Modify Data Store Connections](#modify-data-store-connections).
Modify Data Store Connections
You can modify data store connections as needed if credentials or addresses change. Once updated, your data sources will automatically reference the new connection configuration.
In this release, when your admin enables the Enhanced Experience user interface, you will see changes to workflows you may have used in previous releases.
### **Modify a Data Store Connection**
1. Log in as an administrator, or user with the [group privilege](/simba-embedded-analytics/docs/self-service-analytics/26.3/administer/users/aaa-ov#group-privilege-reference) **Manage Connections**.
2. Select the **Connection** card on your home page or **Connections** from the main menu. The [Connections work area](#connections-page) appears.
Search the list of data store connections defined to locate the data store connection definition you want to modify. See [Search and Filter Lists](/simba-embedded-analytics/docs/self-service-analytics/26.3/get-started/welcome#search-and-filter-lists).
3. Select the data store connection definition you want to modify. The **Connection Details** tab opens.
4. Select the name at the top of the work area to make the field editable. Change the name and select **Save**.
5. Use the fields on the Connection Details tab to alter the URL and other connection details and, if applicable, the authentication credentials (**User Name** and **Password** fields) required to connect to the data store. Any connection requirements for a specific data store are described in the connector documentation for that data store. See the [Data Connector Reference](/simba-embedded-analytics/docs/self-service-analytics/26.3/reference/data-connector-reference).
You can insert variables for connection parameters, if you have defined any custom attributes in your environment. See [Insert Variables for Connection Parameters](#insert-variables-for-connection-parameters). Additionally, you can select any user attributes you have defined for connection parameters using the up and down arrows in the connection parameter section. See [Use User Attributes for Connection Parameters](#use-user-attributes-for-connection-parameters).
6. If the **Do As User** option is available, optionally specify the custom user attributes you set up to enable user delegation. See [Apply User Delegation to a Connection](/simba-embedded-analytics/docs/self-service-analytics/26.3/connect-to-data/connectors/connectors-ov#apply-user-delegation-to-a-connection).
7. This is an optional step.
Each data source configuration specifies refresh settings for the data from the data store. If a data store connection requires special credentials to refresh the data source data, select the **Add an Override** button under **Scheduler Overrides** and select an override setting to use. The override settings you can specify mirror the regular data store connection settings (except for the connection definition name) and vary based on the type of data store connector used for the connection. See [Data Connector Reference](/simba-embedded-analytics/docs/self-service-analytics/26.3/reference/data-connector-reference).
More than one override setting can be specified. Simply select the **Add an Override** button again and select a different setting and provide its input value. Repeat this process until all override settings required by the data store have been specified.
8. Select **Validate** to validate the connection. If the connection is valid, you can save the connection. If invalid, make changes, then select **Validate** again.
9. Select **Save** to save the connection.
10. To see the data source configuration definitions that use this connection definition, select the **Data Sources** tab.
11. Select **Back** at the top of the page to return to the [Connections work area](#connections-page) that lists the connection definitions.
Connect to a Dundas BI Data Store
If you are transitioning from an earlier release of Symphony, complete these steps as you work with technical support to reconnect to the data in your Dundas BI environment.
You will need appropriate licensing for all relevant components to complete this procedure.
* Register the Dundas BI (formerly Managed) connector server, then add the connector. See [Register the Dundas BI (Managed) Connection Server](/simba-embedded-analytics/docs/self-service-analytics/26.3/connect-to-data/connectors/connectors-ov#register-the-dundas-bi-managed-connection-server) and [Define a New Connector](/simba-embedded-analytics/docs/self-service-analytics/26.3/connect-to-data/connectors/connectors-ov#define-a-new-connector).
* Add the credentials to a new connection using the Managed connector. See [Add Data Store Connections](#add-data-store-connections).
* If you are reconnecting to a Dundas BI data store, update your existing sources to use the new connection.
1. Create and validate a new Managed connection. You will need to provide the `PROJECT` information associated with the data source, your Dundas BI credentials, and make the `IMPERSONATE_ACCOUNT` field visible. See [Add Data Store Connections](#add-data-store-connections).
2. Navigate to your [Sources](/simba-embedded-analytics/docs/self-service-analytics/26.3/connect-to-data/sources/data-source-config-overview#data-sources-page) page, then select each Managed source to update it to use the new connection. The Folder and Entity you select must match your original configuration. See [Edit a Data Source](/simba-embedded-analytics/docs/self-service-analytics/26.3/connect-to-data/sources/data-source-config-overview#edit-a-data-source).
3. **Save** your changes. Once updated, your data sources will automatically reference the new connection configuration.
For more information on specifically connecting to a Data Cube, see [Add and Validate a Connection to a Dundas BI Data Source or Data Cube](#add-and-validate-a-connection-to-a-dundas-bi-data-source-or).
Delete Data Store Connections
A data store connection cannot be deleted if it is used by any data source configurations. You must first remove it from the data source configurations before you can delete it.
You must be logged in as an administrator or as a user with the [group privilege](/simba-embedded-analytics/docs/self-service-analytics/26.3/administer/users/aaa-ov#group-privilege-reference) **Manage Connections** to maintain data store connection definitions.
**Delete a data store connection:**
1. Log in as an administrator or as a user with the [group privilege](/simba-embedded-analytics/docs/self-service-analytics/26.3/administer/users/aaa-ov#group-privilege-reference) **Manage Connections**.
2. Select the **Connection** card on your home page or **Connections** from the main menu. The [Connections work area](#connections-page) appears. The [Connections page](#connections-page) appears.
The Connections page lists the data store connections you have defined and identifies how many data source configurations each connection uses.
3. Highlight (hover over) the row listing the data store connection you want to delete. You can search the list to locate the connection definition. See [Search and Filter Lists](/simba-embedded-analytics/docs/self-service-analytics/26.3/get-started/welcome#search-and-filter-lists).
4. Select the delete icon ( ) in the Actions column for the associated row.
A warning dialog appears.
5. Select **Delete** on the warning dialog. The connection is deleted.
If you try to delete a visual, filter snippet, dashboard, self service report, dashboard link, source, or source field, Self-Service Analytics displays an error message naming any objects dependent on the item you’re trying to delete. You can delete the item after you’ve removed the association from the dependent object. See [Fields Usage](/simba-embedded-analytics/docs/self-service-analytics/26.3/connect-to-data/sources/data-source-config-fields-tab#fields-usage).
) in the Actions column for the associated row.
A warning dialog appears.
5. Select **Delete** on the warning dialog. The connection is deleted.
If you try to delete a visual, filter snippet, dashboard, self service report, dashboard link, source, or source field, Self-Service Analytics displays an error message naming any objects dependent on the item you’re trying to delete. You can delete the item after you’ve removed the association from the dependent object. See [Fields Usage](/simba-embedded-analytics/docs/self-service-analytics/26.3/connect-to-data/sources/data-source-config-fields-tab#fields-usage).
List Data Store Connections
You can list data store connection definitions on the [Connections page](#connections-page) in the user interface.
You must be logged in as a user with the [group privilege](/simba-embedded-analytics/docs/self-service-analytics/26.3/administer/users/aaa-ov#group-privilege-reference) **Manage Connections** to maintain data store connection definitions.
**List your data store connection definitions:**
1. Log in as a user with the [group privilege **Manage Connections**](/simba-embedded-analytics/docs/self-service-analytics/26.3/administer/users/aaa-ov#group-privilege-reference).
2. Select the **Connection** card on your home page or **Connections** from the main menu. The [Connections work area](#connections-page) appears. The [Connections page](#connections-page) appears.
The Connections page lists the data store connections you have defined and identifies how many data source configurations each connection uses.
Connections Page
The **Connections** page allows you to review and maintain the connection definitions used by Self-Service Analytics connectors.
**Access the Connections page**
1. Log in as an administrator or as a user with the **Manage Connections** [privilege](/simba-embedded-analytics/docs/self-service-analytics/26.3/administer/users/aaa-ov#group-privilege-reference).
2. Select the **Connection** card on your home page or **Connections** from the main menu. The Connections work area appears. The Connections page appears.
The Connections page shows a table listing all the connection definitions available. Several of these columns can be used to sort the list: select the column header to sort first to last and again to sort last to first. You can search for items by the contents of several columns. See [Search and Filter Lists](/simba-embedded-analytics/docs/self-service-analytics/26.3/get-started/welcome#search-and-filter-lists).
| Column Name | Description |
| ------------- | --------------------------------------------------------------------------------- |
| Type | The logo showing the data store type to which the connection definition pertains. |
| Name | The name of the connection definition. |
| Author | The name of the user who defined the connection definition. |
| Modified Date | The date the connection definition was last modified. |
| Sources | The number of defined data sources that use the connection definition. |
| Actions | Allows you to delete the connection definition. |
Select **Create Connection** to add a new connection definition.
If there are many connections listed, you may need to search for the connection you need. Use the search bar to search for a connection in the list. See [Search and Filter Lists](/simba-embedded-analytics/docs/self-service-analytics/26.3/get-started/welcome#search-and-filter-lists).
Use User Attributes for Connection Parameters
User attributes (variables) can be used for the connection parameters in a connection definition. Attributes can be defined for the full connection string, the host name, the port number, the cluster name, the user name, or the password, and any other parameters supported by the connector. The attributes are passed to the connection string via custom attributes specified in the user definition or dynamically in the custom attributes specified in the SAML or LDAP configurations for your environment. This topic describes how to set up this functionality.
* [Step 1: Review and Select Connector Parameters for Which Attributes Can Be Used](#step-1-review-and-select-connector-parameters-for-which)
* [Step 2: Define Custom Attributes](#step-2-define-custom-attributes)
* [Step 3: Define Connections Using User Attributes](#step-3-define-connections-using-user-attributes)
You can also insert variables directly in the connection parameters of a connection definition. See [Insert Variables for Connection Parameters](#insert-variables-for-connection-parameters).
Step 1: Review and Select Connector Parameters for Which Attributes Can Be Used
**Review and select connector parameters for which user attributes can be used**
1. Log in as a system [admin](/simba-embedded-analytics/docs/self-service-analytics/26.3/administer/users/users-manage#admin-user) or a member of the Supervisors group.
2. Select **Tools > Connectors** from the main menu. The Manage Connector Services page appears.
3. In the Connectors section of the page, select connector parameters to review. Alternatively, you can create a new connector definition and review and modify the parameters in the new definition. See [Define a New Connector](/simba-embedded-analytics/docs/self-service-analytics/26.3/connect-to-data/connectors/connectors-ov#define-a-new-connector).
Either the Edit Connector or the Create New Connector page for the connector appears.
4. Review the connector parameters that appear at the bottom of the Edit Connector or Create New Connector page.
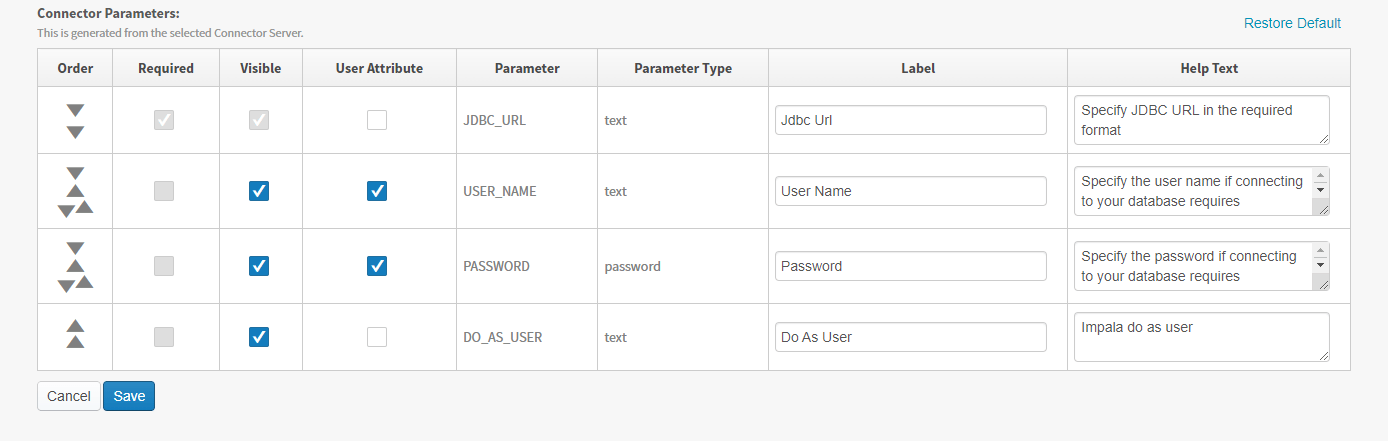
5. In the following Impala connector definition, the **User Attribute** checkbox is selected for the USER\_NAME and PASSWORD parameters. The user definitions in this instance must include custom attributes for these parameters (see [Step 2](#step-2-define-custom-attributes)) and the connection definitions for this Impala connector must select the appropriate custom attributes as user credentials (see [Step 3](#step-3-define-connections-using-user-attributes)).
 6. Alter the other connector parameters, as needed.
* If a connector parameter is required, make sure its **Required** checkbox is selected. Depending on the connector server, some parameters are already selected because they are required.
* If a connector parameter should be visible (especially if the parameter is required) when the connection definition is created, make sure its **Visible** checkbox is selected.
For information about all connector parameters, see [Define a New Connector](/simba-embedded-analytics/docs/self-service-analytics/26.3/connect-to-data/connectors/connectors-ov#define-a-new-connector).
7. Select **Save** to save the connector parameters.
6. Alter the other connector parameters, as needed.
* If a connector parameter is required, make sure its **Required** checkbox is selected. Depending on the connector server, some parameters are already selected because they are required.
* If a connector parameter should be visible (especially if the parameter is required) when the connection definition is created, make sure its **Visible** checkbox is selected.
For information about all connector parameters, see [Define a New Connector](/simba-embedded-analytics/docs/self-service-analytics/26.3/connect-to-data/connectors/connectors-ov#define-a-new-connector).
7. Select **Save** to save the connector parameters.
Step 2: Define Custom Attributes
A custom attribute must be defined for every connector parameter for which you selected the **User Attribute** checkbox in [Step 1](#step-1-review-and-select-connector-parameters-for-which). The only exceptions are the context variables `${User.composerUserName}`, `${User.accountId}`, and `${User.credentials}`. These built-in attributes which automatically exist and can be used connect the currently logged in user.
* `${User.composerUserName}`, `${User.accountId}`: include to insert the name or account ID of the user that is currently logged in.
* `${User.credentials}`: include to pass the session ID or trusted access token (in embedded environments) of the user.
You can define custom attributes in several ways:
* Individually for every user who needs to create data sources from a connection or using the connector. If you use this method, the variable names must be the same for each user. See [Specify Custom User Attributes](/simba-embedded-analytics/docs/self-service-analytics/26.3/administer/users/users-manage#specify-custom-user-attributes).
* Dynamically in the LDAP or SAML configurations for your Self-Service Analytics instance. See [Use Lightweight Directory Access Protocol (LDAP)](/simba-embedded-analytics/docs/self-service-analytics/26.3/administer/security/authorization-tools#use-lightweight-directory-access-protocol-ldap) and [Configure Self-Service Analytics to Support SAML](/simba-embedded-analytics/docs/self-service-analytics/26.3/administer/security/authorization-tools#configure-self-service-analytics-to-support-saml).
JavaScript and HTML Source files used for embedding must be encoded in UTF-8 without BOM.
The same custom attribute key name must be defined and used in all the user definitions of the users expected to use this connection.
Step 3: Define Connections Using User Attributes
**Define connections using user attributes**
1. Log in as an system admin.
2. Create or edit a connection using the connector you updated in [Step 1](#step-1-review-and-select-connector-parameters-for-which). See [Add Data Store Connections](#add-data-store-connections) and [Modify Data Store Connections](#modify-data-store-connections).
3. If a connection parameter is identified as a user attribute, up and down arrows appear in the connection parameter field on the Connections and Connection Details work areas. Use these arrows to select the custom attribute you want to use for the connection from list shown in the **Select Custom Attribute** drop-down menu.
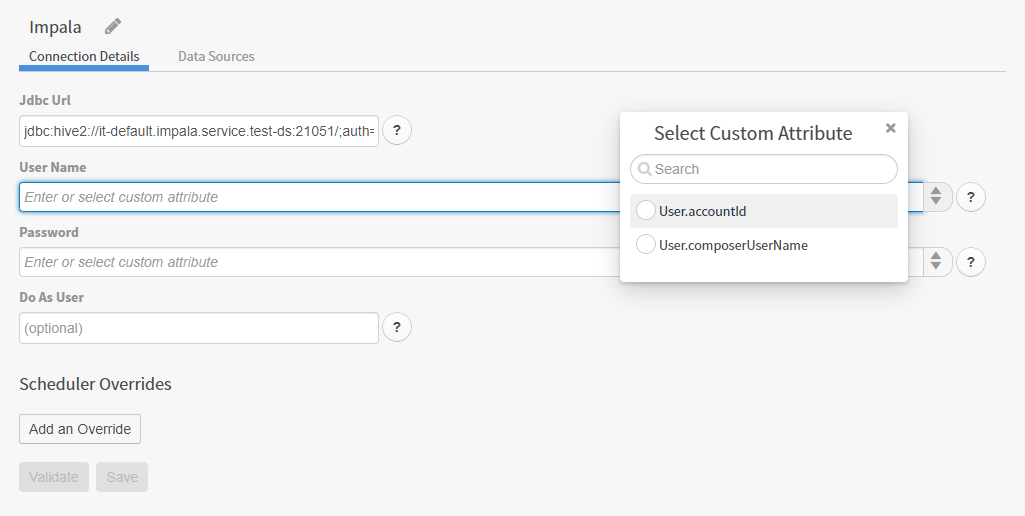 If the [connector](/simba-embedded-analytics/docs/self-service-analytics/26.3/connect-to-data/connectors/connectors-ov#define-a-new-connector) associated with the connection type for the connection definition has **not** been defined with the **User Attribute** checkbox selected (the **User Attribute** checkbox *was* selected in [Step 1](#step-1-review-and-select-connector-parameters-for-which)) for the USER\_NAME or PASSWORD parameters, the Select Custom Attribute drop-down menu is not available and you must manually enter the custom attribute in `${User.}` format. See [Insert Variables for Connection Parameters](#insert-variables-for-connection-parameters). Note that the custom attributes in this case do not use the same format as when you select them from the drop-down menu.
4. Select **Validate** to validate the connection. If the connection is valid, you can save the connection. If invalid, make changes, then select **Validate** again.
5. Select **Save** to save the connection.
If the [connector](/simba-embedded-analytics/docs/self-service-analytics/26.3/connect-to-data/connectors/connectors-ov#define-a-new-connector) associated with the connection type for the connection definition has **not** been defined with the **User Attribute** checkbox selected (the **User Attribute** checkbox *was* selected in [Step 1](#step-1-review-and-select-connector-parameters-for-which)) for the USER\_NAME or PASSWORD parameters, the Select Custom Attribute drop-down menu is not available and you must manually enter the custom attribute in `${User.}` format. See [Insert Variables for Connection Parameters](#insert-variables-for-connection-parameters). Note that the custom attributes in this case do not use the same format as when you select them from the drop-down menu.
4. Select **Validate** to validate the connection. If the connection is valid, you can save the connection. If invalid, make changes, then select **Validate** again.
5. Select **Save** to save the connection.
Insert Variables for Connection Parameters
Variables can be inserted for any connection parameter in a connection definition. The variables are passed to the connection string via custom attributes specified in the user definition or dynamically in the custom attributes specified in the SAML or LDAP configurations for your environment.
You can also specify user attributes for use in the connection parameters of a connection definition. See [Use User Attributes for Connection Parameters](#use-user-attributes-for-connection-parameters).
Step 1: Define Custom Attributes for the Variables
A custom attribute must be defined for every variable you want to use. The only exceptions are the Self-Service Analytics context variables `${User.composerUserName}`, `${User.accountId}`, and `${User.credentials}`. These built-in attributes which automatically exist and can be used connect the currently logged in user.
You can define custom attributes in several ways:
* Individually for every user. If you use this method, the variable names must be the same for every user. See [Specify Custom User Attributes](/simba-embedded-analytics/docs/self-service-analytics/26.3/administer/users/users-manage#specify-custom-user-attributes).
* Dynamically in the LDAP or SAML configurations for your Self-Service Analytics instance. See [Use Lightweight Directory Access Protocol (LDAP)](/simba-embedded-analytics/docs/self-service-analytics/26.3/administer/security/authorization-tools#use-lightweight-directory-access-protocol-ldap) and [Configure Self-Service Analytics to Support SAML](/simba-embedded-analytics/docs/self-service-analytics/26.3/administer/security/authorization-tools#configure-self-service-analytics-to-support-saml).
Details about specifying custom attribute values are provided in [Specify Custom User Attributes](/simba-embedded-analytics/docs/self-service-analytics/26.3/administer/users/users-manage#specify-custom-user-attributes).
Step 2: Define Connections Using Variables
**Define connections using variables**
1. Log in as an system admin.
2. Create or edit a connection definition. See [Add Data Store Connections](#add-data-store-connections) and [Modify Data Store Connections](#modify-data-store-connections).
3. If custom attributes have been defined, they can be directly entered in a connection parameter field on the Connections page using the following syntax:
```
${User.}
```
The same custom attribute key name must be defined and used in all the user definitions of the users expected to use this connection.
For example:
 If the [connector](/simba-embedded-analytics/docs/self-service-analytics/26.3/connect-to-data/connectors/connectors-ov#define-a-new-connector) associated with the connection type for the connection definition has been defined with the [**User Attribute** checkbox](#use-user-attributes-for-connection-parameters) selected for the USER\_NAME or the PASSWORD parameters, a [custom user attribute](/simba-embedded-analytics/docs/self-service-analytics/26.3/administer/users/users-manage#specify-custom-user-attributes) **must** be defined for the user creating the connection and for any users using the connection. In this scenario, the Add Connection screen allows you to select the custom user attribute from a **Select Custom Attribute** drop-down menu, as shown below. Note that the custom attributes in this case are not shown using the same format as when you specify them manually. For complete information, see [Use User Attributes for Connection Parameters](#use-user-attributes-for-connection-parameters).
4. Select **Validate** to validate the connection. If the connection is valid, you can save the connection. If invalid, make changes, then select **Validate** again.
5. Select **Save** to save the connection.
If the [connector](/simba-embedded-analytics/docs/self-service-analytics/26.3/connect-to-data/connectors/connectors-ov#define-a-new-connector) associated with the connection type for the connection definition has been defined with the [**User Attribute** checkbox](#use-user-attributes-for-connection-parameters) selected for the USER\_NAME or the PASSWORD parameters, a [custom user attribute](/simba-embedded-analytics/docs/self-service-analytics/26.3/administer/users/users-manage#specify-custom-user-attributes) **must** be defined for the user creating the connection and for any users using the connection. In this scenario, the Add Connection screen allows you to select the custom user attribute from a **Select Custom Attribute** drop-down menu, as shown below. Note that the custom attributes in this case are not shown using the same format as when you specify them manually. For complete information, see [Use User Attributes for Connection Parameters](#use-user-attributes-for-connection-parameters).
4. Select **Validate** to validate the connection. If the connection is valid, you can save the connection. If invalid, make changes, then select **Validate** again.
5. Select **Save** to save the connection.
Create a Symmetric Key to Encrypt Data Source Passwords
Self-Service Analytics provides a suite of prebuilt connectors that connect the Self-Service Analytics server directly to your data source. If a data store requires a connection password to access the data, the credential information is saved in Self-Service Analytics's storage repository - PostgreSQL. Self-Service Analytics uses symmetric encryption to store the credential information so that it can access the data store, as needed, while providing a level of security for the saved information.
Administrators can generate their own KeyStore using a symmetric key algorithm. This capability provides an additional level of security in the connection to and access of the data sources.
A symmetric key can be generated using Oracle's keytool program, which is a key and certificate management tool. This tool manages a keystore (database) of cryptographic keys, X.509 certificate chains, and trusted certificates. Refer to [Oracle documentation](https://docs.oracle.com/javase/6/docs/technotes/tools/solaris/keytool.html) for additional details about this keytool program.
Use the latest Java SDK to install the keytool program (as older versions of the SDK may require different installation steps).
Remember that this user-generated keystore should be provided to Self-Service Analytics after a new installation, prior to any connections being stored in Self-Service Analytics. If a new user-generated key is provided after some connections are already stored, the passwords for these connections have to be resupplied to Self-Service Analytics after the new key is provided.
### Generate a Keystore with a Symmetric Key
1. [Install the keytool program](https://docs.oracle.com/javase/6/docs/technotes/tools/solaris/keytool.html). Use the latest Java SDK to install the keytool program.
2. Enter the following command line to generate your symmetric key.
```bash theme={null}
keytool -genseckey -alias -keyalg AES -keysize 256 -storetype jceks -keystore .jks
```
3. Create a keystore password and press **Enter** to continue.
4. Create a key password and press **Enter** to continue.
5. Store the keystore file in a location where the Self-Service Analytics Server can access. For example:
```
/etc/zoomdata/.jks
```
Next, you need to edit the `zoomdata.properties` file to add in the parameters needed for Self-Service Analytics to integrate your symmetric key. If you have already logged into Self-Service Analytics, be sure to log out first and close the browser.
6. Edit (or create) the Self-Service Analytics configuration file (`zoomdata.properties`):
```bash theme={null}
vi /etc/zoomdata/zoomdata.properties
```
If the configuration file does not exist, this command creates it.
7. Incorporate instructions for accessing your newly generated keystore file into the **.properties** file as provided below:
```properties theme={null}
keystore.location=file:/etc/zoomdata/.jks
keystore.password=
keystore.key.alias=
keystore.key.password=
```
8. Restart Self-Service Analytics Server. This ensures that the new keystore file is enabled and active within Self-Service Analytics.
For the appropriate Linux commands, see [Restart Microservices](/simba-embedded-analytics/docs/self-service-analytics/26.3/administer/install/about-microsvcs#restart-microservices).
The symmetric key should now be active in Self-Service Analytics. If you see any error messages after the restart, submit a request for assistance.