> ## Documentation Index
> Fetch the complete documentation index at: https://insightsoftware.mintlify.site/llms.txt
> Use this file to discover all available pages before exploring further.

# Publish a Link

> For each visual in a dashboard, you can select cross-source and same-source links to publish for other visuals in the dashboard.

For each visual in a dashboard, you can select cross-source and same-source links to publish. When a visual publishes a link, that visual can apply cross-visual filters using the link field to other dashboard visuals that have subscribed to the link. Cross-visual filters can only be applied if the associated link is published. In addition, they can only be applied using the **Filter** option on the [context menu](/simba-embedded-analytics/docs/self-service-analytics/26.3/analyze-data/visuals/visual-interactivity#use-the-context-menu).

**Publish a same-source or cross-source link for a dashboard visual**

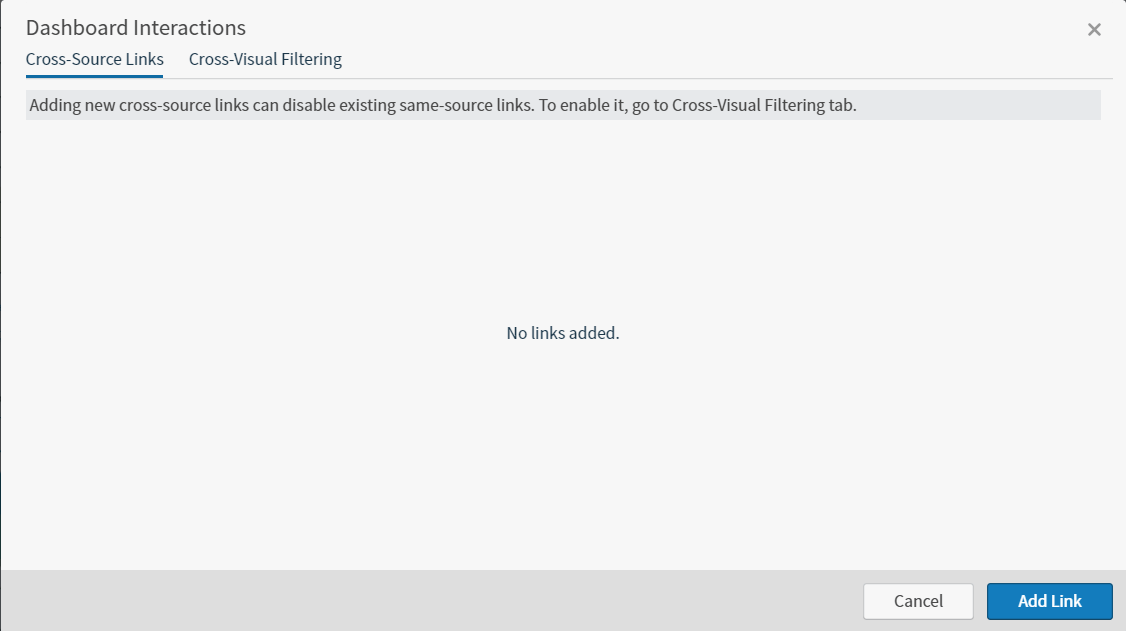
1. Select <img src="https://mintcdn.com/insightsoftware/2cXq_sDOxrDVXUcv/simba-embedded-analytics/docs/self-service-analytics/26.3/images/dashboards/dash-xsourcelink.png?fit=max&auto=format&n=2cXq_sDOxrDVXUcv&q=85&s=a0bac4bcf53aa484043898173bc91e9b" alt="select to manage cross source links in your environment" width="23" height="22" noZoom style={{display: 'inline', verticalAlign: 'middle', width: '23px', height: '22px', margin: '0 2px'}} data-path="simba-embedded-analytics/docs/self-service-analytics/26.3/images/dashboards/dash-xsourcelink.png" /> cross-link icon on the [dashboard icon bar](/simba-embedded-analytics/docs/self-service-analytics/26.3/analyze-data/dashboards/dash-layout#use-the-dashboard-icons). The Dashboard Interactions dialog appears. In the following image, no cross-source links are defined for the dashboard.
   <img src="https://mintcdn.com/insightsoftware/2cXq_sDOxrDVXUcv/simba-embedded-analytics/docs/self-service-analytics/26.3/images/dashboards/dash-interactions.png?fit=max&auto=format&n=2cXq_sDOxrDVXUcv&q=85&s=55eceeadc0879b9103b5313b99ad7d93" alt="" width="1126" height="631" data-path="simba-embedded-analytics/docs/self-service-analytics/26.3/images/dashboards/dash-interactions.png" />

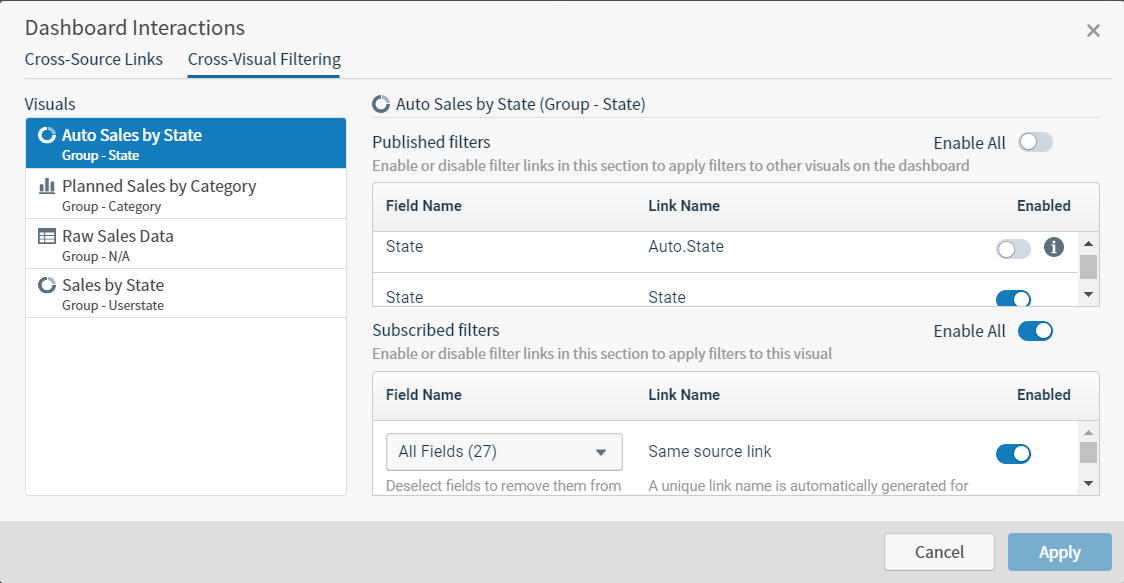
2. Select the **Cross-Visual Filtering** tab.
   <img src="https://mintcdn.com/insightsoftware/2cXq_sDOxrDVXUcv/simba-embedded-analytics/docs/self-service-analytics/26.3/images/dashboards/cross-visfilt.png?fit=max&auto=format&n=2cXq_sDOxrDVXUcv&q=85&s=bfa13b0e4b9e9b8bd92a5bd6d25ae825" alt="" width="1124" height="583" data-path="simba-embedded-analytics/docs/self-service-analytics/26.3/images/dashboards/cross-visfilt.png" />

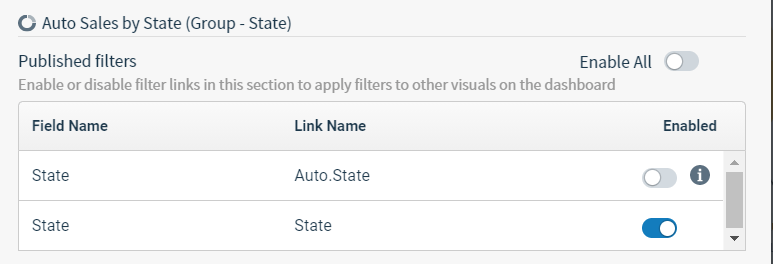
3. Select a visual in the **Visuals** list on the left of the tab. The right side of the tab show the link filters available to be published in the **Published filters** table.
   <img src="https://mintcdn.com/insightsoftware/2cXq_sDOxrDVXUcv/simba-embedded-analytics/docs/self-service-analytics/26.3/images/dashboards/cross-vispub.png?fit=max&auto=format&n=2cXq_sDOxrDVXUcv&q=85&s=7b91e82d139b1b1c5c6c7c526eda302b" alt="" width="773" height="264" data-path="simba-embedded-analytics/docs/self-service-analytics/26.3/images/dashboards/cross-vispub.png" />

4. If you want to publish all of the links available for the visual, slide the **Enable All** switch on (to the right).

   If you just want to publish an individual link, locate the link name in the table of **Published filters**, and slide its corresponding switch in the **Enabled** column on. Repeat this for every individual link you want published.

5. When you have finished identifying the published links for a visual, select **Apply**.

6. Optionally, repeat Steps 3 through 5 for other visuals listed on the left of the tab. Remember to select **Apply** after each update or the link settings for a visual will not be stored.

7. [Save](/simba-embedded-analytics/docs/self-service-analytics/26.3/analyze-data/dashboards/dash-manage#save-a-dashboard) the dashboard to save the cross-visual link specifications.

<h2 id="mute-a-published-link">
  Mute a Published Link
</h2>

For each visual in a dashboard, you can mute (disable) cross-source and same-source links for the dashboard. When they are muted, they can no longer be used by the visual to create cross-visual filters. You can mute links from the Dashboard Interactions dialog.

You can also revoke (undo) published links from the visual itself. See [Revoke a Published Link](#revoke-a-published-link).

**Mute a same-source or cross-source link from the Dashboard Interactions dialog**

1. Select <img src="https://mintcdn.com/insightsoftware/2cXq_sDOxrDVXUcv/simba-embedded-analytics/docs/self-service-analytics/26.3/images/dashboards/dash-xsourcelink.png?fit=max&auto=format&n=2cXq_sDOxrDVXUcv&q=85&s=a0bac4bcf53aa484043898173bc91e9b" alt="select to manage cross source links in your environment" width="23" height="22" noZoom style={{display: 'inline', verticalAlign: 'middle', width: '23px', height: '22px', margin: '0 2px'}} data-path="simba-embedded-analytics/docs/self-service-analytics/26.3/images/dashboards/dash-xsourcelink.png" /> cross-link icon on the [dashboard icon bar](/simba-embedded-analytics/docs/self-service-analytics/26.3/analyze-data/dashboards/dash-layout#use-the-dashboard-icons). The Dashboard Interactions dialog appears. In the following image, no cross-source links are defined for the dashboard.

   <img src="https://mintcdn.com/insightsoftware/2cXq_sDOxrDVXUcv/simba-embedded-analytics/docs/self-service-analytics/26.3/images/dashboards/dash-interactions.png?fit=max&auto=format&n=2cXq_sDOxrDVXUcv&q=85&s=55eceeadc0879b9103b5313b99ad7d93" alt="" width="1126" height="631" data-path="simba-embedded-analytics/docs/self-service-analytics/26.3/images/dashboards/dash-interactions.png" />

2. Select the **Cross-Visual Filtering** tab.

   <img src="https://mintcdn.com/insightsoftware/2cXq_sDOxrDVXUcv/simba-embedded-analytics/docs/self-service-analytics/26.3/images/dashboards/cross-visfilt.png?fit=max&auto=format&n=2cXq_sDOxrDVXUcv&q=85&s=bfa13b0e4b9e9b8bd92a5bd6d25ae825" alt="" width="1124" height="583" data-path="simba-embedded-analytics/docs/self-service-analytics/26.3/images/dashboards/cross-visfilt.png" />

3. Select a visual in the **Visuals** list on the left of the tab. The right side of the tab show the link filters available to be published in the **Published filters** table.

   <img src="https://mintcdn.com/insightsoftware/2cXq_sDOxrDVXUcv/simba-embedded-analytics/docs/self-service-analytics/26.3/images/dashboards/cross-vispub.png?fit=max&auto=format&n=2cXq_sDOxrDVXUcv&q=85&s=7b91e82d139b1b1c5c6c7c526eda302b" alt="" width="773" height="264" data-path="simba-embedded-analytics/docs/self-service-analytics/26.3/images/dashboards/cross-vispub.png" />

4. If you want to mute all of the links available for the visual, slide the **Enable All** switch off (to the left). It no longer is blue.

   If you just want to mute an individual link, locate the link name in the table of **Published filters**, and slide its corresponding switch in the **Enabled** column off. Repeat this for every individual link you want muted.

5. Optionally, repeat Steps 3 and 4 for other visuals listed on the left of the tab.

6. When you have finished muting the links, select **Apply**.

7. [Save](/simba-embedded-analytics/docs/self-service-analytics/26.3/analyze-data/dashboards/dash-manage#save-a-dashboard) the dashboard to save the cross-visual link specifications.

<h2 id="revoke-a-published-link">
  Revoke a Published Link
</h2>

You can revoke (undo) published links from the visual itself. This does not mute the published link, but simply removes its application from the dashboard visuals.

You can also mute a published link using the Data Interactions dialog. See [Mute a Published Link](#mute-a-published-link).

**Revoke a published same-source or cross-source link from the dashboard visual**

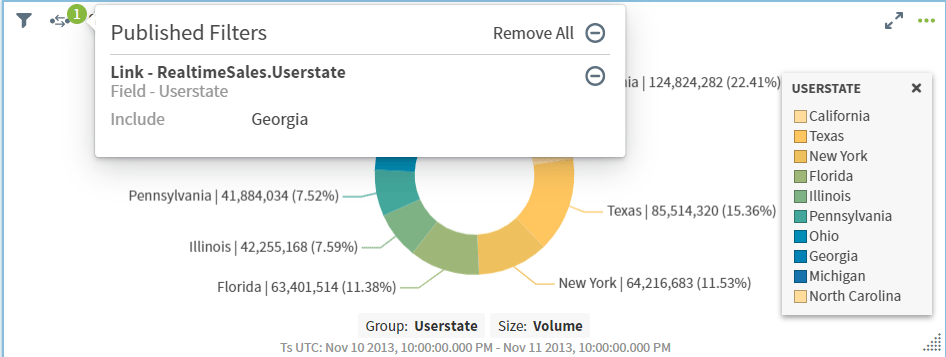
1. Select <img src="https://mintcdn.com/insightsoftware/sLccJ1EJ28cO5lT_/simba-embedded-analytics/docs/self-service-analytics/26.3/images/icons/dash-interact.png?fit=max&auto=format&n=sLccJ1EJ28cO5lT_&q=85&s=363d120a7c4e016429e394b06d6d713d" alt="" width="26" height="18" noZoom style={{display: 'inline', verticalAlign: 'middle', width: '26px', height: '18px', margin: '0 2px'}} data-path="simba-embedded-analytics/docs/self-service-analytics/26.3/images/icons/dash-interact.png" /> dashboard interaction icon on the visual. A drop-down dialog appears for the visual, listing all of the links resulting in published filters for the other visuals on the dashboard.
   <img src="https://mintcdn.com/insightsoftware/cQU1Auv4yvPMjcip/simba-embedded-analytics/docs/self-service-analytics/26.3/images/visuals/pubsub-vis.png?fit=max&auto=format&n=cQU1Auv4yvPMjcip&q=85&s=ea5d77fc79a585dcc9fa53a48c73f98e" alt="" width="946" height="357" data-path="simba-embedded-analytics/docs/self-service-analytics/26.3/images/visuals/pubsub-vis.png" />

2. Select the remove icon <img src="https://mintcdn.com/insightsoftware/sLccJ1EJ28cO5lT_/simba-embedded-analytics/docs/self-service-analytics/26.3/images/icons/delete-grey.png?fit=max&auto=format&n=sLccJ1EJ28cO5lT_&q=85&s=b5cae506ca0133d74de0b5c2feb623ea" alt="" width="17" height="17" noZoom style={{display: 'inline', verticalAlign: 'middle', width: '17px', height: '17px', margin: '0 2px'}} data-path="simba-embedded-analytics/docs/self-service-analytics/26.3/images/icons/delete-grey.png" /> next to the link you want to revoke or select the remove icon <img src="https://mintcdn.com/insightsoftware/sLccJ1EJ28cO5lT_/simba-embedded-analytics/docs/self-service-analytics/26.3/images/icons/delete-grey.png?fit=max&auto=format&n=sLccJ1EJ28cO5lT_&q=85&s=b5cae506ca0133d74de0b5c2feb623ea" alt="" width="17" height="17" noZoom style={{display: 'inline', verticalAlign: 'middle', width: '17px', height: '17px', margin: '0 2px'}} data-path="simba-embedded-analytics/docs/self-service-analytics/26.3/images/icons/delete-grey.png" /> next to Remove All to revoke all the links published by the visual.

   The links are revoked and all filters applied by the links are removed.

3. [Save](/simba-embedded-analytics/docs/self-service-analytics/26.3/analyze-data/dashboards/dash-manage#save-a-dashboard) the dashboard to save the cross-visual link specifications.

<h2 id="subscribe-a-visual-to-a-link">
  Subscribe a Visual to a Link
</h2>

You can select cross-source and same-source links to which a visual on a dashboard should subscribe (use). When a visual subscribes to a link, the visual will be filtered by the link field if another visual creates a cross-visual filter for the same field.

**Subscribe to a same-source or cross-source link for a dashboard visual**

1. Select the link icon <img src="https://mintcdn.com/insightsoftware/2cXq_sDOxrDVXUcv/simba-embedded-analytics/docs/self-service-analytics/26.3/images/dashboards/dash-xsourcelink.png?fit=max&auto=format&n=2cXq_sDOxrDVXUcv&q=85&s=a0bac4bcf53aa484043898173bc91e9b" alt="select to manage cross source links in your environment" width="23" height="22" noZoom style={{display: 'inline', verticalAlign: 'middle', width: '23px', height: '22px', margin: '0 2px'}} data-path="simba-embedded-analytics/docs/self-service-analytics/26.3/images/dashboards/dash-xsourcelink.png" /> on the [dashboard icon bar](/simba-embedded-analytics/docs/self-service-analytics/26.3/analyze-data/dashboards/dash-layout#use-the-dashboard-icons). The Dashboard Interactions dialog appears. In the following image, no cross-source links are defined for the dashboard.

   <img src="https://mintcdn.com/insightsoftware/2cXq_sDOxrDVXUcv/simba-embedded-analytics/docs/self-service-analytics/26.3/images/dashboards/dash-interactions.png?fit=max&auto=format&n=2cXq_sDOxrDVXUcv&q=85&s=55eceeadc0879b9103b5313b99ad7d93" alt="" width="480" height="269" data-path="simba-embedded-analytics/docs/self-service-analytics/26.3/images/dashboards/dash-interactions.png" />

2. Select the **Cross-Visual Filtering** tab.

   <img src="https://mintcdn.com/insightsoftware/2cXq_sDOxrDVXUcv/simba-embedded-analytics/docs/self-service-analytics/26.3/images/dashboards/cross-visfilt.png?fit=max&auto=format&n=2cXq_sDOxrDVXUcv&q=85&s=bfa13b0e4b9e9b8bd92a5bd6d25ae825" alt="" width="480" height="249" data-path="simba-embedded-analytics/docs/self-service-analytics/26.3/images/dashboards/cross-visfilt.png" />

3. Select a visual in the **Visuals** list on the left of the tab. The right side of the tab show the link filters to which the visual can subscribe in the **Subscribed filters** table.
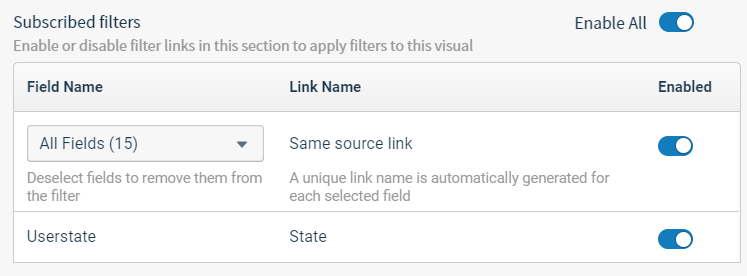
   <img src="https://mintcdn.com/insightsoftware/2cXq_sDOxrDVXUcv/simba-embedded-analytics/docs/self-service-analytics/26.3/images/dashboards/cross-vissub.png?fit=max&auto=format&n=2cXq_sDOxrDVXUcv&q=85&s=530b8faaa637ba7b8ae68963a20e4d50" alt="" width="480" height="177" data-path="simba-embedded-analytics/docs/self-service-analytics/26.3/images/dashboards/cross-vissub.png" />

4. If you want the visual to subscribe to all of the links available, slide the **Enable All** switch on (to the right).

   If you just want the visual to subscribe to an individual link, locate the link name in the table of **Subscribed filters**, and slide its corresponding switch in the **Enabled** on. Repeat this for every individual link to which you want the visual subscribed.

5. Optionally, repeat Steps 3 and 4 for other visuals listed on the left of the tab.

6. When you have finished identifying the subscribed links, select **Apply**.

7. [Save](/simba-embedded-analytics/docs/self-service-analytics/26.3/analyze-data/dashboards/dash-manage#save-a-dashboard) the dashboard to save the cross-visual link specifications.

<h2 id="mute-a-subscribed-link-for-a-visual">
  Mute a Subscribed Link for a Visual
</h2>

You can mute (disable) cross-source and same-source links that you do *not* want a visual on a dashboard to subscribe (use). When a visual mutes a link subscription, the visual can no longer be filtered by the link field if another visual creates a cross-visual filter for it.

**Mute to a same-source or cross-source link for a dashboard visual**

1. Select the link icon <img src="https://mintcdn.com/insightsoftware/2cXq_sDOxrDVXUcv/simba-embedded-analytics/docs/self-service-analytics/26.3/images/dashboards/dash-xsourcelink.png?fit=max&auto=format&n=2cXq_sDOxrDVXUcv&q=85&s=a0bac4bcf53aa484043898173bc91e9b" alt="select to manage cross source links in your environment" width="23" height="22" noZoom style={{display: 'inline', verticalAlign: 'middle', width: '23px', height: '22px', margin: '0 2px'}} data-path="simba-embedded-analytics/docs/self-service-analytics/26.3/images/dashboards/dash-xsourcelink.png" /> on the [dashboard icon bar](/simba-embedded-analytics/docs/self-service-analytics/26.3/analyze-data/dashboards/dash-layout#use-the-dashboard-icons). The Dashboard Interactions dialog appears. In the following image, no cross-source links are defined for the dashboard.

   <img src="https://mintcdn.com/insightsoftware/2cXq_sDOxrDVXUcv/simba-embedded-analytics/docs/self-service-analytics/26.3/images/dashboards/dash-interactions.png?fit=max&auto=format&n=2cXq_sDOxrDVXUcv&q=85&s=55eceeadc0879b9103b5313b99ad7d93" alt="" width="480" height="269" data-path="simba-embedded-analytics/docs/self-service-analytics/26.3/images/dashboards/dash-interactions.png" />

2. Select the **Cross-Visual Filtering** tab.

   <img src="https://mintcdn.com/insightsoftware/2cXq_sDOxrDVXUcv/simba-embedded-analytics/docs/self-service-analytics/26.3/images/dashboards/cross-visfilt.png?fit=max&auto=format&n=2cXq_sDOxrDVXUcv&q=85&s=bfa13b0e4b9e9b8bd92a5bd6d25ae825" alt="" width="480" height="249" data-path="simba-embedded-analytics/docs/self-service-analytics/26.3/images/dashboards/cross-visfilt.png" />

3. Select a visual in the **Visuals** list on the left of the tab. The right side of the tab show the link filters to which the visual can subscribe in the **Subscribed filters** table.

   <img src="https://mintcdn.com/insightsoftware/2cXq_sDOxrDVXUcv/simba-embedded-analytics/docs/self-service-analytics/26.3/images/dashboards/cross-vissub.png?fit=max&auto=format&n=2cXq_sDOxrDVXUcv&q=85&s=530b8faaa637ba7b8ae68963a20e4d50" alt="" width="480" height="177" data-path="simba-embedded-analytics/docs/self-service-analytics/26.3/images/dashboards/cross-vissub.png" />

4. If you want the visual to mute all of the links available, slide the **Enable All** switch off (to the left). It no longer is blue.

   If you just want the visual to mute an individual link, locate the link name in the table of **Subscribed filters**, and slide its corresponding switch in the **Enabled** off. Repeat this for every individual link you want muted.

5. Optionally, repeat Steps 3 and 4 for other visuals listed on the left of the tab.

6. When you have finished muting the links, select **Apply**.

7. [Save](/simba-embedded-analytics/docs/self-service-analytics/26.3/analyze-data/dashboards/dash-manage#save-a-dashboard) the dashboard to save the cross-visual link specifications.

<h2 id="publish-custom-cross-visual-filters">
  Publish Custom Cross-Visual Filters
</h2>

You can build and enable your own custom cross-visual filters. An example is provided below.

<Note>
  If you use date-time fields in your custom cross-visual filters, they must be in the format required by Self-Service Analytics. See [Date-Time Formats in Cross-Visual Filters](/simba-embedded-analytics/docs/self-service-analytics/26.3/analyze-data/filters/pubsub-ov#date-time-formats-in-cross-visual-filters) for information on the required date-time format and an example for how to convert your data to the required format.
</Note>

```javascript theme={null}
// START: PUB/SUB COMMON SECTION
// An embedding application should listen for the 'composer-dashboard-ready' event
// BEFORE attempting to publish or subscribe to cross-visual filters. The code below
// should be specified at the beginning of both publish and subscribe Javascript code.

const DASHBOARD_READY_EVENT = 'composer-dashboard-ready';
  const pubSubReady = new Promise((resolve) => {
    const resolvePubSubReady = (message, publisherId) => {
      resolve();
      document.removeEventListener(DASHBOARD_READY_EVENT, resolvePubSubReady);
    }
    document.addEventListener(DASHBOARD_READY_EVENT, resolvePubSubReady);
  });
/* END: Pub/Sub common section */

/* START: Publish to Cross-Visual Filters */

// The following code represents the From and To date pickers on the
// embedding application's page that allow users to filter the data by
// a date range.  The BETWEEN operator is used for the link name
// defined in the dashboard called 'LaunchedDate'. Note that the first part of
// this code converts the date-time data to the format expected by Composer.

const dateFromInput = document.getElementById('date-from');
  const dateToInput = document.getElementById('date-to');

const formatDate = (date) => {
    const d = new Date(date);
  const year = `${d.getFullYear()}`;
    let month = `${d.getMonth() + 1}`;
  let day = `${d.getDate()}`;
    if (month.length < 2) {
      month = `0${month}`;
    }
    if (day.length < 2) {
      day = `0${day}`;
    }

    return `${year}-${month}-${day}`;
  }

  const getEndOfDayString = dateString => `${dateString} 23:59:59.999`;
  const getStartOfDayString = dateString => `${dateString} 00:00:00.000`;

    const dateInputChangeHandler = (event) => {
        const dateFromInputValue = dateFromInput.value;
        const dateToInputValue = dateToInput.value;

      const dateFrom = dateFromInputValue ? new Date(dateFromInput.value) : null;
      const dateTo = dateToInputValue ? new Date(dateToInput.value) : null;

        const dateFromString = dateFrom ? formatDate(dateFrom) : null;
        const dateToString = dateTo ? formatDate(dateTo) : null;

        const dateTimeFromString = dateFromString ? getEndOfDayString(dateFromString) : null;
      const dateTimeToString = dateToString ? getStartOfDayString(dateToString) : null;

        let operation = 'BETWEEN';
      let value = [dateTimeFromString, dateTimeToString];

          if (!dateTimeFromString) {
          operation = 'LT';
          value = dateTimeToString;
        }

          if (!dateTimeToString) {
          operation = 'GT';
          value = dateTimeFromString;
        }

          let publishObject = {
            type: 'selection',
            valueType: 'TIME',
            ranges: [
                {
                  operation: '<operation>',
                  value: '<value>'
                }
            ]
        }

          if (!dateTimeFromString && !dateTimeToString) {
          publishObject = null;
        }

        pubSubReady.then(() =>  embedManager.publish('LaunchedDate', publishObject));
      }

      dateFromInput.addEventListener('change', dateInputChangeHandler);
      dateToInput.addEventListener('change', dateInputChangeHandler);

// This represents a drop-down field on the embedding application's page that
// lists a set of countries the user can filter by. After selecting a value,
// the embedding application calls its 'publishValue' function, defined
// below with the link name '<linkname> and the selected country value.
// The link name is defined in the dashboard. To clear the value filter,
// make sure you pass a null value as shown below.

      const fieldSelect = document.getElementById('field-select');
      fieldSelect.addEventListener('change', (event) => {
          const value = event.target.value;
          const publishObject = value !== 'null' ? {
              type: 'selection',
              valueType: 'ATTRIBUTE',
              ranges: [
                {
                  operation: 'IN',
                  value: '<value>'
                }
              ]
          } : null;
          pubSubReady.then(() =>  embedManager.publish('Country', publishObject));
        });
/* END: Publish to Cross-Visual Filters */
```

The `publish` method publishes a message (filter) for a specific cross-source or same-source link (channel). Publishing a link filter causes any subscribing handlers for the link to be called and passed the filter message. There is no registration process for a link, simply call the `publish` method with a link name and it will be created. No value is returned.

<table>
  <thead>
    <tr>
      <th>Property/Object</th>
      <th>Description</th>
    </tr>
  </thead>

  <tbody>
    <tr>
      <td>`<linkName>`</td>

      <td>
        The link (channel) name. Link names can be custom names, specified when a cross-source link is created, or names in the format `<source-name>.<field-name>`, automatically generated for every field in a data source for same-source links.

        <br />

        The link name is defined when you define a cross-source link. See [Define Cross-Source Links](/simba-embedded-analytics/docs/self-service-analytics/26.3/analyze-data/filters/using-cross-source-links#define-cross-source-links). It is published for use by a dashboard as a cross-visual filter. See Publish a Link. The link name represents the channel into which the message should be published. It is typically called a *topic* in standard publish/subscribe systems.

        <br />

        <Warning>
          There is a one-to-one relationship between cross-source link names and your data fields. You cannot use the same link name for multiple data fields. In addition, you cannot create multiple cross-source links for the same data field.
        </Warning>

        <br />

        Type: string
      </td>
    </tr>

    <tr>
      <td>`<message>`</td>

      <td>
        The message sent with the link. The message published can either be an arbitrary object or null. An object published to a link channel is not restricted to any particular structure but a Self-Service Analytics dashboard only recognizes messages in the structure described in [Published Cross-Visual JavaScript Message Structure](/simba-embedded-analytics/docs/self-service-analytics/26.3/embed-and-extend/embed/pubsub-embed#published-cross-visual-javascript-message-structure).

        <br />

        Publishing a null message can clear the last published message from the channel. If the last published message's `publisherId` matches the null message's `publisherId`, the last message is removed from the channel and subscribers receive a null message. If the `publisherId` of the last published message on the channel does not match the null message's `publisherId`, nothing happens.

        <br />

        The most recently published message on each channel is stored and sent to new subscribers at the time of subscription.

        <br />

        Type: object or null
      </td>
    </tr>

    <tr>
      <td>`<options>`</td>

      <td>
        Options for how the link should be applied. All values are optional. Options include:

        <br />

        * `options.publisherId`: An arbitrary sting identifying the publisher of the link. This can be used to handle subscriptions differently based on publisher. For example, a subscriber may decide not to apply messages they posted themselves.
        * `options.timestamp`: A number representing the time at which the link is published. It defaults to `Date.now()`.
        * `options.targetComponents`: A string that allows the publisher to target only specific dashboards when more than one dashboard is embedded on a page. If not provided, it applies the link to all embedded dashboards. To target a component, add its `componentInstanceId` (provided in the return from the call to `embedManager.createComponent`).

        <br />

        Type: object
      </td>
    </tr>
  </tbody>
</table>

<table>
  <thead>
    <tr>
      <th>Property</th>
      <th>Description</th>
    </tr>
  </thead>

  <tbody>
    <tr>
      <td>`type: 'selection'`</td>

      <td>
        Only a value of `selection` is supported at this time, identifying a selection of values on a visual or widget. This signifies that the message is a `SelectionMessage`.

        <br />

        Type: string
      </td>
    </tr>

    <tr>
      <td>`valueType: 'NUMBER'`</td>

      <td>
        Identifies the type of value being selected. The following value types are supported:

        <br />

        * ATTRIBUTE - Use for string values
        * NUMBER - Use for integer and floating point values
        * TIME - Use for date and date-time values

        <br />

        Type: string
      </td>
    </tr>

    <tr>
      <td>`ranges`</td>

      <td>
        An array of selected ranges. The set of allowed operations depends on the specified `valueType`. Currently only a single range is supported per message (filter). Ranges after the first range will be ignored. Ranges should be structured as follows:

        <br />

        ```
        ranges: [
           {
              operation: '<operation>',
              value: '<value>'
           },
        ]
        ```

        <br />

        The `operation` and `value` properties are described next.

        <br />

        Type: array
      </td>
    </tr>

    <tr>
      <td>`operation: 'EQUALS'`</td>

      <td>
        The filter operation. Supported operations include:

        <br />

        * `IN` - Includes. Supported for ATTRIBUTE and NUMBER `valueType`s. Provide an array of values for `value`.
        * `NOTIN` - Excludes. Supported for ATTRIBUTE and NUMBER `valueType`s. Provide an array of values for `value`.
        * `BETWEEN` - Between. Supported for NUMBER or TIME `valueType`s. Provide a two-item array of the start and end values for `value`.
        * `GT` - Greater Than. Supported for NUMBER or TIME `valueType`s. Provide a single value to compare against for `value`.
        * `GE` - Greater Than or Equal To. Supported for NUMBER or TIME `valueTypes`s. Provide a single value to compare against for `value`.
        * `EQUALS` - Equal To. Supported for NUMBER or TIME `valueTypes`s. Provide a single value to compare against for `value`.
        * `NOTEQUALS` - Not Equal To. Supported for NUMBER or TIME `valueTypes`s. Provide a single value to compare against for `value`.
        * `LE` - Less Than or Equal To. Supported for NUMBER or TIME `valueTypes`s. Provide a single value to compare against for `value`.
        * `LT` - Less Than. Supported for NUMBER or TIME `valueTypes`s. Provide a single value to compare against for `value`.

        <br />

        Type: string
      </td>
    </tr>

    <tr>
      <td>`value: '6'`</td>

      <td>
        Provide a value as described for each filter `operation`.

        <br />

        Type: string, number, array\<string | number | null>
      </td>
    </tr>
  </tbody>
</table>

<h2 id="subscribe-to-a-cross-visual-filter">
  Subscribe to a Cross-Visual Filter
</h2>

When a visual subscribes to a cross-visual filter, the visual is filtered by the link field in the filter if another visual creates a cross-visual filter for the same field.

When a visual publishes a link, that visual can apply cross-visual filters using the link field to other dashboard visuals that have subscribed to the link. Cross-visual filters can only be applied if the associated link is published. In addition, they can only be applied using the **Filter** option on the [context menu](/simba-embedded-analytics/docs/self-service-analytics/26.3/analyze-data/visuals/visual-interactivity#use-the-context-menu).

The following example shows how to subscribe to a cross-visual filter:

```javascript theme={null}
// An embedding application should listen for the 'composer-dashboard-ready' event
// before attempting to publish or subscribe

const DASHBOARD_READY_EVENT = 'composer-dashboard-ready';
const pubSubReady = new Promise((resolve) => {
   function resolvePubSubReady() {
      resolve();
      document.removeEventListener(DASHBOARD_READY_EVENT, resolvePubSubReady);
   }
   document.addEventListener(DASHBOARD_READY_EVENT, resolvePubSubReady);
});

// The following covers an example of how to subscribe to a linkName and receive
// the latest value published

function subscriptionHandler(<message>, <publisherId>) {
   if (<message> === null) {
      alert(<publisherId> + ' cleared its publication');
   } else {
      const value = message.ranges[0].value;
      alert(<publisherId> + ' published ' + value);
   }
}
let unsubscribe;
pubSubReady.then(() => {
   // The returned unsubscribe function should be stored and called when the
   // subscriber should stop receiving messages.
   unsubscribe = window.Zoomdata.subscribe('<linkname>', subscriptionHandler);
});
```

### The `subscribe` Method

The `subscribe` method attaches a subscription handler to a cross-source or same-source link (filter). Each time a new cross-visual filter is published to the link, the subscription handler is called and passed the newly published filter.

When you call the `subscribe` method, the `unsubscribe` function is returned. Run the `unsubscribe` function to remove the handler for the link. This guarantees that the handler will no longer be notified when new messages are published for the link.

Messages passed on the channel can be an arbitrary message object or `null`. Because the message objects are not restricted, the subscription handler should never assume its structure and always check that the message is in the structure the handler is expecting.

Messages that are `null` are interpreted as a clearing of the channel and should be handled by undoing any actions taken based on the last messages received by the handler. For example, when a visual receives a `null` message in its filtering logic, it removes any filters created by previous messages on the given channel (link).

If a message is published to the channel before the `subscribe` method is called, the subscription handler is executed immediately with the latest message that was published on the channel.

### The `subscribe` Properties

The properties for the `subscribe` method of the `Zoomdata` class are described in the following table.

<table>
  <thead>
    <tr>
      <th>Property/Object</th>
      <th>Description</th>
    </tr>
  </thead>

  <tbody>
    <tr>
      <td>`<linkName>`</td>

      <td>
        The link (channel) name to which the subscription handler should subscribe.

        <br />

        The link name is defined when you define a cross-source link. See [Define Cross-Source Links](/simba-embedded-analytics/docs/self-service-analytics/26.3/analyze-data/filters/using-cross-source-links#define-cross-source-links). It is published for use by a dashboard as a cross-visual filter. See Publish a Link. The link name represents the channel from which the message should be subscribed. It is typically called a *topic* in standard publish/subscribe systems.

        <br />

        <Warning>
          There is a one-to-one relationship between cross-source link names and your data fields. You cannot use the same link name for multiple data fields. In you cannot create multiple cross-source links for the same data field.
        </Warning>

        <br />

        Type: string
      </td>
    </tr>

    <tr>
      <td>`subscriptionHandler`</td>

      <td>
        The handler that will be called upon new messages. This handler will be provided with the published message as the first argument and the ID of the publisher as the second argument.

        <br />

        Type: function
      </td>
    </tr>
  </tbody>
</table>

<h2 id="custom-chart-support-for-cross-visual-links-and-filters">
  Custom Chart Support for Cross-Visual Links and Filters
</h2>

The `cmp-chart` CLI supports the ability to publish and subscribe to cross-visual links. To implement publish/subscribe cross-visual filtering for custom charts, use the CLI to edit your charts and enable the controls for publish and subscribe. See [Step 4. Enable Cross-Visual Filtering](/simba-embedded-analytics/docs/self-service-analytics/26.3/embed-and-extend/custom-charts/custom-chart-tut-ov-pt4#step-4-enable-cross-visual-filtering).

<Note>
  Publish should only be enabled if the custom chart uses the context menu and filtering.
</Note>

Cross-source links and same-source links are automatically populated and supported on the **Cross-Visual Filtering** tab of the [Dashboard Interactions dialog](/simba-embedded-analytics/docs/self-service-analytics/26.3/analyze-data/filters/pubsub-ov#understand-the-cross-visual-filtering-tab) for custom charts when they are added to a dashboard, in the following circumstances.

* When a custom chart has the **Filter** option in its context menu, same-source links appear in the **Published filters** and **Subscribed filters** sections of the tab.

* When a custom chart does *not* have the **Filter** option in its context menu, same-source links appear in the **Subscribed filters** section of the tab, but no **Published filters** section is shown.

* When two custom charts using different data sources are added to the dashboard and a cross-source link is added between their data sources, the cross-source link appears in the **Published filters** section for the chart that can publish the link (the chart using the first data source in the cross-source link) only. However, the cross-source link appears in the **Subscribed filters** section for both charts.

* Cross-visual filters are *automatically* applied to custom charts when they are added to a dashboard, in the following circumstances.

  * When two custom charts using the same data source are added to the dashboard, a cross-visual filter specified for the same-source link field on one custom chart is automatically applied to the other custom chart.
  * When two custom charts using different data sources are added to the dashboard and a cross-source link is added between their data sources, a cross-visual filter specified for the cross-source link field on one custom chart is automatically applied to the other custom chart.
