> ## Documentation Index
> Fetch the complete documentation index at: https://insightsoftware.mintlify.site/llms.txt
> Use this file to discover all available pages before exploring further.

# Configure Kerberos Single Sign-On (SSO) Settings

> Your software supports Kerberos as a Single Sign On (SSO) mechanism.

Kerberos is an enterprise authentication protocol that uses the concept of tickets and three-way authentication to enable users and computers to identify themselves and secure access to resources.

Self-Service Analytics supports Kerberos as a Single Sign On (SSO) mechanism. Using Kerberos SSO, users can seamlessly log into Self-Service Analytics and administrators can completely externalize and centrally manage users or group memberships using their existing Kerberos infrastructure. You can learn more about Kerberos [here](https://en.wikipedia.org/wiki/Kerberos_%28protocol%29).

### How It Works

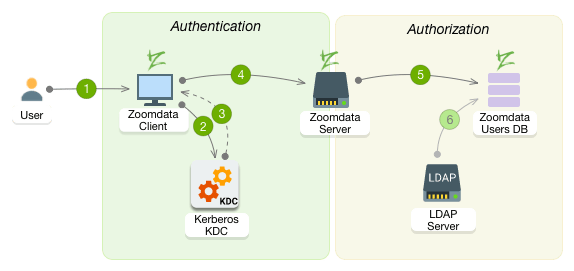
When using Kerberos with Self-Service Analytics, the workflow is as follows:

1. A user logs in to their company domain (for example, logging into a Windows workstation) and is authenticated with Kerberos. In the case of Windows environments, this is likely Active Directory.
2. In a browser window, the user visits the Self-Service Analytics application and Self-Service Analytics then leverages the user's Kerberos identity to automatically log them into Self-Service Analytics. If this is a users first visit to Self-Service Analytics, then Self-Service Analytics will auto-provision them as a new user in the Self-Service Analytics environment.
3. Kerberos authentication is often paired with LDAP to look up a user's authorization or group membership. Self-Service Analytics will look up the user's group membership. For more information, see the topic on [Use Lightweight Directory Access Protocol (LDAP)](/simba-embedded-analytics/docs/self-service-analytics/26.3/administer/security/authorization-tools#use-lightweight-directory-access-protocol-ldap) .

<img src="https://mintcdn.com/insightsoftware/sLccJ1EJ28cO5lT_/simba-embedded-analytics/docs/self-service-analytics/26.3/images/diagrams/kerberos.png?fit=max&auto=format&n=sLccJ1EJ28cO5lT_&q=85&s=f3c91abdd9387ad5e5e3a060bd996d3f" alt="" width="574" height="271" data-path="simba-embedded-analytics/docs/self-service-analytics/26.3/images/diagrams/kerberos.png" />

### Prerequisites

Before you start configuring settings for Self-Service Analytics to use Kerberos, you must:

* Create a Kerberos Principal. For more information on how to create a Kerberos Principal, refer to [Kerberos documentation](http://web.mit.edu/KERBEROS/krb5-1.5/krb5-1.5.4/doc/krb5-user/What-is-a-Kerberos-Principal_003f.html).
* Create the keytab file on the instance where KDC runs and upload it to Self-Service Analytics Server.

<Note>
  If you have Kerberos enabled, you must use a static context path for the Self-Service Analytics login URL. Multiple or dynamic context paths are not supported.
</Note>

#### How to Generate the Keytab File

To generate the `.keytab` file for existing AD users, run the following command on AD server:

```
ktpass
-out <file_name>.keytab
-princ <HTTP/zoomdata_host> @<realm>
-mapUser <user_name>
–pass <user_password>
-crypto RC4-HMAC
-pType KRB5_NT_PRINCIPAL
```

To generate the `.keytab` file for existing MIT LDAP user, run the following command on LDAP server side:

```
$kadmin
kadmin: xst -e "rc4-hmac" -k <file_name>.keytab <HTTP/zoomdata_host> @<realm>
```

### Configure General Settings

To configure the Kerberos settings for Self-Service Analytics Server, complete the following steps:

1. Enable the Kerberos SSO service on the Security Services tab. Keep in mind, that if you have SAML or x509 authentication enabled, you will have to disable them first to use Kerberos.

2. Restart the Self-Service Analytics server by running the following command:

   ```bash theme={null}
   sudo service zoomdata restart
   ```

3. Log in as a system [admin](/simba-embedded-analytics/docs/self-service-analytics/26.3/administer/users/users-manage#admin-user) or a member of the Supervisors group and select **Tools >** **Security**. Navigate to the **Kerberos Settings** tab.

4. Slide the **Enable Kerberos** switch on (to the right).

5. Specify the **Kerberos Service Principal**.

6. Select **Upload Kerberos Keytab File** and upload the `.keytab` file, that you have generated before.

7. Select the **Include Kerberos realm/domain name in auto provisioned Self-Service Analytics username** if you want to have the user name in the following format: `username@realm`.

8. Save your settings.

### Configure the Settings on the Client Side

Perform the steps listed below on the client instance that will connect to kerberized Self-Service Analytics.

1. Install the Kerberos command line tools:

   ```bash theme={null}
   sudo yum install krb5-workstation
   sudo yum install krb5-libs
   ```

2. Navigate to the `krb5.conf` file and specify the host on which Self-Service Analytics server runs:

   ```javascript theme={null}
   [libdefaults]
   default_realm = ZOOMDATA.LOCAL
   [realms]
   ZOOMDATA.LOCAL = {
   kdc = <composer_host>.local
   admin_server = <composer_host>.local
   }
   [logging]
   default = FILE:/var/log/krb5.log
   kdc = FILE:/var/log/krb5.log
   [domain_realm]
   .zoomdata.local = ZOOMDATA.LOCAL
   zoomdata.local = ZOOMDATA.LOCAL
   ```

3. List all the Kerberos tickets available on the current instance:

   ```
   klist
   ```

4. Remove all the Kerberos tickets (if there are any):

   ```
   kdestroy -A
   ```

5. Obtain a Kerberos ticket for a user (the realm is not required if there is a default one specified in krb5.conf):

   ```
   kinit user@ZOOMDATA.LOCAL
   ```

6. Configure your browser to support Kerberos SSO to Self-Service Analytics.

<Note>
  To authenticate a user with a Kerberos ticket in Self-Service Analytics, you must either enable LDAP autoprovisioning or create a user with the same name in Self-Service Analytics.
</Note>

<h2 id="kerberos-authentication-for-connectors">
  Kerberos Authentication for Connectors
</h2>

Kerberos is an enterprise authentication protocol that uses the concept of tickets and three-way authentication to enable users and computers to identify themselves and secure access to resources. Kerberos support does not apply to some connectors.

Support for this feature by connector is shown in the following table.

<strong>Key:</strong>**Y** - Supported; **N** - Not Supported; N/A - not applicable

<table>
  <thead>
    <tr>
      <th>Connector</th>
      <th>Supported?</th>
      <th>Notes</th>
    </tr>
  </thead>

  <tbody>
    <tr>
      <td>[Amazon Redshift](/simba-embedded-analytics/docs/self-service-analytics/26.3/connect-to-data/connectors/connecting-to-amazon-redshift)</td>
      <td>**N**</td>

      <td />
    </tr>

    <tr>
      <td>[Amazon S3](/simba-embedded-analytics/docs/self-service-analytics/26.3/connect-to-data/connectors/connecting-to-amazon-s3)</td>
      <td>**N**</td>

      <td />
    </tr>

    <tr>
      <td>[Apache Drill](/simba-embedded-analytics/docs/self-service-analytics/26.3/connect-to-data/connectors/connecting-to-apache-drill)</td>
      <td>**Y**</td>

      <td />
    </tr>

    <tr>
      <td>[Apache Phoenix](/simba-embedded-analytics/docs/self-service-analytics/26.3/connect-to-data/connectors/connecting-to-apache-phoenix)</td>
      <td>**Y**</td>
      <td rowSpan={2}>Apache Phoenix supports Kerberos, but Apache Phoenix Query Server does not. For more information, see [Enable Kerberos Authentication for Apache Phoenix Connectors](/simba-embedded-analytics/docs/self-service-analytics/26.3/connect-to-data/connectors/connecting-to-apache-phoenix#enable-kerberos-authentication-for-apache-phoenix-connectors).</td>
    </tr>

    <tr>
      <td>[Apache Phoenix Query Server (QS)](/simba-embedded-analytics/docs/self-service-analytics/26.3/connect-to-data/connectors/connecting-to-apache-phoenix)</td>
      <td>**N**</td>
    </tr>

    <tr>
      <td>[Apache Solr](/simba-embedded-analytics/docs/self-service-analytics/26.3/connect-to-data/connectors/connecting-to-solr)</td>
      <td>**Y**</td>

      <td />
    </tr>

    <tr>
      <td>[BigQuery](/simba-embedded-analytics/docs/self-service-analytics/26.3/connect-to-data/connectors/connecting-to-bigquery)</td>
      <td>**N**</td>
      <td>If you need to access a BigQuery partition, explicitly include an alias for the built in partition column in your select clause, such as `select *, _PARTITIONTIME as pt from projectId.datasetId.tableId`.</td>
    </tr>

    <tr>
      <td>[Cloudera Impala](/simba-embedded-analytics/docs/self-service-analytics/26.3/connect-to-data/connectors/cloudera-ov#manage-the-impala-connector)</td>
      <td>**Y**</td>

      <td />
    </tr>

    <tr>
      <td>[Cloudera Search](/simba-embedded-analytics/docs/self-service-analytics/26.3/connect-to-data/connectors/cloudera-search)</td>
      <td>**Y**</td>

      <td />
    </tr>

    <tr>
      <td>[Couchbase](/simba-embedded-analytics/docs/self-service-analytics/26.3/connect-to-data/connectors/couchbase)</td>
      <td>N/A</td>

      <td />
    </tr>

    <tr>
      <td>[Dremio](/simba-embedded-analytics/docs/self-service-analytics/26.3/connect-to-data/connectors/connecting-to-dremio)</td>
      <td>**N**</td>

      <td />
    </tr>

    <tr>
      <td>[Dundas BI (Managed)](/simba-embedded-analytics/docs/self-service-analytics/26.3/connect-to-data/connectors/dbi)</td>
      <td>source-dependent</td>

      <td />
    </tr>

    <tr>
      <td>[Elasticsearch 7.0](/simba-embedded-analytics/docs/self-service-analytics/26.3/connect-to-data/connectors/connecting-to-elastic-search)</td>
      <td>**N**</td>

      <td rowSpan={2} />
    </tr>

    <tr>
      <td>[Elasticsearch 8.0](/simba-embedded-analytics/docs/self-service-analytics/26.3/connect-to-data/connectors/connecting-to-elastic-search)</td>
      <td>**N**</td>
    </tr>

    <tr>
      <td>[File Upload (Upload API)](/simba-embedded-analytics/docs/self-service-analytics/26.3/connect-to-data/connectors/uploading-a-flat-file)</td>
      <td>**N**</td>

      <td />
    </tr>

    <tr>
      <td>[HDFS](/simba-embedded-analytics/docs/self-service-analytics/26.3/connect-to-data/connectors/hdfs)</td>
      <td>**Y**</td>

      <td />
    </tr>

    <tr>
      <td>[Hive](/simba-embedded-analytics/docs/self-service-analytics/26.3/connect-to-data/connectors/hive)</td>
      <td>**Y**</td>

      <td />
    </tr>

    <tr>
      <td>[Jira](/simba-embedded-analytics/docs/self-service-analytics/26.3/connect-to-data/connectors/connecting-to-jira)</td>
      <td>**N**</td>

      <td />
    </tr>

    <tr>
      <td>[MemSQL](/simba-embedded-analytics/docs/self-service-analytics/26.3/connect-to-data/connectors/connecting-to-memsql)</td>
      <td>**N**</td>

      <td />
    </tr>

    <tr>
      <td>[Microsoft SQL Server](/simba-embedded-analytics/docs/self-service-analytics/26.3/connect-to-data/connectors/connecting-to-sql-server)</td>
      <td>**N**</td>

      <td />
    </tr>

    <tr>
      <td>[MongoDB](/simba-embedded-analytics/docs/self-service-analytics/26.3/connect-to-data/connectors/connecting-to-mongodb)</td>
      <td>**N**</td>

      <td />
    </tr>

    <tr>
      <td>[MySQL](/simba-embedded-analytics/docs/self-service-analytics/26.3/connect-to-data/connectors/connecting-to-mysql)</td>
      <td>**N**</td>

      <td />
    </tr>

    <tr>
      <td>[Oracle](/simba-embedded-analytics/docs/self-service-analytics/26.3/connect-to-data/connectors/connecting-to-oracle)</td>
      <td>**N**</td>

      <td />
    </tr>

    <tr>
      <td>[PostgreSQL](/simba-embedded-analytics/docs/self-service-analytics/26.3/connect-to-data/connectors/connecting-to-postgresql)</td>
      <td>**N**</td>

      <td />
    </tr>

    <tr>
      <td>[Python](/simba-embedded-analytics/docs/self-service-analytics/26.3/connect-to-data/connectors/connecting-to-python)</td>
      <td>**N**</td>

      <td />
    </tr>

    <tr>
      <td>[Real Time Sales](/simba-embedded-analytics/docs/self-service-analytics/26.3/connect-to-data/connectors/enabling-real-time-sales-demo-source)</td>
      <td>N/A</td>

      <td />
    </tr>

    <tr>
      <td>[Salesforce](/simba-embedded-analytics/docs/self-service-analytics/26.3/connect-to-data/connectors/connecting-to-salesforce)</td>
      <td>**N**</td>

      <td />
    </tr>

    <tr>
      <td>[SAP Hana](/simba-embedded-analytics/docs/self-service-analytics/26.3/connect-to-data/connectors/connecting-to-sap-hana)</td>
      <td>**N**</td>

      <td />
    </tr>

    <tr>
      <td>[SAP S/4HANA](/simba-embedded-analytics/docs/self-service-analytics/26.3/connect-to-data/connectors/connecting-to-saps-4hana)</td>
      <td>**N**</td>

      <td />
    </tr>

    <tr>
      <td>[SAP IQ](/simba-embedded-analytics/docs/self-service-analytics/26.3/connect-to-data/connectors/connecting-to-sap-iqsql)</td>
      <td>**Y**</td>

      <td />
    </tr>

    <tr>
      <td>[Spark SQL](/simba-embedded-analytics/docs/self-service-analytics/26.3/connect-to-data/connectors/connecting-to-sparksql)</td>
      <td>**Y**</td>
      <td>To enable Kerberos authentication for Spark SQL connectors, see [Connect to Spark SQL Sources on a Kerberized HDP Cluster](/simba-embedded-analytics/docs/self-service-analytics/26.3/connect-to-data/connectors/connecting-to-sparksql#connect-to-spark-sql-sources-on-a-kerberized-hdp-cluster).</td>
    </tr>

    <tr>
      <td>[Snowflake](/simba-embedded-analytics/docs/self-service-analytics/26.3/connect-to-data/connectors/connecting-to-snowflake)</td>
      <td>**N**</td>

      <td />
    </tr>

    <tr>
      <td>[Teradata](/simba-embedded-analytics/docs/self-service-analytics/26.3/connect-to-data/connectors/connecting-to-teradata)</td>
      <td>**N**</td>

      <td />
    </tr>

    <tr>
      <td>[TIBCO DV](/simba-embedded-analytics/docs/self-service-analytics/26.3/connect-to-data/connectors/tibcodv)</td>
      <td>**N**</td>

      <td />
    </tr>

    <tr>
      <td>[Trino](/simba-embedded-analytics/docs/self-service-analytics/26.3/connect-to-data/connectors/connecting-to-trino)</td>
      <td>**N**</td>

      <td />
    </tr>

    <tr>
      <td>[File Upload (Upload API)](/simba-embedded-analytics/docs/self-service-analytics/26.3/connect-to-data/connectors/uploading-a-flat-file)</td>
      <td>**N**</td>

      <td />
    </tr>

    <tr>
      <td>[Vertica](/simba-embedded-analytics/docs/self-service-analytics/26.3/connect-to-data/connectors/connecting-to-vertica)</td>
      <td>**N**</td>

      <td />
    </tr>
  </tbody>
</table>

<h2 id="configure-client-certificate-authentication">
  Configure Client Certificate Authentication
</h2>

Self-Service Analytics supports X.509 client certificate authentication. However, note that auto-provisioning of user accounts is not available for client certificate authentication.

To use the X.509 authorization you need to:

* Enable the X.509 option in the [Security Services](/simba-embedded-analytics/docs/self-service-analytics/26.3/administer/install/about-microsvcs#stop-microservices) section
* Configure the required properties in the `zoomdata.properties` file

### Caveat

Self-Service Analytics does not support auto-provisioning of user accounts for client certificate authentication.

### Configuration Steps

For guidance on accessing and editing a Self-Service Analytics property file, refer to the topic [Edit a Configuration File](/simba-embedded-analytics/docs/self-service-analytics/26.3/administer/configure/config-mgmt-ov#edit-a-configuration-file).

Add the following settings to your `zoomdata.properties` file:

```properties theme={null}
server.port= 8443 server.ssl.enabled= true server.ssl.client-auth= want server.ssl.key-store= .../server.jks server.ssl.key-store-password= <Your_password> server.ssl.key-store-type= <use_either_jks_or_pkcs12> server.ssl.trust-store= .../truststore.jks server.ssl.trust-store-password=<Your_password> server.ssl.trust-store-type= <use_either_jks_or pkcs12>
```

For each user, create an user account in Self-Service Analytics with the username set to the 'CN' in the user's certificate.

### Troubleshooting

Challenges you may run into:

* User is never prompted to select a certificate:

  * Make sure you have added at least one CA to the trust-store file.
  * Verify `server.ssl.client-auth` is set to `want`.

* Selecting login brings me back to the login page:

  * Make sure the username matches the CN of the certificate being used.
  * Make sure the client certificate is signed by a CA in the trust-store.

For further troubleshooting assistance, contact [Technical Support](/simba-embedded-analytics/docs/self-service-analytics/26.3/get-started/tech-support).

<h2 id="add-an-ssl-certificate">
  Add an SSL Certificate
</h2>

Self-Service Analytics supports SSL certificates so that a secure connection between the Self-Service Analytics server and the browser can be established. In particular, Self-Service Analytics supports two common formats for SSL certificates - JKS and PKCS12. For information on creating a keystore or Certificate Signing Request (CSR) for use with Self-Service Analytics, see [https://www.digicert.com/kb/code-signing/java-code-signing-guide.htm](https://www.digicert.com/kb/code-signing/java-code-signing-guide.htm).

To enable HTTPS and a secure browser connection, the SSL certificate needs to be copied into the appropriate Self-Service Analytics directory and the proper parameters be added to the `zoomdata.properties` configuration file.

Perform the following steps:

1. From your terminal, SSH to your Self-Service Analytics server.

2. Stop Self-Service Analytics microservices. See [Stop Microservices](/simba-embedded-analytics/docs/self-service-analytics/26.3/administer/install/about-microsvcs#stop-microservices).

3. Copy your SSL keystore file to the `/etc/zoomdata` or `/opt/zoomdata/conf` directory. To obtain the SSL keystore file, work with your website domain provider.

4. Use the following command to access and open the `zoomdata.properties` file:

   ```bash theme={null}
   vi /etc/zoomdata/zoomdata.properties
   ```

   If the `.properties` file does not exist, this command will create the file.

5. Add the following lines to the `zoomdata.properties` file:

   ```properties theme={null}
   server.port=8443
   server.ssl.enabled=true
   server.ssl.key-store=/etc/zoomdata/<keystore_name>
   server.ssl.key-store-password=<your_keystore_password>
   ```

   Replace the placeholders `<keystore_name>` and `<your_keystore_password>` with your keystore details. Self-Service Analytics supports the JKS and PKCS12 certificate formats.

6. Save and exit the `.properties` file.

7. Start Self-Service Analytics microservices. See [Start Microservices](/simba-embedded-analytics/docs/self-service-analytics/26.3/administer/install/about-microsvcs#start-microservices).

After the Self-Service Analytics server has successfully restarted, open a new browser and check for a secure connection (that is, HTTPS).

### Revert the SSL Certificate to the Default Version

If you need to remove the SSL certificate, you must edit the `zoomdata.properties` file so that the SSL certificate is reverted back to the default version. Edit the `zoomdata.properties` file as follows:

```properties theme={null}
server.ssl.key-store=/opt/zoomdata/conf/keystore
keystorePass=changeit
```

Remember to save and exit the `.properties` file. Then restart Self-Service Analytics microservices. See [Restart Microservices](/simba-embedded-analytics/docs/self-service-analytics/26.3/administer/install/about-microsvcs#restart-microservices).

This reverts the SSL connection to the original self-signed certificate preinstalled with Self-Service Analytics.

<h2 id="disable-the-ssl-certificate-in-self-service-analytics">
  Disable the SSL Certificate in Self-Service Analytics
</h2>

You can disable the SSL certificate in Self-Service Analytics by adding a parameter to the `zoomdata.properties` file located in the `/etc/zoomdata` directory. The purpose of the parameter is to disable a redirect by Spring Boot to SSL and enable you to use the HTTP port. Take the following steps to disable the SSL Certificate:

1. From your terminal, SSH to your Self-Service Analytics Server.

2. Stop Self-Service Analytics microservices. See [Stop Microservices](/simba-embedded-analytics/docs/self-service-analytics/26.3/administer/install/about-microsvcs#stop-microservices).

3. Use the following command to access and open the `zoomdata.properties` file:

   ```bash theme={null}
   vi /etc/zoomdata/zoomdata.properties
   ```

   If the `.properties` file does not exist, this command creates the file.

4. Add the following parameters into the file as new lines:

   ```properties theme={null}
   server.port=8080
   server.ssl.enabled=false
   ```

5. Save and exit the `.properties` file.

6. Start Self-Service Analytics services. See [Start Microservices](/simba-embedded-analytics/docs/self-service-analytics/26.3/administer/install/about-microsvcs#start-microservices).

After the Self-Service Analytics server has successfully restarted, you can open a new browser window and log in. You should no longer be redirected to an SSL connection.

If you have configured your firewall (see next section) then use the following URL format:

```
http://<composer-IP-address>/discovery
```

Otherwise, use the following URL format:

```
http://<composer-IP-address>:8080/discovery
```

<h3 id="configure-the-firewall-for-centos">
  Configure the Firewall (for CentOS)
</h3>

See [Configure the Firewall](/simba-embedded-analytics/docs/self-service-analytics/26.3/administer/install/install-ov#configure-the-firewall) for setup instructions.